# JustReview: full documentation
> Every JustReview help article and blog post in one file, so an assistant can read the
> whole product in a single fetch. Short version with pricing and install snippet:
> https://justreview.co/llms.txt
Generated: 2026-07-26. Source: https://justreview.co/docs/
Sections keep their canonical URL so answers can cite the right page.
==============================================================================
# Documentation
==============================================================================
---
## JustReview Help Center
Source: https://justreview.co/docs/
Summary: Guides for installing your reviews widget, connecting review sources and customising how reviews look on your website.
## Install the widget on your platform
## Go further
**Regenerate the code after every change.** Widget settings are baked into the snippet on your
site. If you change colours, sources or layout in the dashboard, generate the code again and
replace the old snippet, otherwise nothing changes on your website.
**Add your domain to the whitelist.** The widget only renders on domains listed in
[Settings](https://app.justreview.co/#/settings). This is also why the widget does not show
inside your CMS admin preview, only on the live site.
Still stuck? Email [contact@justreview.co](mailto:contact@justreview.co) with your website
address and a screenshot, and we will look at it.
---
## Changing your account email and deleting your account
Source: https://justreview.co/docs/account/change-email-and-delete-account/
Summary: Why the email field is locked, how to change it, and what deleting your account removes.
## Changing the account email
The email field in [Settings](https://app.justreview.co/#/settings) is **read-only on purpose**. It is
your login and it ties your account to your billing, so changing it by yourself could separate you from
your subscription or lock you out.
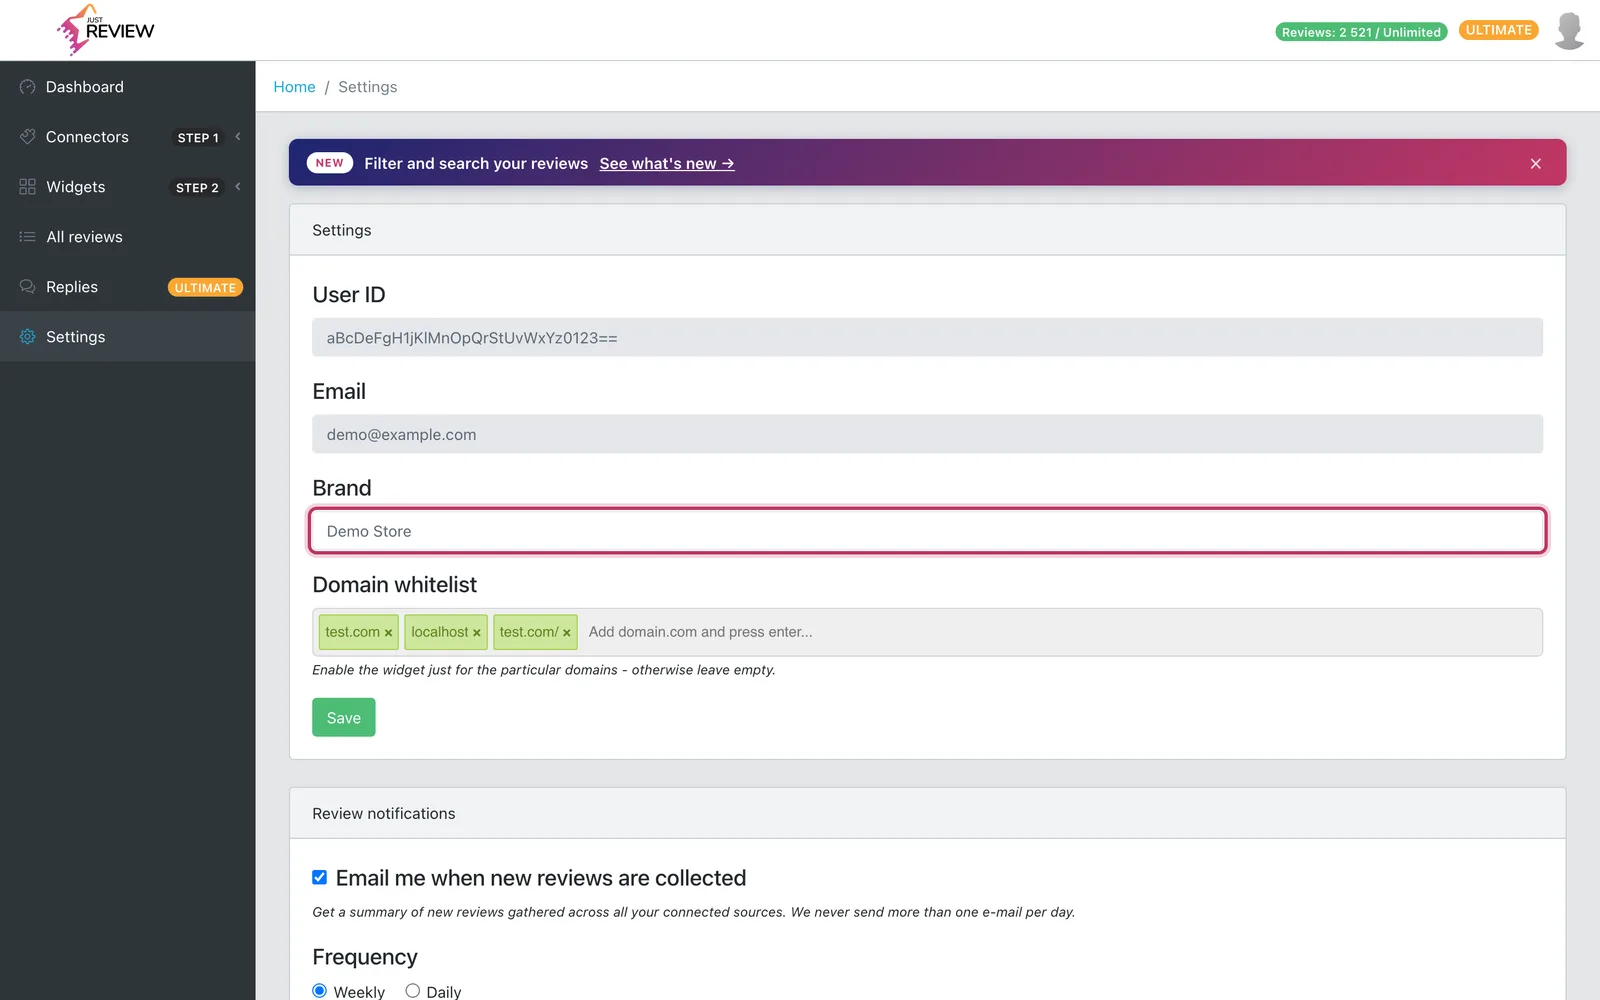
To change it, write to [contact@justreview.co](mailto:contact@justreview.co) **from the current account
address** and give us the new one. If you no longer have access to the old mailbox, tell us and we will
confirm your identity another way, for example against your billing details.
Typical reasons this comes up, all fine with us:
- the business changed domain,
- the account was created by an agency or a former employee and needs handing over,
- you signed up with a personal address and want a company one.
If your subscription was paid from a different address, mention that too, so we link both in one go
rather than leaving you on a plan the system cannot match to your account.
## Handing the account over to someone else
Same route: write to us. Do **not** create a second account and reconnect everything, because your
reviews, widget settings and the snippet already on your website all belong to the first account. A new
account starts empty and the widget on your site keeps pointing at the old one.
## Deleting your account
Write to [contact@justreview.co](mailto:contact@justreview.co) from the account address and ask for
deletion.
1. **Cancel the subscription first**, in [Payments](https://app.justreview.co/#/payments), so nothing is
charged while we process it.
2. **Remove the JustReview snippet from your website.** After deletion the widget has nothing to load, so
leaving the code behind means an empty space and a pointless request on every page view.
3. **Export your reviews first if you want to keep them.** Once the account is gone, so is the data. The
export is in [All reviews](https://app.justreview.co/#/reviews).
## What deletion removes
Your account, your connected sources and the reviews collected under it.
What it does **not** touch: the reviews on Google, Facebook or any other platform. Those belong to the
platform and to the people who wrote them. Deleting your JustReview account has no effect there, which
also means you can come back later and reconnect.
## Your data and GDPR
If you need a data export, deletion confirmation, or a data processing agreement for your own compliance
records, write to [contact@justreview.co](mailto:contact@justreview.co) and say what you need. Where the
review data comes from and on what basis is explained in
[where our reviews come from](/docs/scraping-reviews-is-it-legal/).
## Cancelling versus deleting
They are not the same thing:
- **Cancelling** stops the charges. Your account stays, downgraded, and your reviews stay with it, so
you can return without importing everything again. See
[cancelling and refunds](/docs/troubleshooting/cancelling-and-refunds/).
- **Deleting** removes the account and its data. There is no undo.
If you are unsure, cancel. It is reversible.
---
## Can I show different reviews on each product page?
Source: https://justreview.co/docs/account/reviews-per-product/
Summary: The honest answer about per-product review filtering, and the workarounds that do exist.
**Short answer: no.** Reviews are shown per account, not per product. The widget on a product page
displays the same set as the one on your home page.
We would rather tell you this before you buy than after.
## Why
Most sources we collect from publish reviews **about the seller or the business**, not about individual
products. A Google or Facebook review is about your company. There is nothing in that data to attach to a
specific product page.
Where product-level reviews do exist, matching them reliably to your catalogue would need a shared
identifier, and platforms do not expose a consistent one. Guessing by product name produces wrong matches,
which is worse than none.
Not in the widget settings, and not through the embed code. If you read otherwise anywhere, it is out of
date.
## What people usually want, and what actually works
**"I want social proof on the product page."** Use the widget as it is. Reviews of your business on a
product page still work: they answer "can I trust this shop", which is the actual objection at that point,
and often matters more than an opinion on that exact item.
**"I want stars in Google for my products."** The structured data we output is a business-level rating, not
a product rating. Google shows it for the page carrying the widget. See
[stars in Google results](/docs/getting-started/stars-in-google-results/).
**"I have my own per-product reviews from my shop software."** Two options, both real:
- **[Import them from CSV](/docs/getting-started/import-reviews-from-csv/)** and display them alongside
everything else. Still not filtered per product, but the content is yours.
- Keep your shop platform's native product reviews on product pages, and use JustReview for
business-level social proof on the home page, checkout and landing pages. Plenty of customers run both,
and they answer different objections.
**"I sell on a marketplace with product reviews."** Those reviews come in, but as part of your account's
pool, not tied to catalogue entries.
## If this is a deal breaker
Say so at [contact@justreview.co](mailto:contact@justreview.co). Per-product filtering is a recurring
request and demand shapes what gets built. Telling us which platform your product reviews live on is more
useful than a general vote.
---
## Show the same widget twice on one page
Source: https://justreview.co/docs/adding-multiple-times-the-same-widget-on-page/
Summary: Place two or more copies of the same widget type on a single page by giving each one its own CSS class.
By default each widget type renders once per page. To show two Testimonials blocks with different
settings, or the same Summary in two places, give each copy its own CSS class and pass that class
to the init function.
1. **Build the first widget and click "Generate Code for your website".**
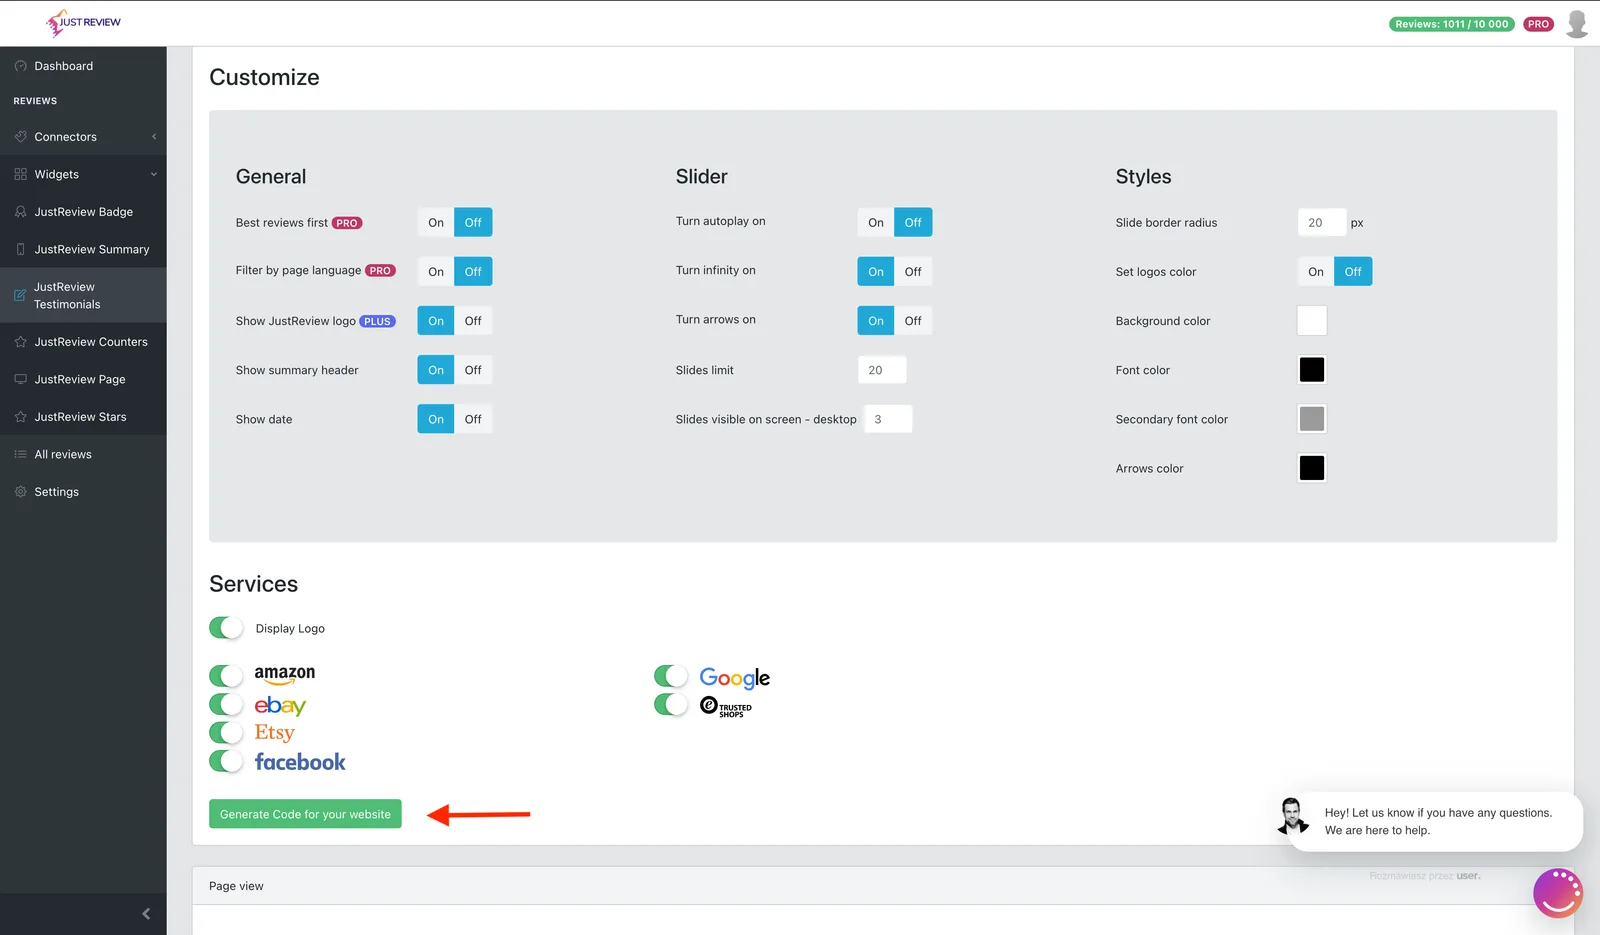
2. **Give the container a class of your choice and pass the same class to the function.**
The class name is the third argument. It is what tells JustReview which container to fill, so
**every copy needs a different class**.
```html
```
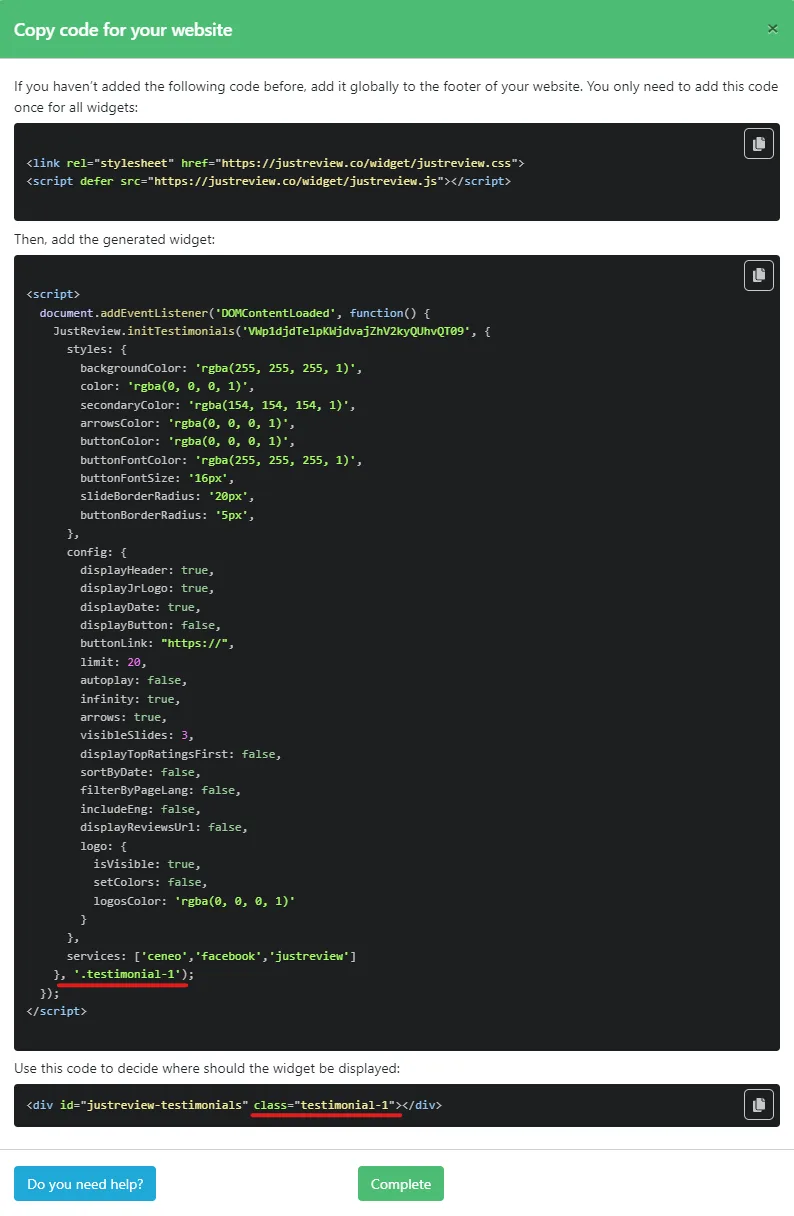
Part 1 of the snippet (the library) belongs on the page exactly once, no matter how many widgets
you show. Only the configuration block and the container repeat.
This does not work for **JustReview Badge** or **JustReview Stars**. The Badge attaches itself to
the corner of the viewport, so a second copy has nowhere to go.
## Common mistakes
- **Same class on both copies.** Both init calls target the first match, so you see one widget or
a duplicate of the same one.
- **Class passed only to the `
`, not to the function.** Without the third argument the widget
looks for its default container and ignores your class.
- **Class name mismatch**, for example `reviews-home` in the HTML and `reviews_home` in the script.
The names must be identical.
---
## Your platform is not in the guides
Source: https://justreview.co/docs/developers/other-platforms/
Summary: How to install the widget on any CMS or site builder, including IdoSell, DUDA, Subbly, MODX and Mobirise.
We have step-by-step guides for the most common platforms. Everything else follows the same three-part
pattern, and almost every builder has the two places you need.
Platforms customers regularly ask about that are not yet in the guides: **IdoSell, DUDA, Subbly, MODX,
Mobirise**, plus most self-built sites.
## What you are looking for
1. **A place for site-wide code**, ideally injected before the closing `
` tag.
Depending on the platform it is called: *Custom code*, *Code injection*, *Site-wide code*, *Header and
footer scripts*, *Tracking code*, *Custom HTML in the theme*. Put **part 1 and part 2** of the snippet
there.
If the only field available is in the `` rather than the footer, use it. The widget still works,
it is only slightly worse for page speed.
2. **A place for an HTML block on the page** where the reviews should appear.
Called: *HTML block*, *Custom HTML*, *Embed code*, *Raw HTML*, *Code widget*. Put **part 3** there.
That is the whole job. If your platform has both, the widget will work.
## If there is no site-wide code field
Some closed builders on cheaper plans do not allow custom scripts at all. Then put **all three parts into
one HTML block** on the page where the widget should appear. It works, with two caveats: the widget only
exists on that page, and if you add several such blocks the library loads more than once, which can break
rendering.
On several platforms custom code requires a higher plan. Squarespace is the clearest example. If you cannot
find the field, check whether your plan includes it before assuming something is broken.
## After installing, always check these
1. **Your domain is in the whitelist** in [Settings](https://app.justreview.co/#/settings), matching what
visitors actually type, including or excluding `www` as appropriate.
2. **The container from part 3 is present** on the page you are looking at. The library alone renders
nothing.
3. **You are looking at the live site, not the editor preview.** Most builders do not run custom code in
the editor, and the whitelist blocks it there anyway.
4. **The cache is cleared**, both the platform's and any CDN in front of it.
Full checklist: [widget still not visible](/docs/troubleshooting/no-reviews-or-api-code-is-invalid/) and
the [JavaScript reference](/docs/developers/widget-javascript-reference/).
## Builders that serve custom code from an iframe
Some builders, Wix being the known case, run your code inside an iframe hosted on **their** domain, not
yours. The whitelist then sees their domain and blocks the widget. Two ways out: whitelist that host, or
clear the whitelist so the widget runs anywhere. Details in
[the Wix guide](/docs/wix-code-embed-instruction/).
If you hit this on another builder, the symptom is the same: everything looks correct and nothing renders.
Write to us with your site address and we will tell you which host to whitelist.
## Want a guide for your platform?
Write to [contact@justreview.co](mailto:contact@justreview.co) with the platform name. If several
customers use it, we will add a guide with screenshots. Send the names of the two fields you found and it
gets written faster.
---
## Widget JavaScript reference
Source: https://justreview.co/docs/developers/widget-javascript-reference/
Summary: Every init function and configuration option in the embed snippet, for developers and agencies integrating JustReview.
For developers and agencies. If you just want the widget on your site, use the
[installation guides](/docs/other-sites-universial-tutorial/) instead, the dashboard generates this code
for you.
## Structure of the snippet
Three parts. Part 1 loads the library **once per page**. Part 2 initialises one widget. Part 3 is the
container that decides where it renders.
```html
```
`YOUR_USER_ID` is the hashed identifier from
[Settings](https://app.justreview.co/#/settings). It is safe in public HTML, it only allows reading the
reviews you chose to publish.
## The functions
| Function | Widget | Plan |
|---|---|---|
| `initBadge` | floating badge with your rating | Free |
| `initSummary` | average, count and rating breakdown | Plus |
| `initTestimonials` | carousel of full reviews | Plus |
| `initCounters` | review counts per source | Plus |
| `initReviewsPage` | full reviews page with optional form | Pro |
| `initStars` | inline stars | Pro |
Signature:
```js
initTestimonials(userId, options, containerClass);
```
The third argument is optional and only needed when you show
[the same widget more than once on a page](/docs/adding-multiple-times-the-same-widget-on-page/).
## Options
### Shared
**`services`** (array of strings) limits the widget to selected sources. Empty or omitted means every
connected source.
```js
services: ["google", "facebook", "etsy.com"]
```
Use the internal source names. Domain-style sources carry the domain, for example `etsy.com`,
`booking.com`, `apps.apple.com`. The generated code from the dashboard already contains the correct
values, which is the safest way to get them right.
**`styles`** (object) sets colours, radii and positioning. The dashboard colour pickers write into this.
**`showJustReviewLogo`** (boolean) shows or hides our logo. Hiding it is **White Label**, available from
**Plus**.
### `initBadge`
| Option | Type | What it does |
|---|---|---|
| `enableAggregateRatings` | boolean | outputs structured data for Google. **Pro+**, and your brand name must be set |
| `disableBadge` | boolean | does not render the visible badge. Combined with the above, gives structured data only |
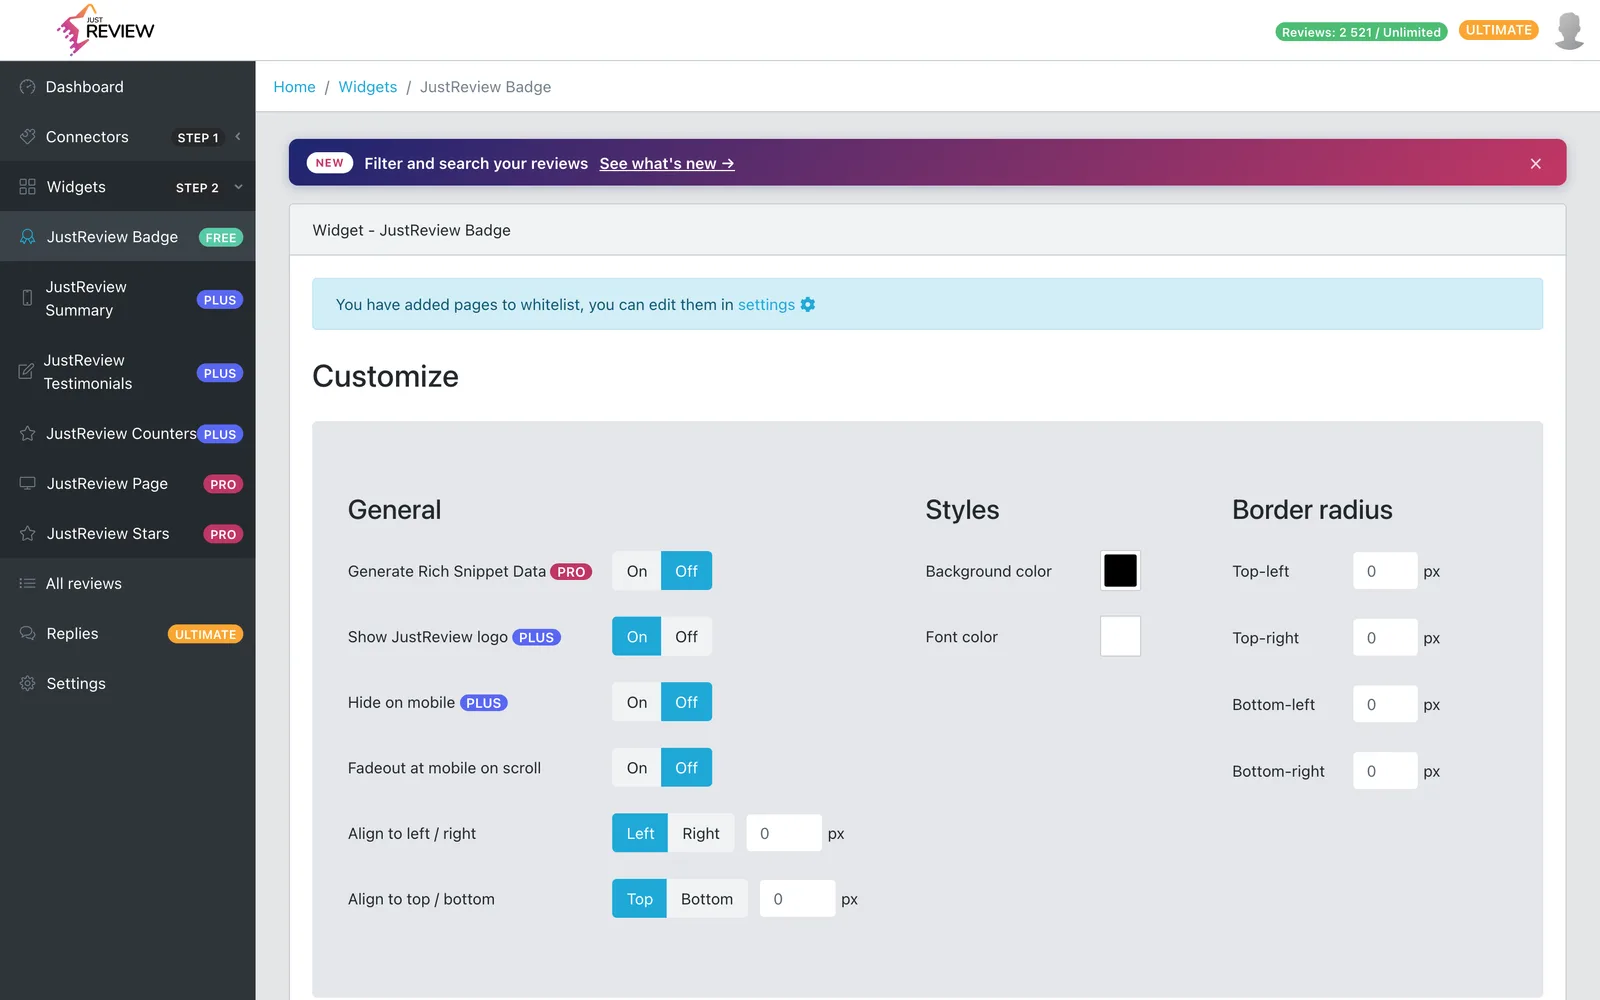
| `disableOnMobile` | boolean | hides the badge on small screens. In the panel: **Hide on mobile**, from **Plus** |
| `fadeOutWhenScrollingOnMobile` | boolean | fades the badge out while scrolling on mobile. In the panel: **Fadeout at mobile on scroll** |
The badge is the only widget that emits structured data. See
[stars in Google results](/docs/getting-started/stars-in-google-results/).
### `initSummary`
| Option | Type | What it does |
|---|---|---|
| `displayHeader` | boolean | shows the default heading |
| `displayCustomHeader` | boolean | use your own heading instead |
| `customHeader` | string | the heading text |
### `initCounters`
| Option | Type | What it does |
|---|---|---|
| `displayReviewsAmount` | boolean | shows the number next to each source |
| `config` | object | per-source display settings |
### `initStars`
| Option | Type | What it does |
|---|---|---|
| `displayLogo` | boolean | shows the JustReview logo next to the stars |
| `displaySummary` | boolean | shows the rating and count next to the stars |
### `initReviewsPage`
| Option | Type | What it does |
|---|---|---|
| `config` | object | layout, sorting and paging |
The review form and moderation live in this widget, see
[collect your own reviews](/docs/getting-started/collect-your-own-reviews/).
## Reinitialising after content loads
The widget initialises on page load. Elements added later by JavaScript never get processed, so call the
init function again after your new content is in the DOM. Full recipe, including a `MutationObserver`
fallback, in
[widget missing on dynamically loaded content](/docs/troubleshooting/widget-not-updating-dynamic-pages/).
## Things that will bite you
Changing anything in the dashboard does not change what your site renders. The configuration is inside the
`init` call on your page. Regenerate and replace it, or edit the object by hand.
The widget will not render on a domain that is not in
[Settings](https://app.justreview.co/#/settings). This includes staging domains and builder preview
domains. Wix serves custom code from an iframe on its own host, which needs whitelisting separately, see
[the Wix guide](/docs/wix-code-embed-instruction/).
Two copies of `justreview.js` on one page can break rendering. With several widgets, part 1 appears once
and part 2 repeats.
**Do not minify or self-host `justreview.js`.** It is served with the caching and headers it needs, and a
modified copy breaks subresource integrity for everyone.
**Asynchronous loading and script combiners.** Optimisation plugins that defer or bundle scripts change the
execution order, which is the most common cause of a widget that worked and then stopped. Exclude
`justreview.js` from JavaScript optimisation.
---
## Browsing, filtering and exporting your reviews
Source: https://justreview.co/docs/getting-started/all-reviews-filters-and-export/
Summary: Find any review in seconds with the filter bar, and export everything to CSV.
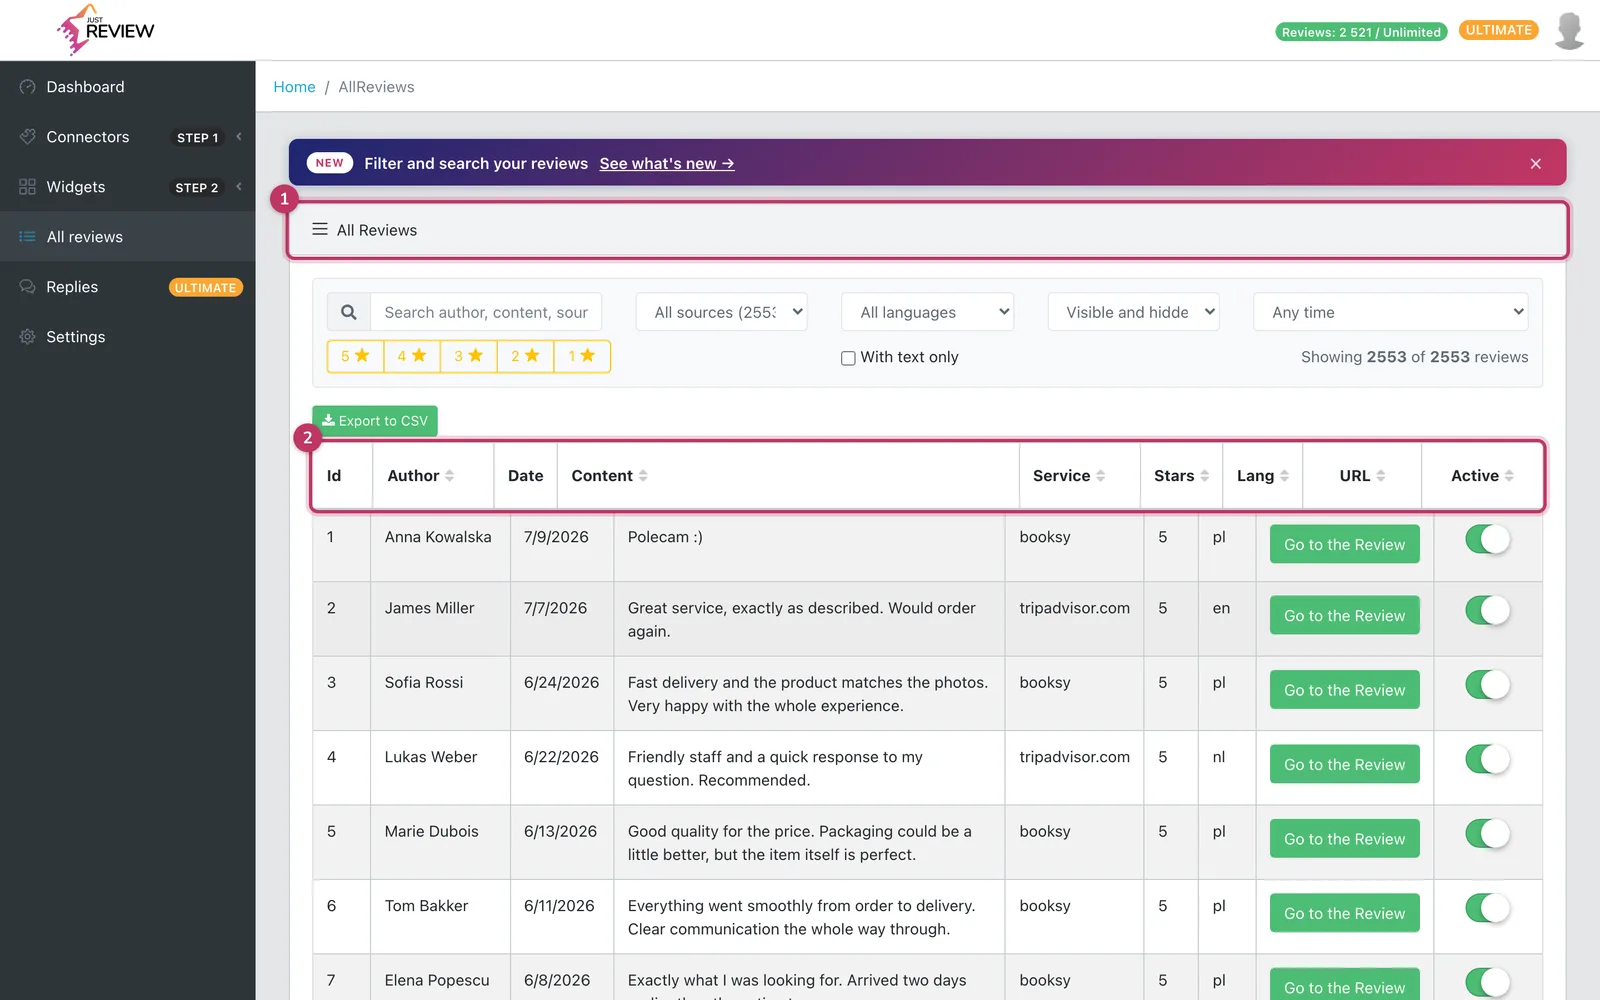
Everything JustReview collected for you lives in
[All reviews](https://app.justreview.co/#/reviews). On an account with thousands of reviews the filter
bar is the difference between finding one in three seconds and not finding it at all.
## The filters
**Source.** One platform at a time, for example only Google, only Facebook.
**Rating.** Pick a star level. The quickest way to see everything negative: filter 1 and 2 stars.
**Language.** Handy on multilingual stores, and it tells you whether
[filtering by page language](/docs/how-to-use-the-filter-by-page-language-function/) has enough
material in a given language to be worth switching on.
**Status.** Visible or hidden, if you use
[Review Curation](/docs/getting-started/turn-reviews-on-and-off/).
**Date range.** Narrows to a period, for example to check whether anything arrived after a campaign.
**Text search.** Searches review content and author name. Use it when a customer writes in and you need
their review: search their name or a phrase they used.
Filters combine. "Google, 1 to 2 stars, last 30 days" is one click each.
Comparing your total against a platform's? Filter by that source and read the count. That is the number
to compare, not what a widget displays, because a widget can be limited to a subset. See
[why counts differ](/docs/troubleshooting/review-counts-do-not-match/).
## Export to CSV
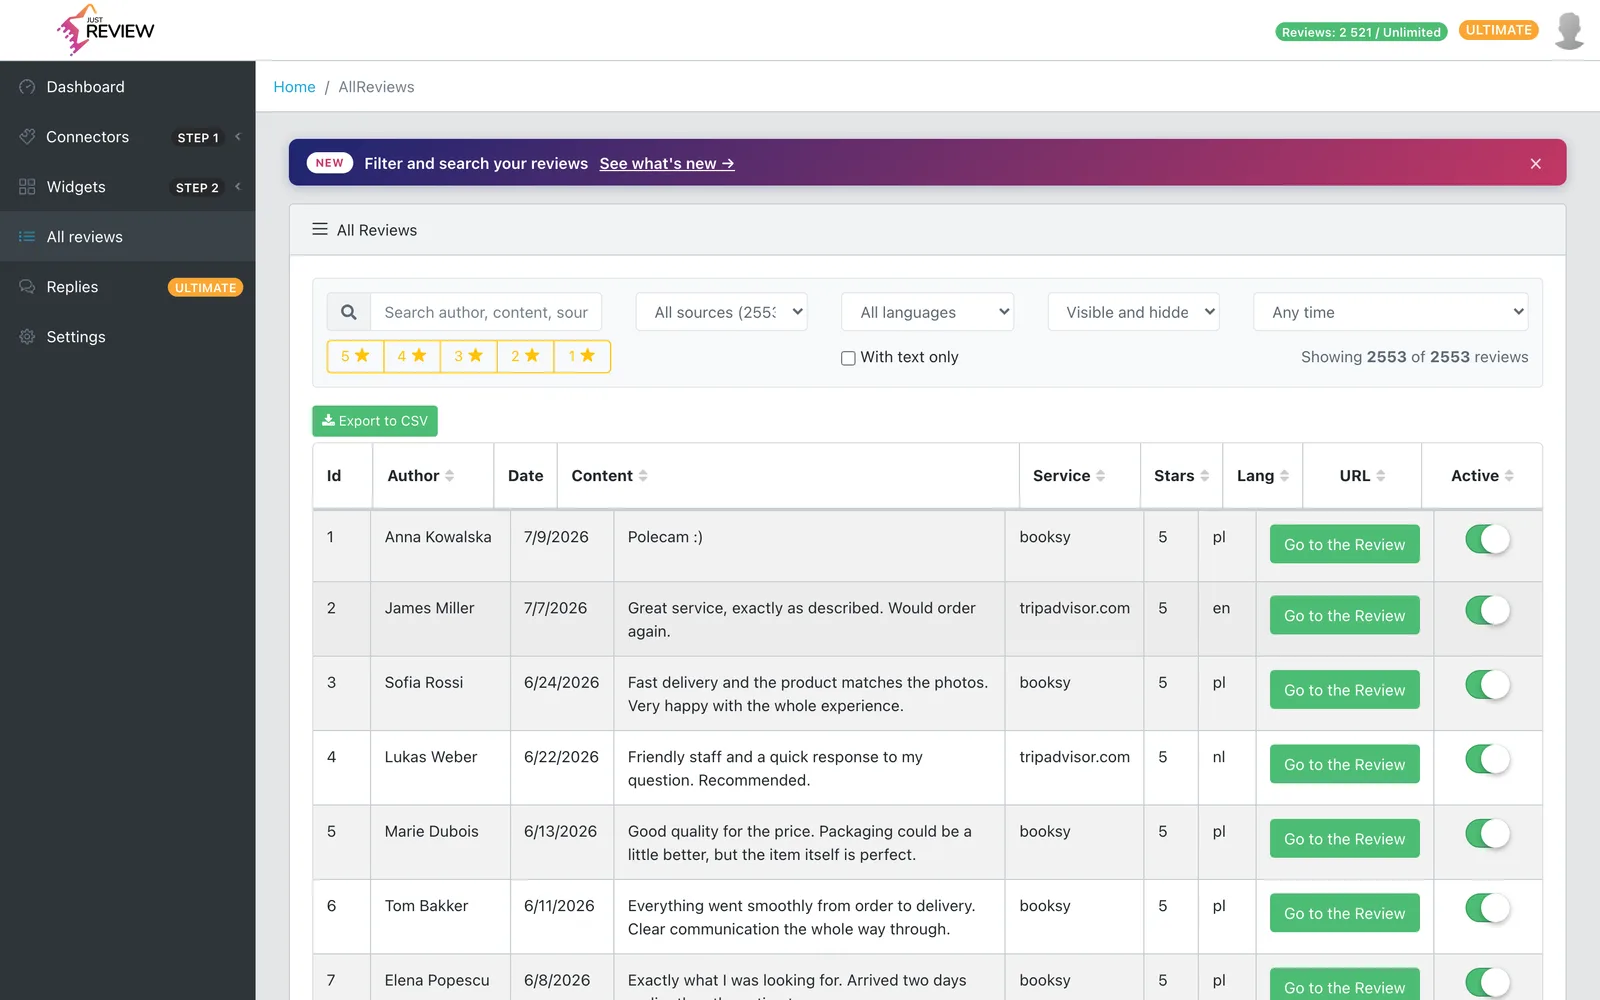
The export gives you everything currently in your account: author, text, rating, date, source and
language, plus an internal ID, the review link and its visibility status.
What it is good for:
- **A backup** before any bigger change.
- **Reporting**, for instance average rating per month in a spreadsheet.
- **Moving reviews you collected yourself** to another tool. Reviews imported from external platforms
stay subject to those platforms' terms.
Round-tripping an export back through [CSV import](/docs/getting-started/import-reviews-from-csv/)
creates duplicates for anything that came from a connector, because a CSV row and an API-fetched review
are not recognised as the same record.
## On very large accounts
Above a few thousand reviews the list takes a moment to build. Narrow with filters first instead of
scrolling: the filters run before the list renders, so a filtered view is faster than an unfiltered one.
---
## Collect your own reviews with a form
Source: https://justreview.co/docs/getting-started/collect-your-own-reviews/
Summary: Let customers leave reviews directly on your website, with moderation before anything is published.
Besides pulling reviews from external platforms, JustReview can collect them **on your own site**. The
Reviews Page widget can include a form where a customer leaves a rating and a comment.
This is the answer for businesses whose customers do not use review portals at all: local services,
B2B, anything sold offline.
Both the form and the moderation switch are Ultimate features, inside the **JustReview Page** widget.
## Switching the form on
1. Open the **JustReview Page** widget in [Widgets](https://app.justreview.co/#/widgets).
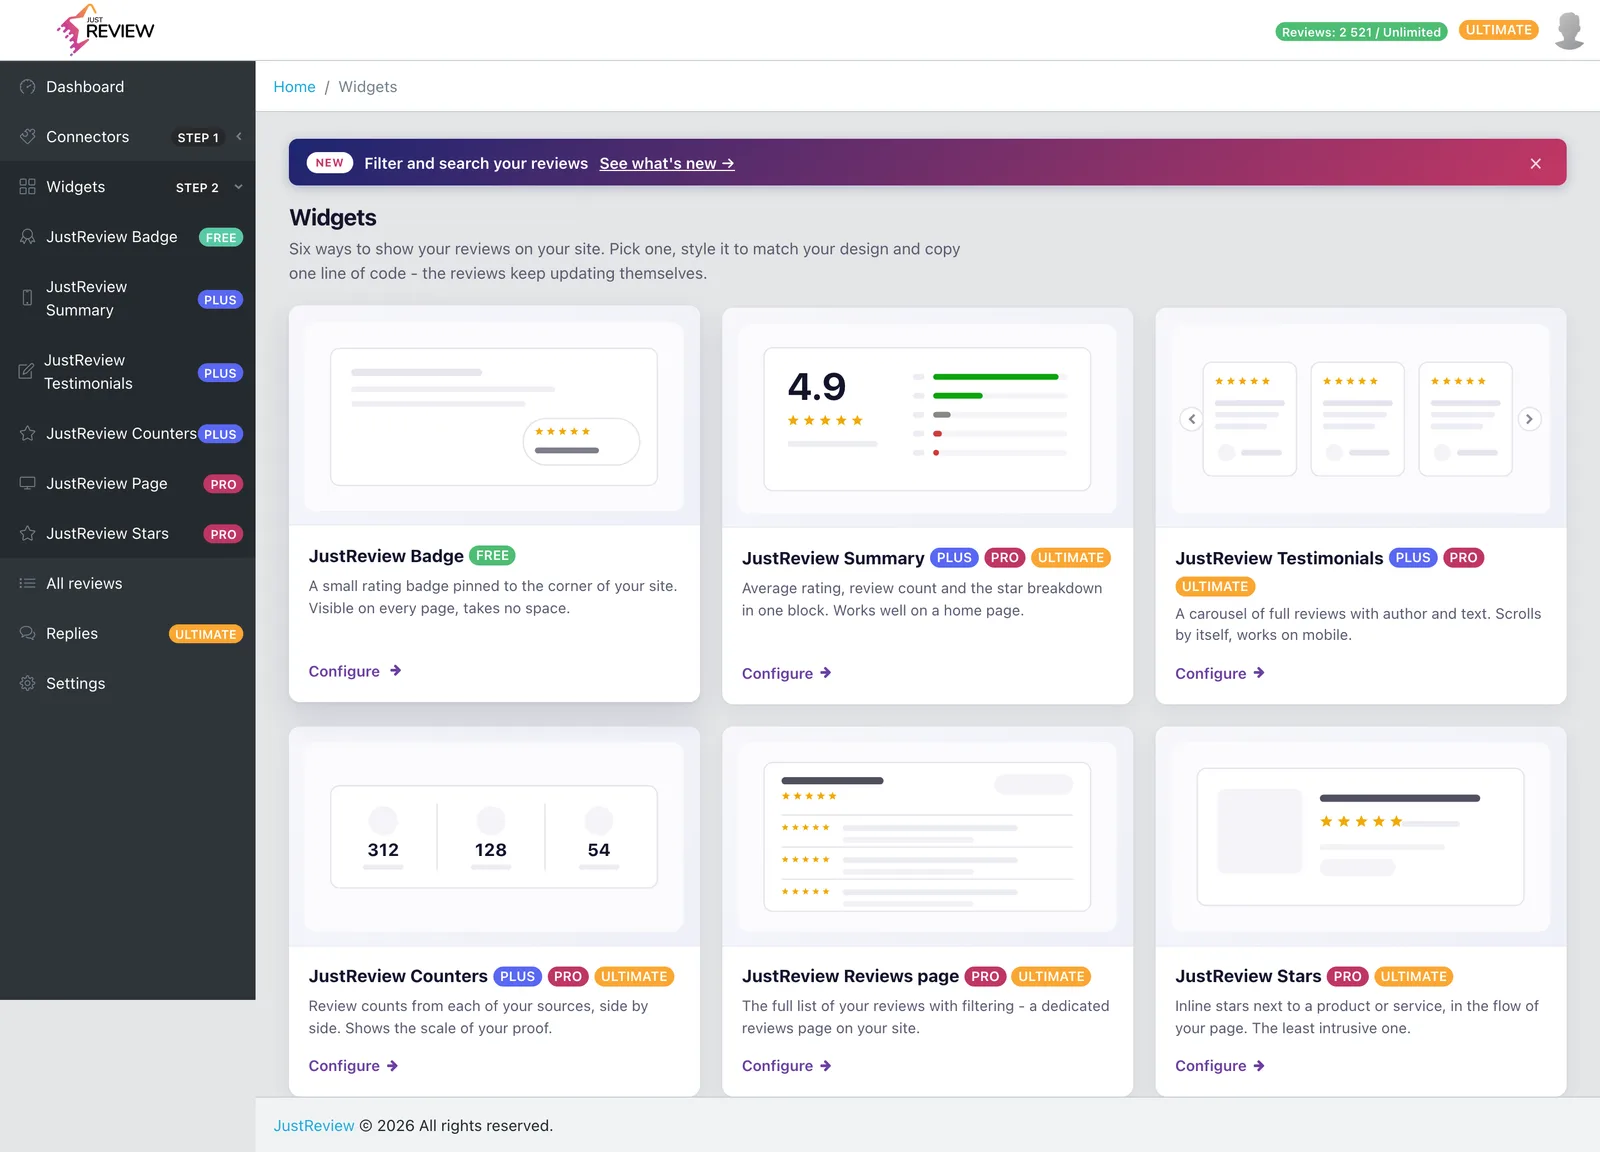
2. Turn on **Display review form**. It is **off by default**, so the reviews page shows only existing
reviews until you enable it.
3. **Turn on "Check review before publish".** Strongly recommended, see the warning below.
4. Generate the code again and replace the snippet on your site.
**"Check review before publish" is off by default**, which means anything submitted through the form
appears on your website immediately, with no review by you.
On a public page that is a bad default to leave alone. Switch it on, and new submissions wait for your
approval in [All reviews](https://app.justreview.co/#/reviews) instead of publishing themselves.
## Approving submitted reviews
With moderation on, a submitted review lands in your account as hidden. Open
[All reviews](https://app.justreview.co/#/reviews), filter by status, read it and switch it on to publish.
See [turn reviews on and off](/docs/getting-started/turn-reviews-on-and-off/).
## Sending customers straight to the form
Link to your reviews page with `#leave-review` at the end and the form scrolls into view and opens by
itself. Ideal for a post-purchase email:
```
https://yourwebsite.com/reviews#leave-review
```
Full details in [link straight to the review form](/docs/how-to-scroll-to-and-open-comment-form-in-justreview-page/).
## What happens to these reviews
**They stay yours and stay on your site.** We do not publish them to Google, Facebook or anywhere else,
and there is no way to push them out. If you want reviews on your Google listing, the customer has to
leave them there.
**They are labelled as your own collected reviews**, not attributed to any external platform. We will not
present your own data as coming from a source it did not come from.
**They count towards your [plan limit](/docs/getting-started/plans-and-limits/)** like every other review.
**They appear in widgets alongside imported ones**, and you can include or exclude them per widget through
the **Services** selection.
## Getting customers to actually use it
The form works. Getting traffic to it is the real task.
- **Ask by email after purchase**, with the `#leave-review` link. This single thing outperforms everything
else.
- **Ask once, at the right moment**, when the product has arrived or the service is done.
- **Keep the ask short.** Every extra field costs you responses.
- **Do not offer rewards for positive reviews.** In the EU that runs straight into consumer protection
rules, and platforms remove incentivised reviews.
Moderation exists to stop spam and abuse, not to remove criticism. A visible four-star review with a real
reservation converts better than a wall of fives, and selectively hiding negatives to mislead is what the
[Omnibus Directive](https://eur-lex.europa.eu/eli/dir/2019/2161/oj) prohibits.
---
## Reading your dashboard
Source: https://justreview.co/docs/getting-started/dashboard-explained/
Summary: What the numbers, trend chart and rating breakdown on the dashboard actually tell you.
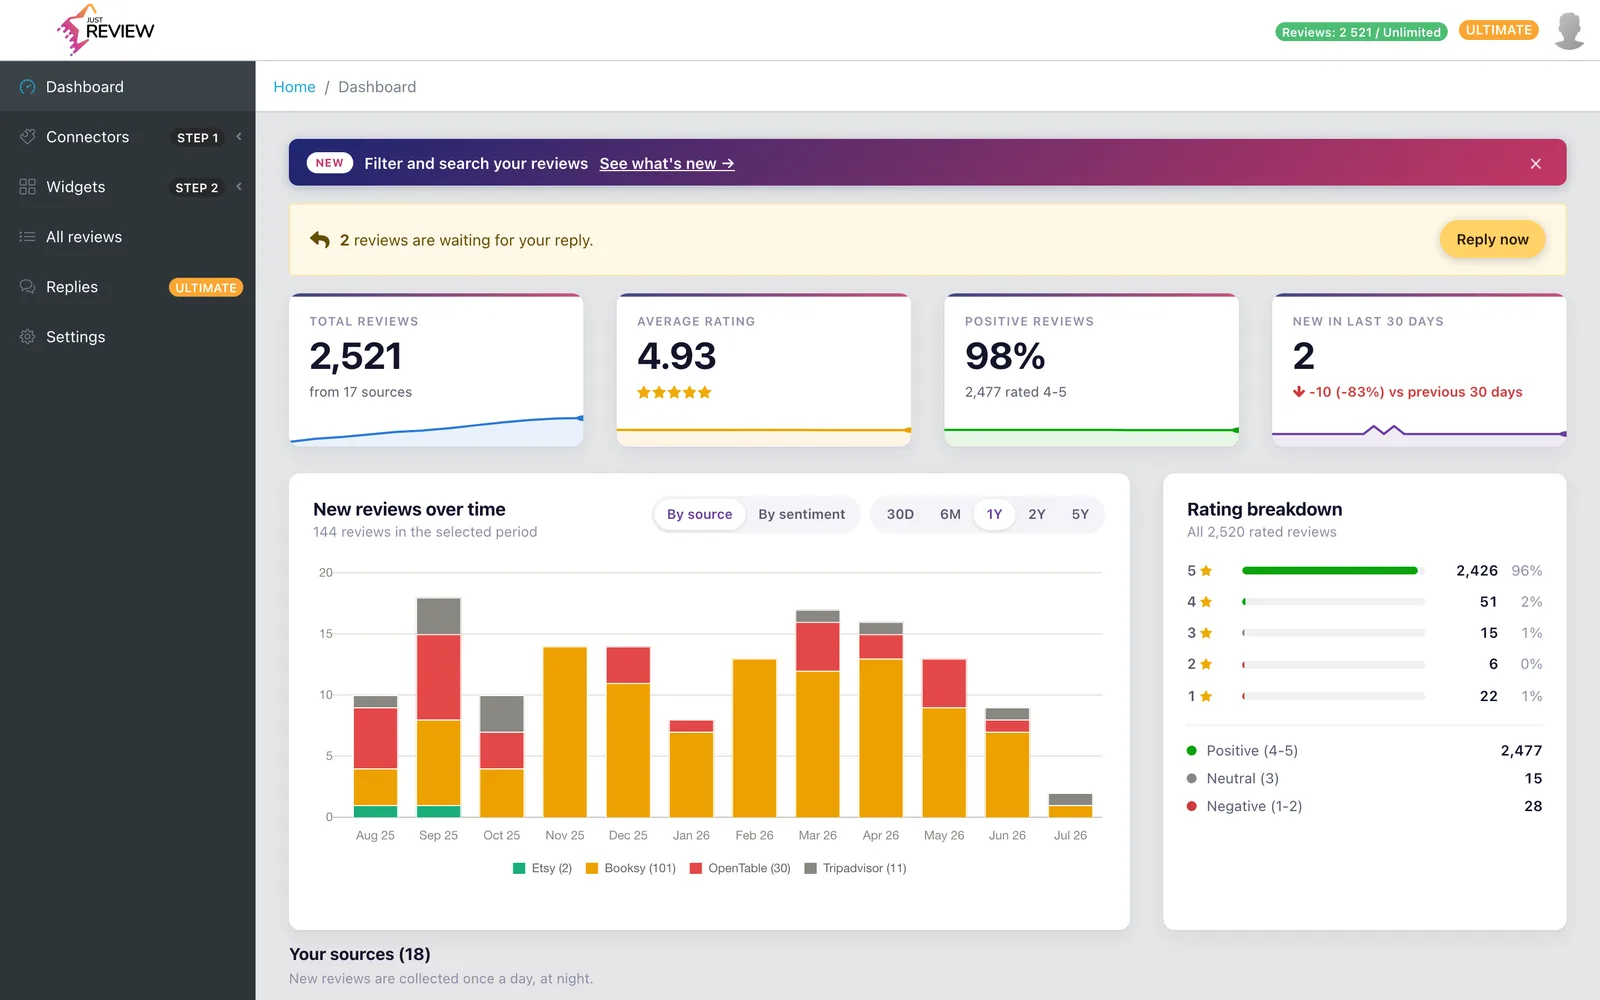
The [dashboard](https://app.justreview.co/#/dashboard) is the first thing you see after logging in. It
answers three questions: how many reviews you have, whether they are still coming in, and how they are
distributed.
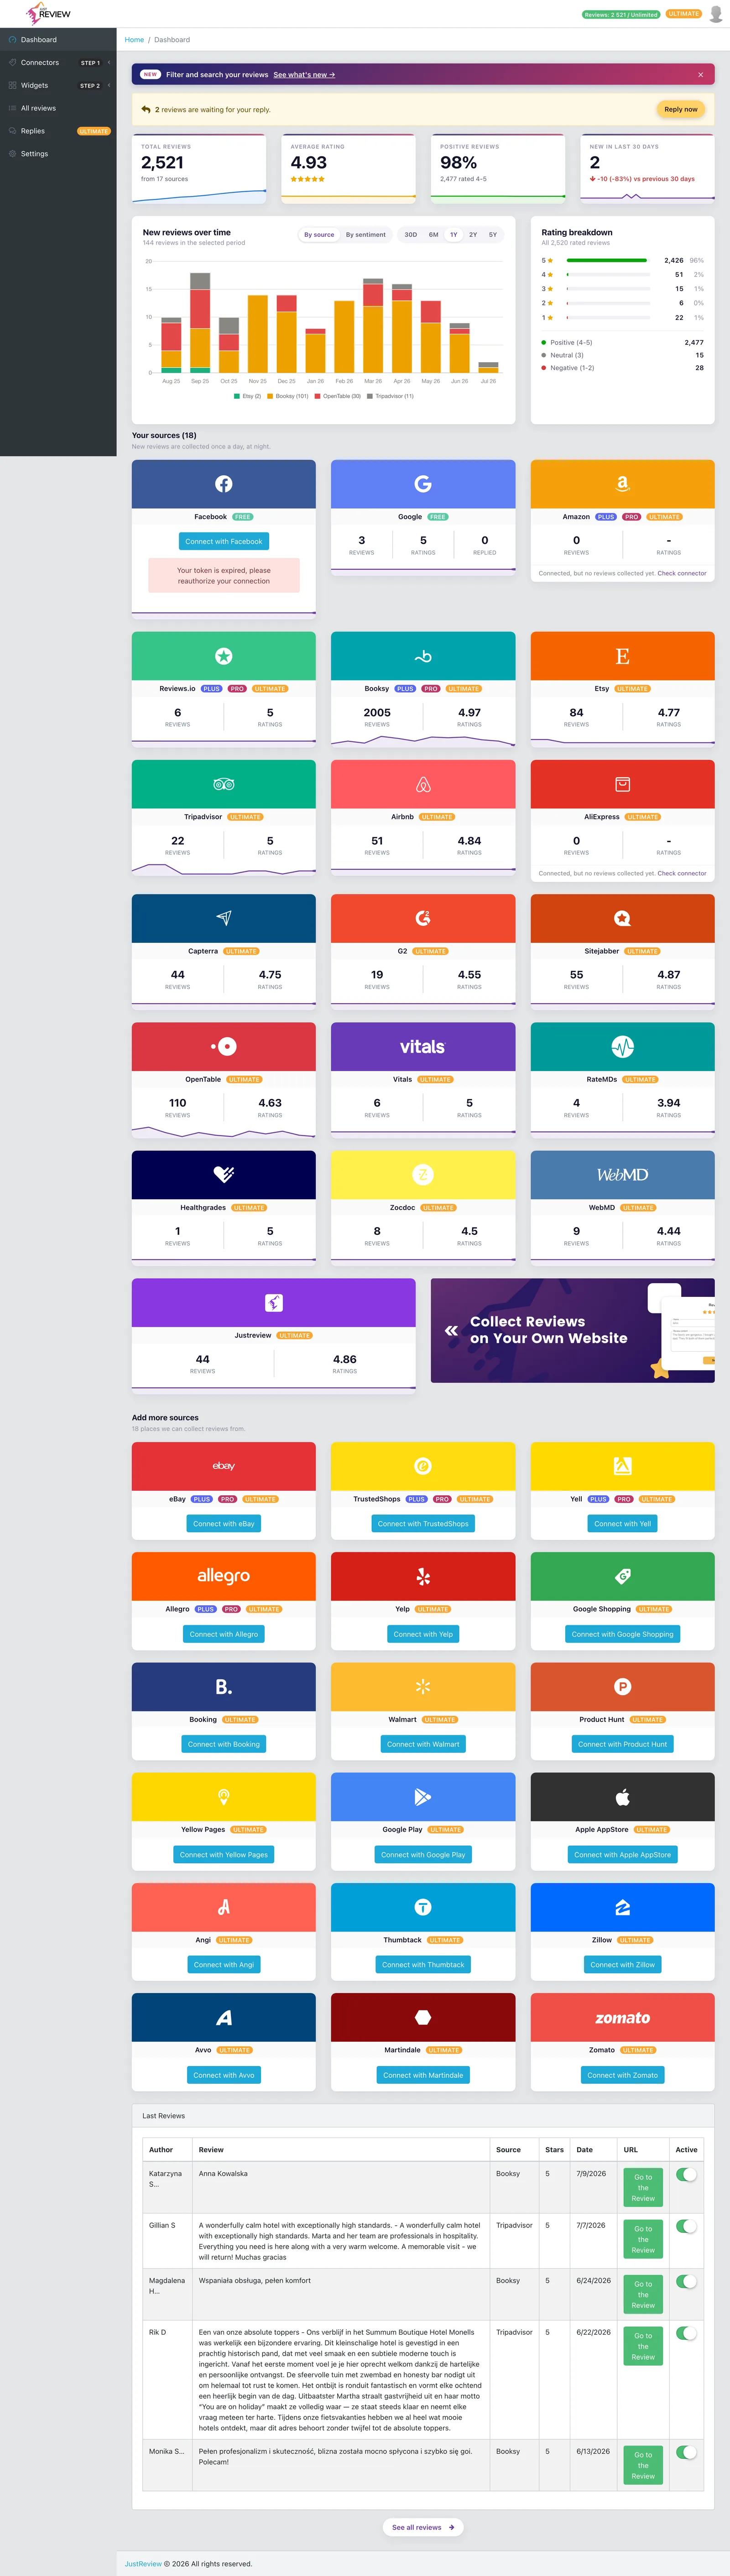
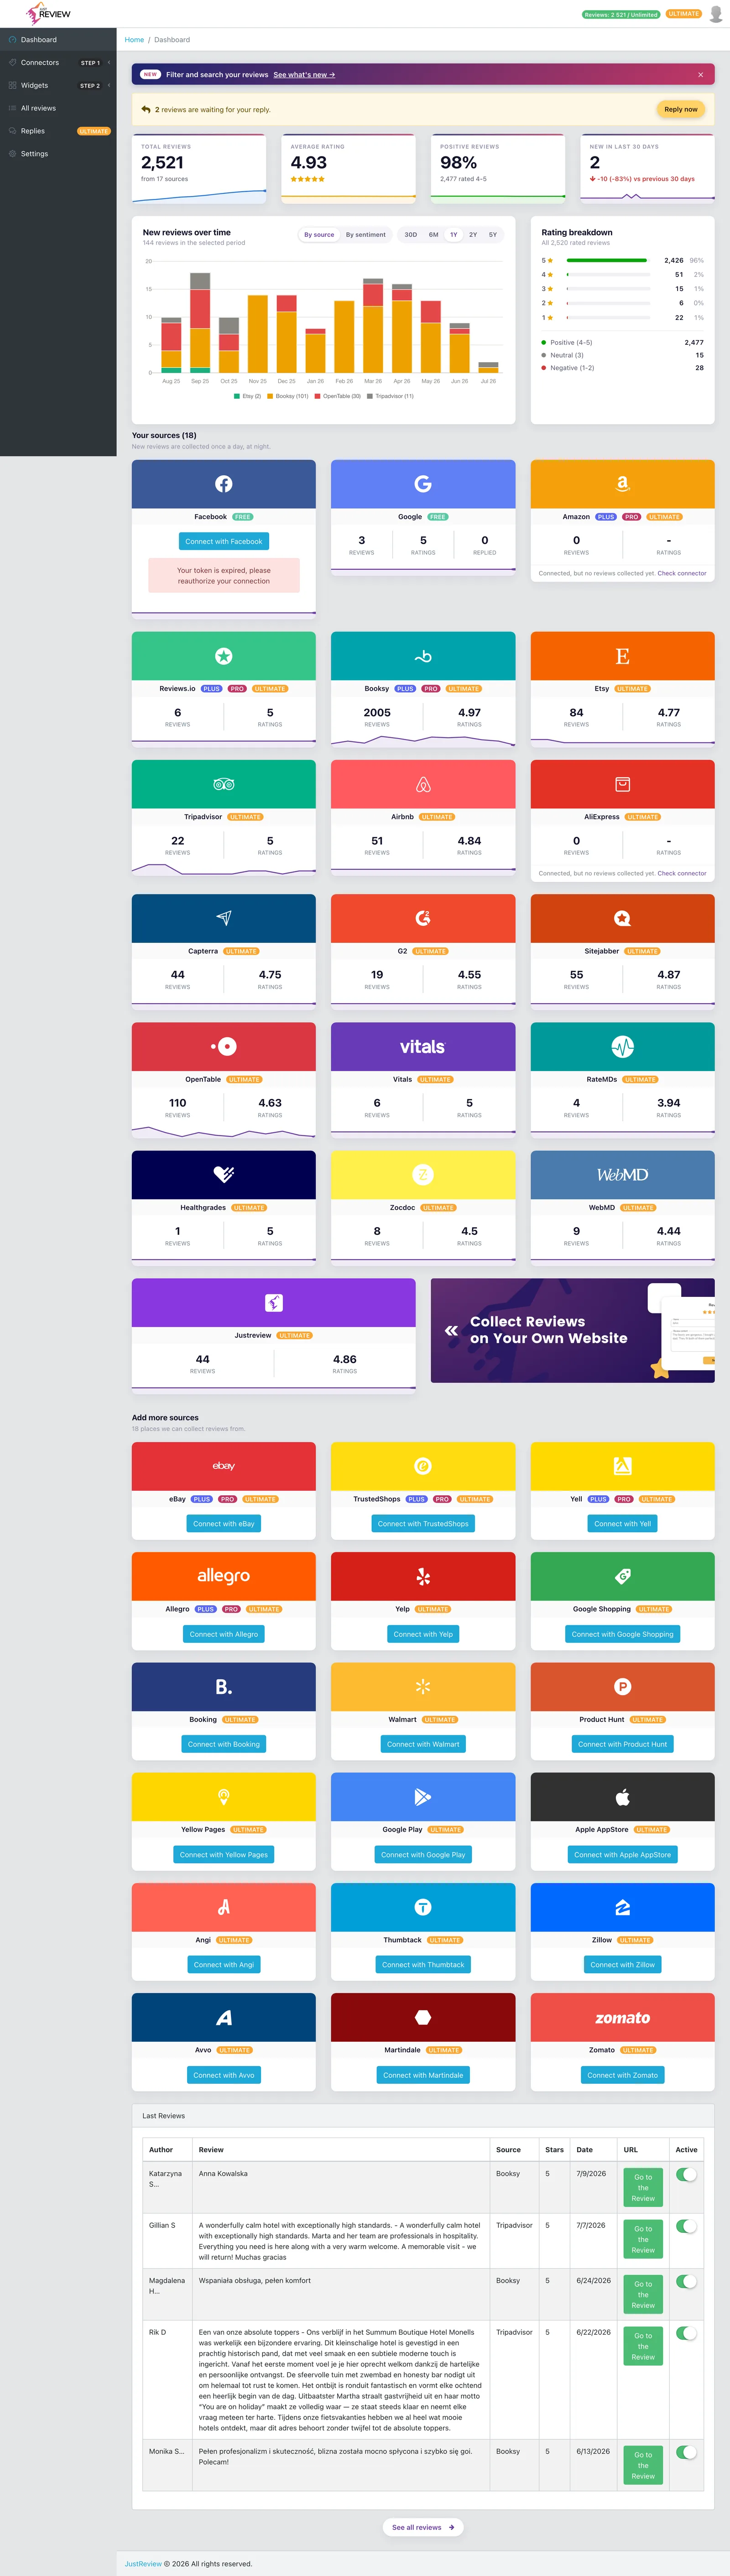
## Connected sources
Each connected platform gets a tile with its review count. Sources you have not connected are shown too,
so you can see what is available on your plan.
**Use it as a health check.** If a tile you connected months ago shows a suspiciously round or low
number, that is your first signal something stopped. Confirm in
[All reviews](https://app.justreview.co/#/reviews) by filtering that source and looking at the newest
date, then read
[reviews stopped updating](/docs/troubleshooting/reviews-stopped-updating/).
## Total reviews and average rating
The total is **all reviews stored in your account, across every source**, including any you hid and any
imported from CSV. It is the number your
[plan limit](/docs/getting-started/plans-and-limits/) applies to.
A widget can be limited to selected sources, ratings or languages, so it legitimately displays fewer.
When comparing numbers, always start from the dashboard or All reviews, never from a widget.
## Reviews over time
The chart shows how many reviews arrived in each period, and can be narrowed by source and by sentiment
over ranges from 30 days up to 5 years.
Two things it is genuinely good for:
**Spotting a dead connector.** A line that drops to zero and stays there is a connection that expired,
not customers going quiet. This is the fastest way to catch it, because nothing else announces it.
**Checking whether asking works.** Send a review request campaign, then look at the following weeks. If
the line does not move, the campaign did not land.
## Rating breakdown
How many reviews at each star level. Worth a look for one reason: **the shape matters more than the
average**. A 4.6 built from many fives and a few ones reads differently to a 4.6 built from mostly
fours, and it tells you whether you have a consistency problem or isolated incidents.
Filter 1 and 2 stars in [All reviews](https://app.justreview.co/#/reviews) to read them together. That
is usually the most useful ten minutes you can spend in the panel.
## An empty dashboard
If you just signed up and everything is at zero, nothing is broken. Connect a source and the first
[Google or Facebook](/docs/getting-started/supported-sources/), both are available on Free.
---
## How JustReview works
Source: https://justreview.co/docs/getting-started/how-justreview-works/
Summary: Collect reviews from 30+ external sources and display them on your website in three steps.
JustReview pulls the reviews your customers already left on external platforms, Google, Facebook,
Amazon and around thirty more, and displays them on your own website through ready-made widgets.
We do not create reviews and we do not change what your customers wrote. We gather what exists and
put it where it sells: on your site.
## The three steps
1. **Connect your review sources.**
In [Connectors](https://app.justreview.co/#/connectors/google) you link the platforms where your reviews
live. Google and Facebook use their own sign-in screen. Other sources need an identifier or a
profile link.
2. **Build a widget.**
In [Widgets](https://app.justreview.co/#/widgets) pick the format that fits the spot on your page,
set the colours, and choose which sources it should show.

3. **Paste the code on your website.**
Click **"Generate Code for your website"** and paste the snippet where the reviews should appear.
We have a step-by-step guide for every popular platform.
## What you get
**Social proof where it converts.** Reviews on the product page and at checkout, not on a profile
someone has to go looking for.
**Everything in one place.** Reviews from all your platforms in one dashboard, with filters by source,
rating, language and date.
**Stars in Google results.** From the Pro plan the widget can output structured data, which lets
Google show a star rating next to your page in search results. See
[stars in Google](/docs/getting-started/stars-in-google-results/).
## What JustReview does not do
Being straight about the limits saves you time:
- **Reviews are shown per account, not per product.** There is no filtering by product, ASIN or URL,
so a product page shows the same set as the home page.
- **One account covers one business.** Separate businesses or brands need separate accounts. Several
locations of the **same** business fit in one account on Ultimate, see
[multiple locations](/docs/getting-started/multiple-locations/).
- **We do not publish anywhere else.** Reviews collected through your own form stay on your site,
they are not sent to Google or Facebook.
- **We do not translate reviews.** You can, however, show only reviews matching the page language,
see [filter by page language](/docs/how-to-use-the-filter-by-page-language-function/).
## Two rules that prevent most problems
Widget settings are baked into the snippet on your site. Change anything in the dashboard, then
generate the code again and replace the old snippet. Otherwise your website keeps showing the
previous configuration.
The widget only renders on domains listed in [Settings](https://app.justreview.co/#/settings). This
is also why it stays invisible inside your CMS admin preview and only shows on the live site.
## Next steps
---
## Import reviews from a CSV file
Source: https://justreview.co/docs/getting-started/import-reviews-from-csv/
Summary: Bring in reviews you already hold, from a previous review tool, your shop software or a platform export.
Useful when you are moving from another review tool, recovering history that fell outside a
platform's time window, or you collected reviews yourself and want them on your site.
CSV import is available from **Plus**. On Free the option is locked.
## The file format
One header row, then one row per review. **Both a header row and at least one data row are
required.**
The separator is detected automatically: if the header contains more semicolons than commas, we read
it as semicolon-separated, which means an export straight out of Excel usually works untouched.
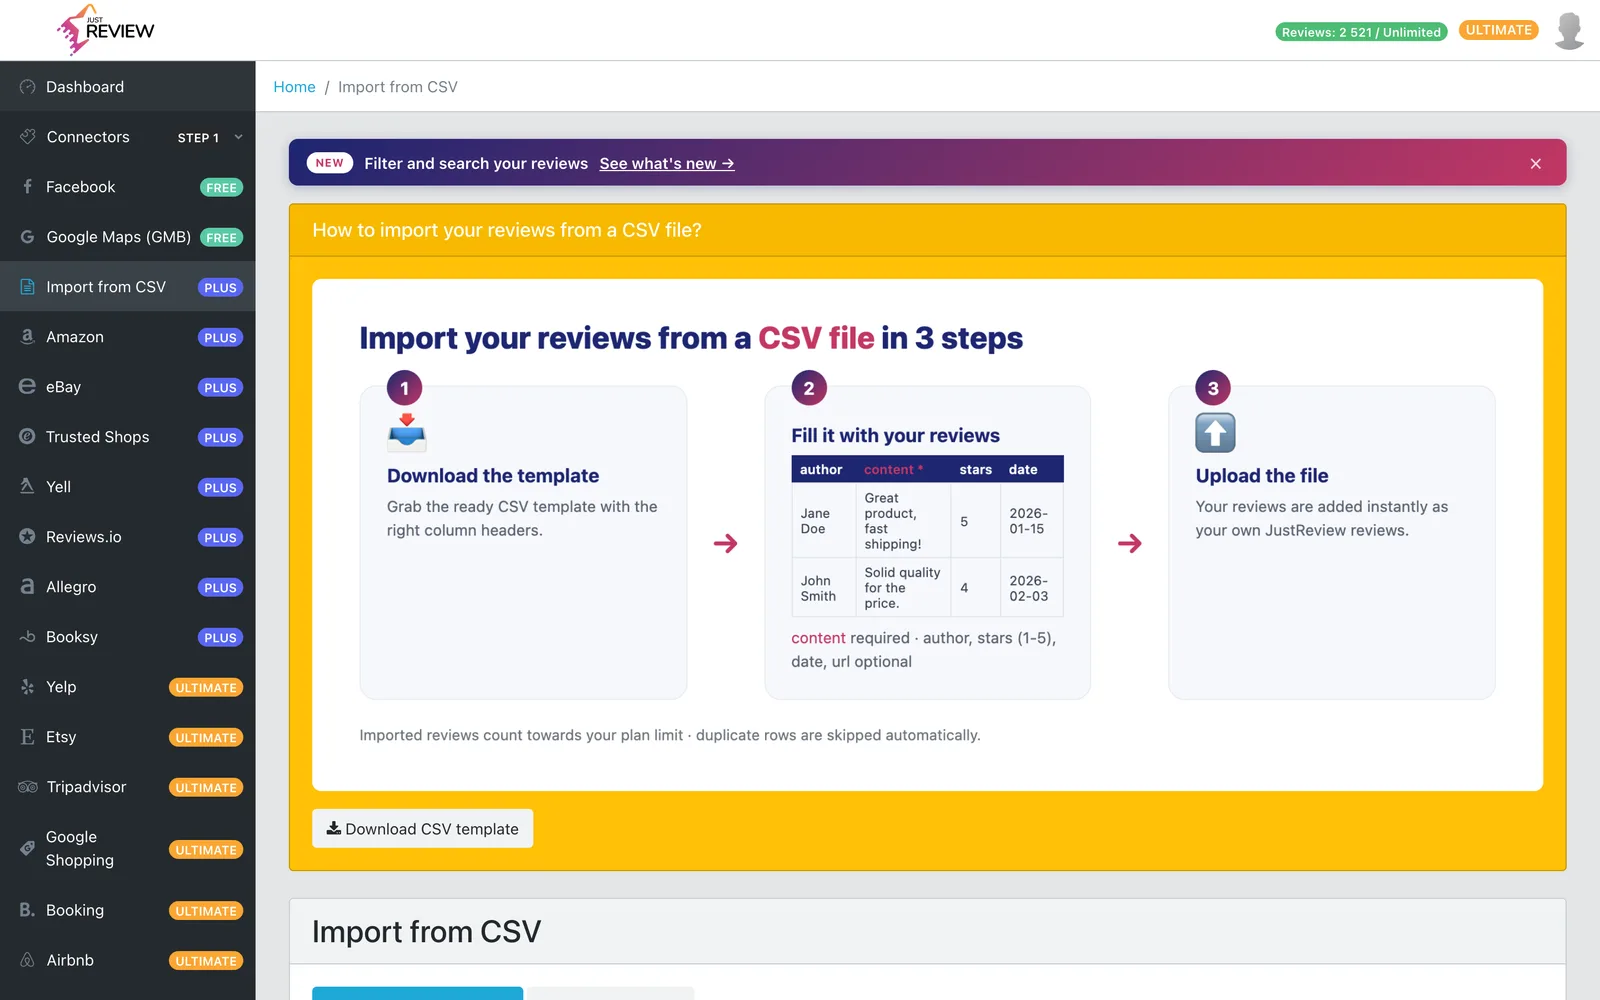
Only **one column is mandatory**: the review text.
| Column | Required | Accepted header names | If missing |
|---|---|---|---|
| Review text | **yes** | `content`, `text`, `review`, `comment`, `body`, `tresc`, `opinia` | file rejected |
| Author | no | `author`, `name`, `reviewer`, `autor` | becomes `Anonymous` |
| Rating | no | `stars`, `rating`, `score`, `star`, `ocena`, `gwiazdki` | becomes 5 |
| Date | no | `date`, `created`, `data` | becomes today |
| Link | no | `url`, `link` | empty |
| Language | no | `lang`, `language`, `jezyk` | becomes `en` |
Header names are case-insensitive, so `Author` and `author` both work.
### Example
```csv
author,content,stars,date,lang
Anna Kowalska,"Fast shipping, exactly as described.",5,2026-03-14,en
Marek,"Good product, packaging could be better.",4,2026-04-02,pl
,"Very happy with the service.",5,,en
```
The third row has no author, so it will show as `Anonymous`.
## How values are handled
**Rating** is rounded and clamped to the 1 to 5 range. A `4,5` with a comma works, so European
exports do not need converting. Anything above 5 becomes 5, anything below 1 becomes 1.
**Date** accepts common formats. If a date cannot be read, today's date is used rather than failing
the whole row.
**Language** is what the [page language filter](/docs/how-to-use-the-filter-by-page-language-function/)
uses later. Worth filling in if your site is multilingual.
**Rows with empty review text are skipped**, and reported back as skipped.
## Import it
1. Open [Connectors](https://app.justreview.co/#/connectors/csv-import) and choose **CSV import**.
2. Upload your file.
3. Check the result. You get back how many reviews were **imported** and how many **skipped**.
## Things worth knowing before you import
Duplicates are detected by author, rating and review text together. Upload the same file twice and
the second pass reports everything as skipped instead of doubling your reviews.
The flip side: two genuinely different reviews with the identical author name, identical rating and
identical text count as one. In practice that is almost always an actual duplicate.
A row from a CSV and the same review fetched from a platform API are **not** recognised as the same
thing, so you would end up with both. If you are filling a gap in history, trim the export to the
dates you are actually missing first.
**Imported reviews count towards your plan limit.** If the file is larger than your remaining room,
we import what fits and tell you the limit was reached.
**Maximum 20 000 rows per file, and 5 MB per file.** Whichever you hit first, split the file.
A very large export can exceed 5 MB well below 20 000 rows.
**Imported reviews are attributed to JustReview**, not to Google, Facebook or any other platform. We
will not label your own data as coming from a source it did not come from. In widgets they appear as
your own collected reviews.
**They are visible immediately** after import.
## Common problems
**"CSV must have a content column".** Your text column is named something we do not recognise. Rename
it to `content` and re-upload.
**"CSV needs a header row and at least one data row".** The file has only a header, or is empty.
**Everything reported as skipped.** Either the reviews are already in your account, or the text column
is empty for every row. Open the file in a plain text editor and check that the text really is in the
column named in the header.
**Fewer reviews than the file contains.** You hit your plan limit, or rows had empty text. Both are
in the response.
---
## Multiple locations in one account
Source: https://justreview.co/docs/getting-started/multiple-locations/
Summary: Connect several Google or Facebook listings to one JustReview account, with an honest note on what the widget can and cannot separate.
If your business has several branches, each with its own Google listing, you can connect them all to one
account instead of paying for several.
Up to **5 profiles per source** are included, so 5 Google listings plus 5 Facebook pages. Multiple
locations work for **Google and Facebook only**, other sources connect one profile each.
## How to add another location
1. Open [Connectors](https://app.justreview.co/#/connectors/google) and pick **Google** or **Facebook**.
2. Sign in and select the **next** listing. Your existing one stays connected, the new one is added
alongside it.
3. Repeat for each location. The panel shows how many you have used out of your limit.
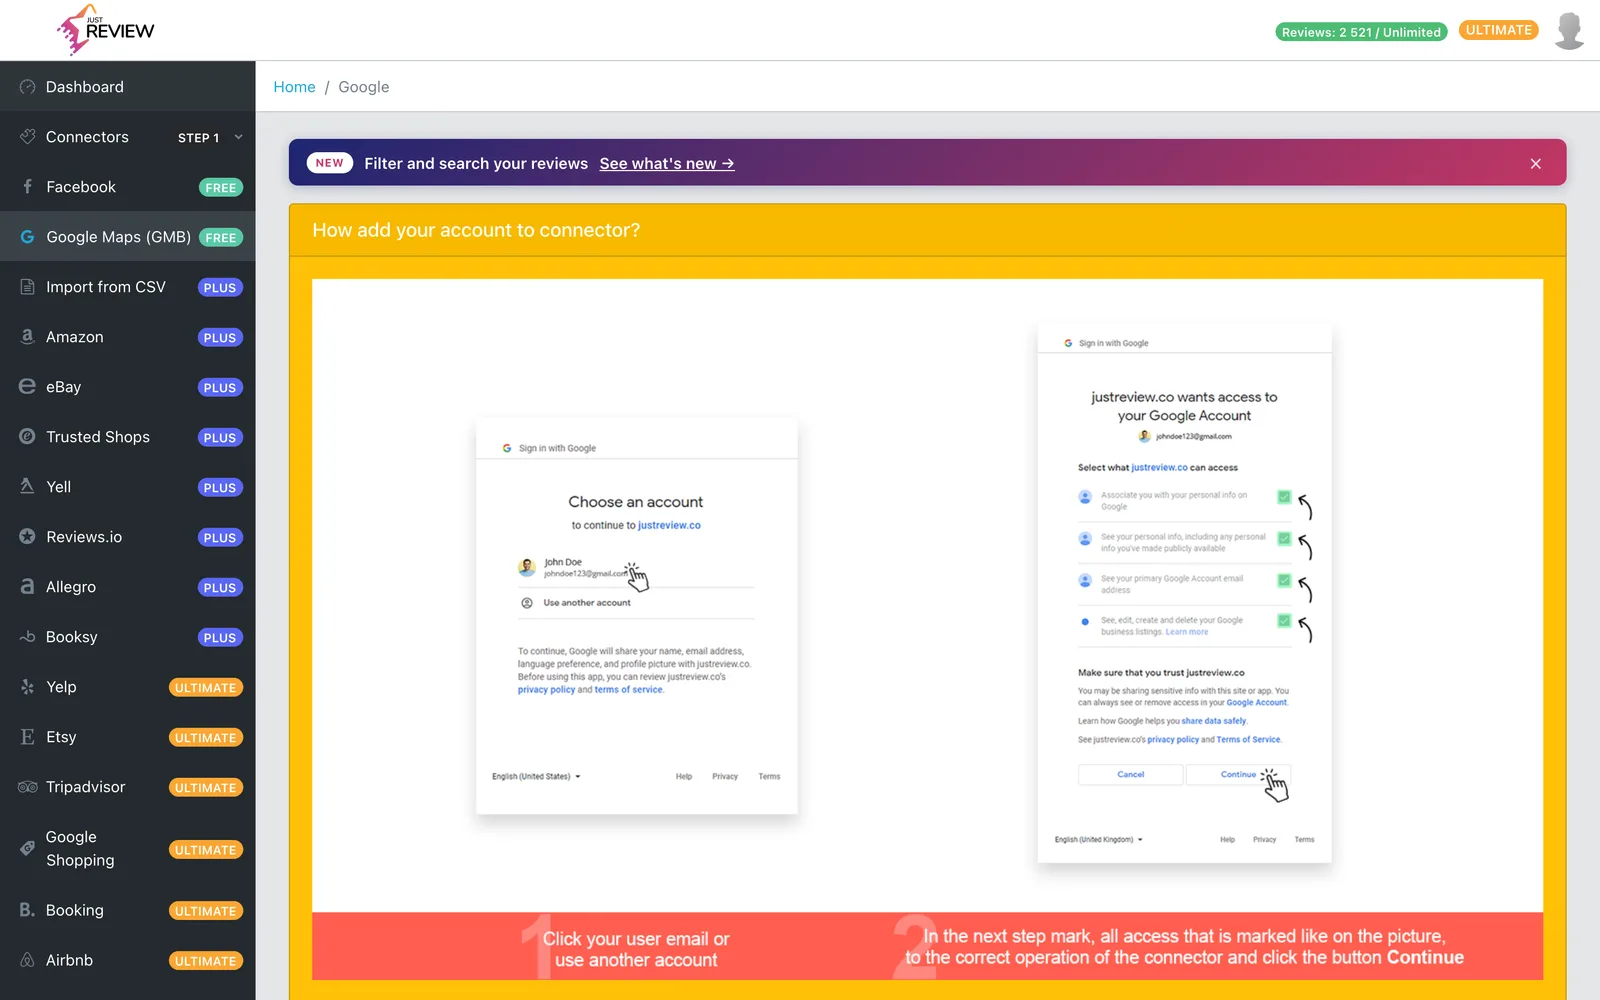
Reviews from all connected locations flow into one pool and appear together in
[All reviews](https://app.justreview.co/#/reviews) and in your widgets.
## Read this before you buy
This is the limitation people are most often surprised by, so it is better said up front: reviews from all
your locations are displayed **together**. There is no per-location filter in the widget and no way to put
"only the Kraków branch" on the Kraków page.
If you need each branch page to show only its own reviews, one account with multiple locations is **not**
the right setup. Separate accounts per branch is, because each has its own widget and its own pool.
What multiple locations **is** good for:
- **One combined rating and review count** across the whole business, which for a chain is usually the
stronger number.
- **One dashboard** instead of logging into several accounts.
- **One subscription** instead of several.
What it is **not** good for:
- Branch-specific pages that need branch-specific reviews.
- Franchise setups where each owner needs their own access.
## More than five locations
Five per source is included with Ultimate. Above that, extra locations are available as a paid add-on.
Write to [contact@justreview.co](mailto:contact@justreview.co) with how many you need and we will set it
up.
## Removing one location
You can disconnect a single profile without touching the others. **Disconnecting a location removes the
reviews collected from it**, while the rest stay. The panel tells you the count before you confirm.
## One business, not several businesses
Multiple locations mean **branches of the same business**. Separate companies or unrelated brands need
separate JustReview accounts, since they have different names, different ratings and usually different
websites.
If you are an agency managing several clients, each client needs their own account. Write to us if you
handle a number of them, that is a conversation worth having directly.
## Troubleshooting
**Profile limit reached.** The panel shows a note about the limit and an upgrade button. You have used your five for that source, ask us about the add-on.
**Upgrade prompt instead of the profile list.** The feature needs Ultimate. Note that some lifetime deal tiers grant a plan name
without the review allowance this feature requires, so if you believe you are on the right plan and still
see this, write to us and we will check your account.
**A new location shows no reviews.** Each connection imports separately and in the background. Give it
time, then check by filtering that source in All reviews.
**One location stopped updating.** Access is granted per profile, so it can expire for one listing and not
the others. Reconnect that one, see
[reviews stopped updating](/docs/troubleshooting/reviews-stopped-updating/).
---
## Plans, limits and what each one includes
Source: https://justreview.co/docs/getting-started/plans-and-limits/
Summary: How the review limit works, which features need which plan, and what happens when you hit the ceiling.
## The review limit is a total, not a monthly allowance
This is the single most misunderstood thing about our pricing, so it goes first.
| Plan | Review limit |
|---|---|
| Free | 100 |
| Plus | 1 000 |
| Pro | 10 000 |
| Ultimate | 20 000 |
It is the **total number of reviews stored in your account across all sources**. It does not reset
every month. If you have 980 reviews on Plus, you have room for 20 more, not 1 000 more this month.
Once you reach the ceiling, imports stop. Existing reviews keep displaying, but nothing new comes in
until you upgrade. If your count is sitting on exactly 100, 1 000, 10 000 or 20 000, that is your
answer, not a bug.
## Which feature needs which plan
**Free**
- Google and Facebook sources
- JustReview Badge widget
**Plus and above**
- Amazon, eBay, Allegro, Booksy, Trusted Shops, Reviews.io, Yell sources
- **Import from CSV**
- Summary, Testimonials and Counters widgets
- **White Label**: the **Show JustReview logo** switch in each widget
**Pro and above**
- Reviews Page and Stars widgets
- **Generate Rich Snippet Data**, the structured data that lets Google show stars
- **Best reviews first**, labelled **Best reviews on top** in the Reviews Page widget
- **Filter by page language**
**Ultimate**
- **All remaining sources**, roughly two thirds of the catalogue, including Etsy, Yelp, Tripadvisor,
Google Shopping, Booking, Airbnb, Walmart, AliExpress, Capterra, G2, Sitejabber, Product Hunt,
Google Play, Apple App Store and the professional directories
- **Review Curation**, switching individual reviews on and off
- **Multiple locations** in one account
- **Replies** to Google reviews
The current comparison table is always on the [pricing page](https://justreview.co/#pricelist).
## Trial
Paid plans start with a **7-day trial**. You give card details up front, and you can cancel inside
the trial without being charged.
## Lifetime deals from AppSumo
If you bought a lifetime deal, your plan is tied to the tier you purchased and does not renew, so
there is nothing to pay monthly.
Cancelling can remove lifetime access, which is not what you want and is awkward to restore. If you
need to change anything about a lifetime account, write to
[contact@justreview.co](mailto:contact@justreview.co) first.
## Changing plans
Upgrades and downgrades happen in [Payments](https://app.justreview.co/#/payments). An upgrade takes
effect immediately.
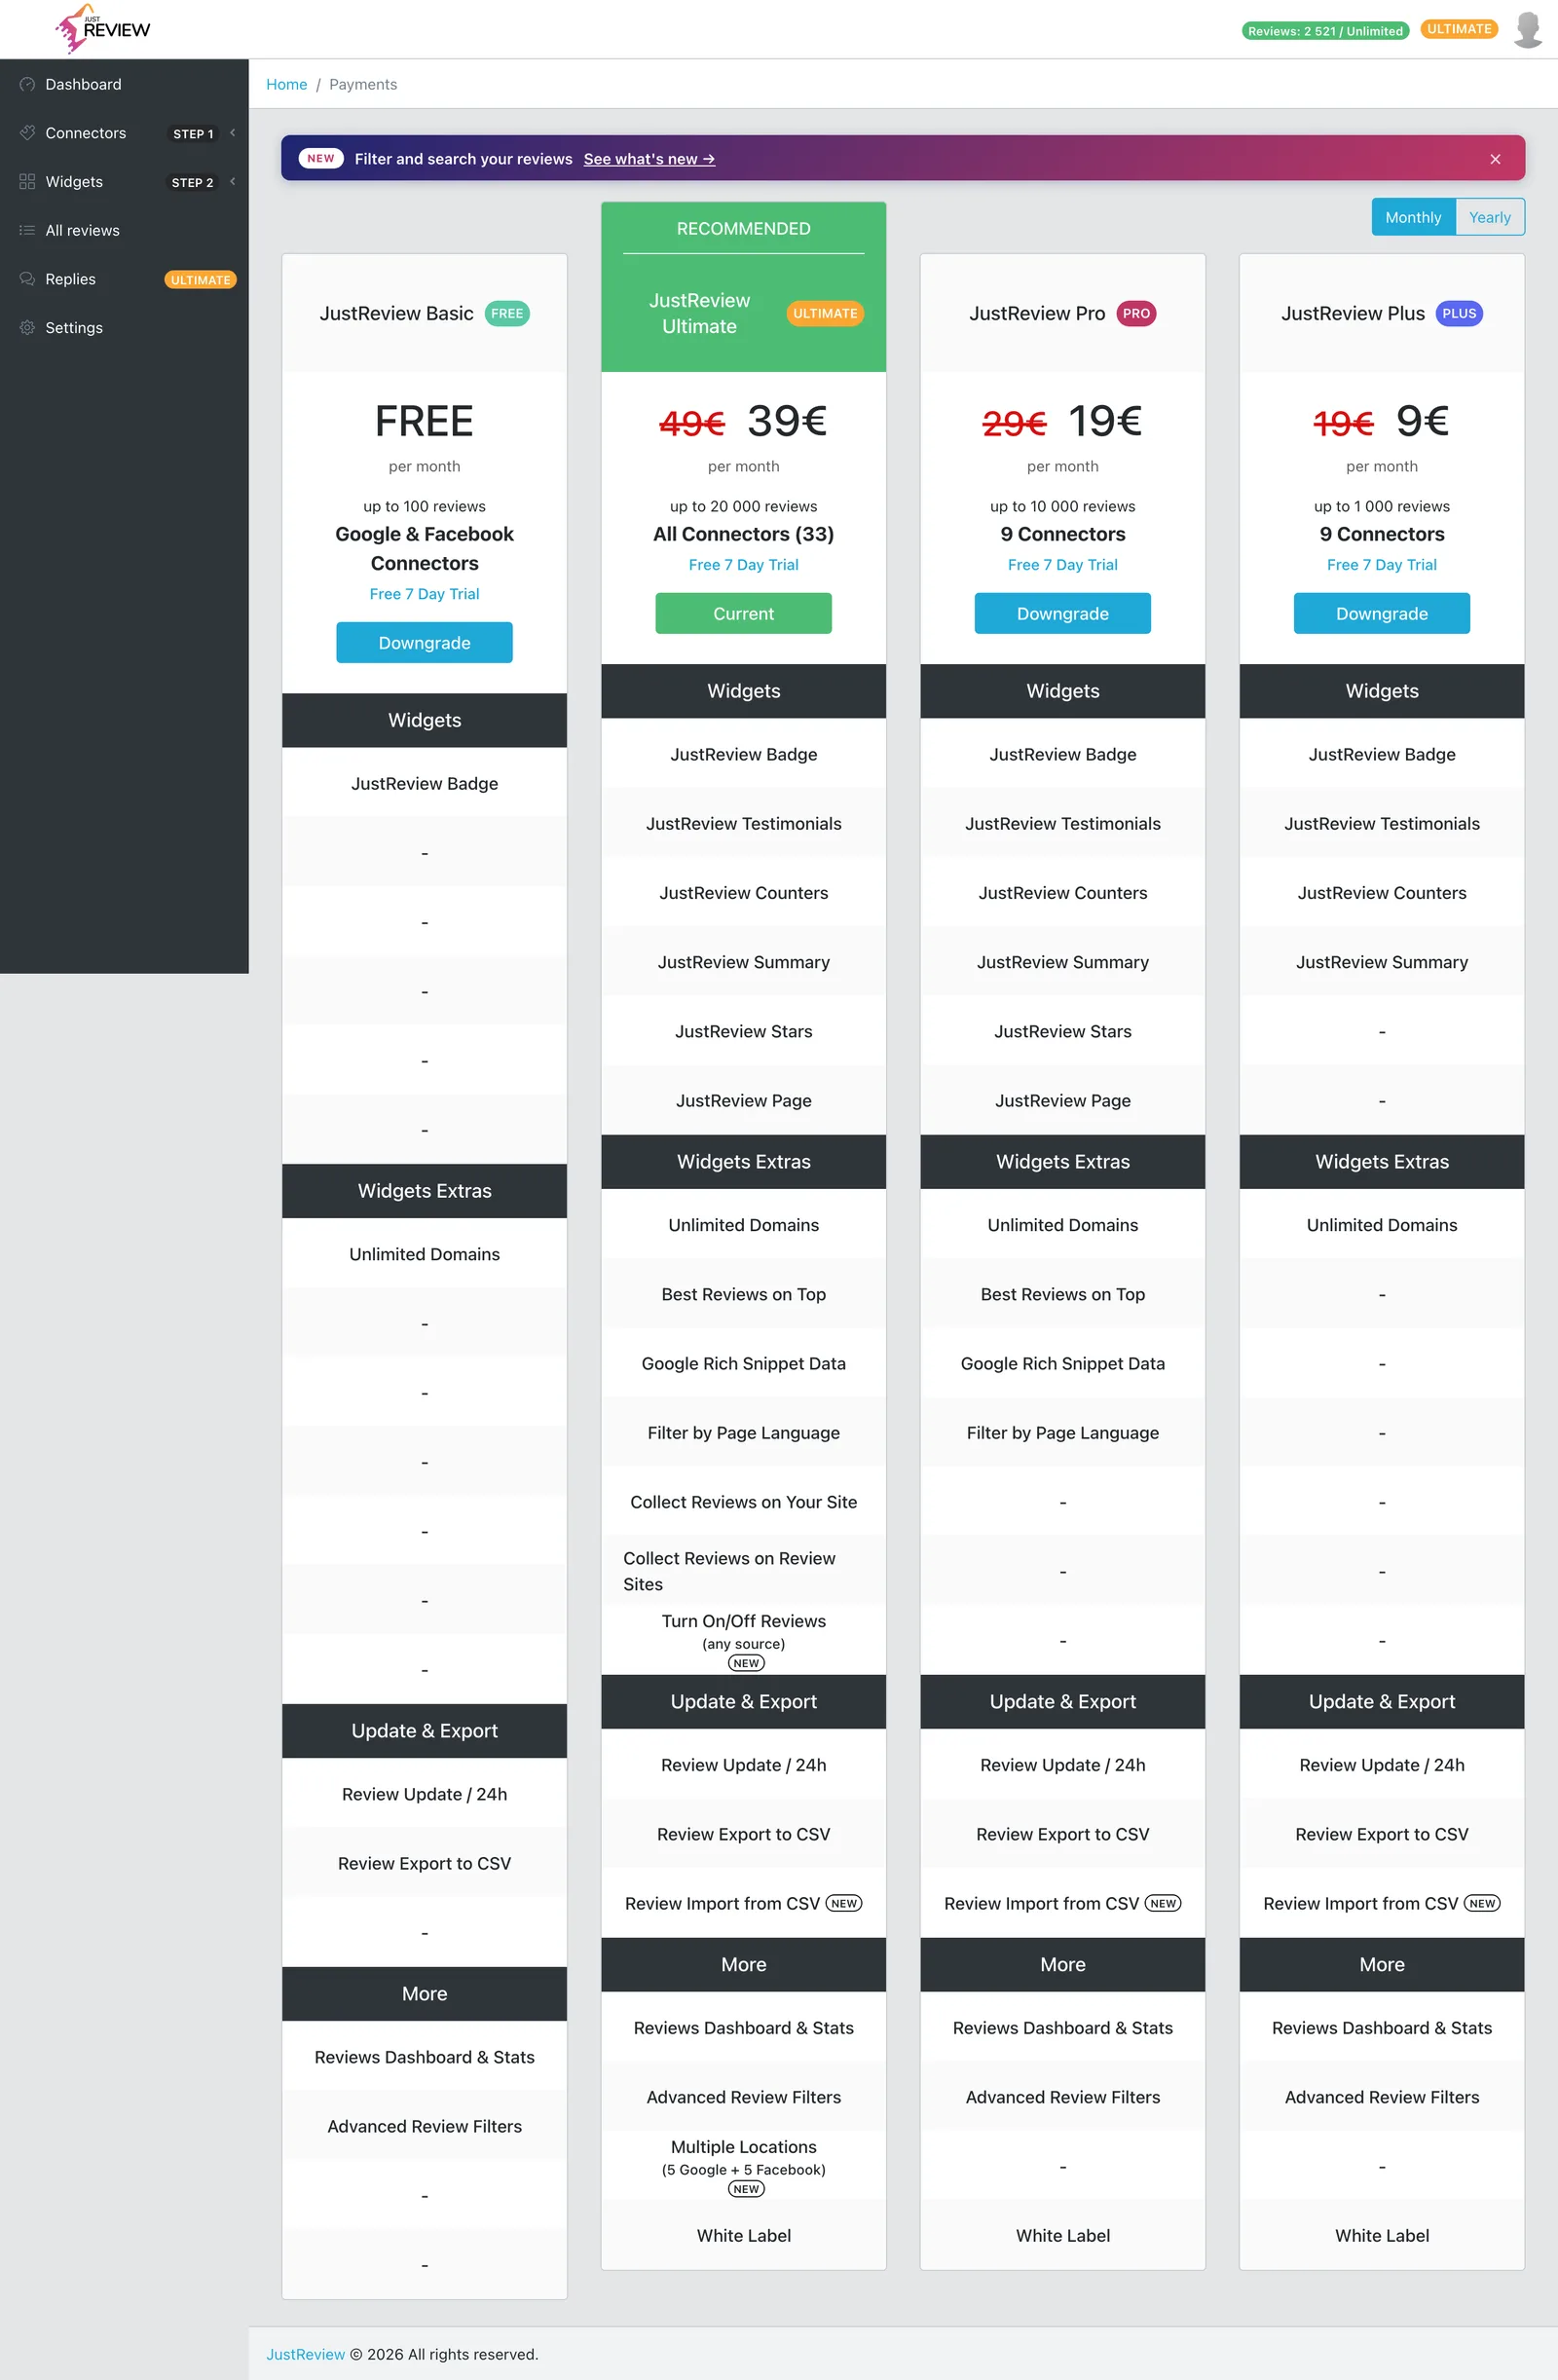
**If your plan does not change right after payment**, log out and back in first, then read
[paid but still on Free](/docs/troubleshooting/paid-but-still-on-free/). The usual cause is paying
with a different email address than your account uses.
## When you are over the limit after a downgrade
Downgrading does not delete reviews. You keep what you have, but imports stay paused until your count
is back under the new ceiling. On Ultimate you can hide reviews you do not need, though hiding does
not reduce the stored count. In practice: downgrade only when your review volume genuinely fits the
smaller plan.
## Billing
We charge in **EUR**. Invoices and the payment method live in the billing portal, reachable from
[Payments](https://app.justreview.co/#/payments). If you are a VAT-registered company in the EU and
need reverse charge on the invoice, write to us and we will correct it.
---
## Stars in Google search results
Source: https://justreview.co/docs/getting-started/stars-in-google-results/
Summary: Turn on structured data so Google can show a star rating next to your page, including how to do it without a visible badge.
Those stars under a search result are a rich result. They come from **structured data** in your page's
HTML, and JustReview can output it for you.
The setting is called **Generate Rich Snippet Data** and starts on **Pro**.
## How to switch it on
1. **Set your brand name** in [Settings](https://app.justreview.co/#/settings).
This is not optional. The structured data carries your brand name, and **without it nothing is
generated at all**. If stars never appear, check this first.

2. **Open the JustReview Badge widget** and enable **Generate Rich Snippet Data**.
The structured data is produced by the **Badge widget only**. No other widget emits it, so a page
carrying just Testimonials will not get stars.
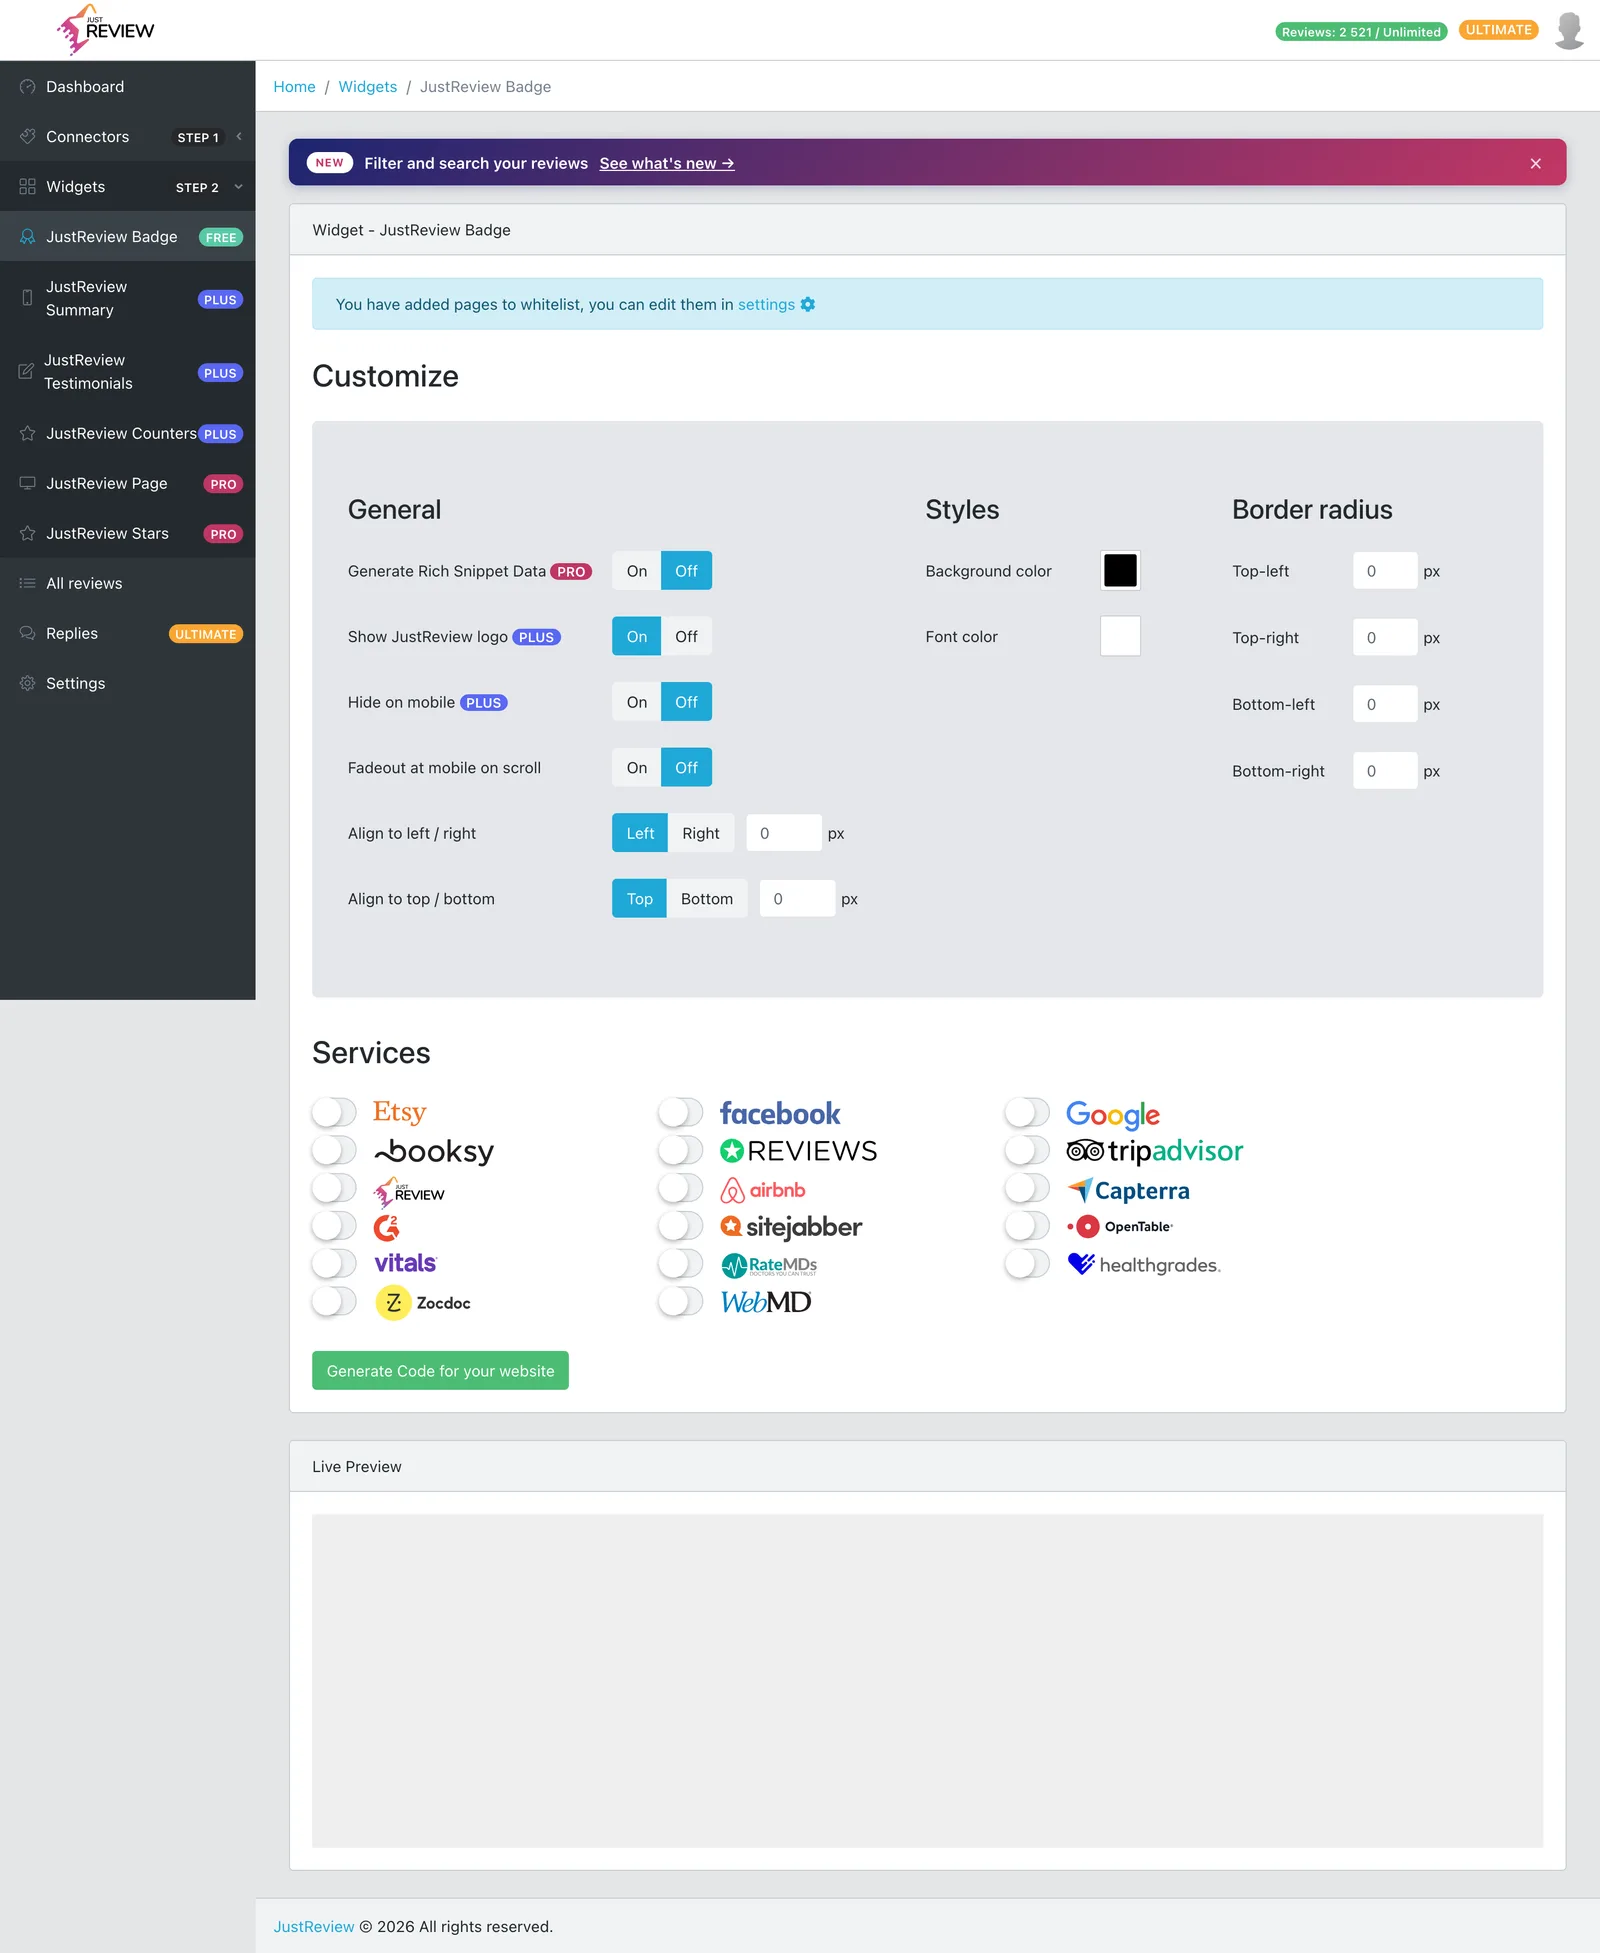
3. **Generate the code again and replace the snippet on your site.**
4. **Check it with Google's tester.**
Paste your page address into the
[Rich Results Test](https://search.google.com/test/rich-results). It should report an
`AggregateRating` with your rating value and review count.
## Stars without a visible badge
A common and reasonable request: you want the rating in Google, but not the floating badge in the corner
of the page.
That works, and it is one line in the snippet. The visible badge and the structured data are two
independent switches.
```js
initBadge("YOUR_USER_ID", {
enableAggregateRatings: true, // structured data for Google
disableBadge: true, // do not render the visible badge
// ...the rest of your settings
});
```
There is no toggle for this in the dashboard yet, so the generated code will not contain it. Add
`disableBadge: true` yourself after pasting the snippet, and add it again whenever you regenerate the
code.
Do **not** hide the badge with CSS instead. `display: none` leaves the element on the page while making
it invisible, which is the situation Google's guidelines warn about. `disableBadge` never renders it at
all, which is the clean way.
## What the data contains
An `AggregateRating`: your average rating, the number of reviews, and a best rating of 5, attached to
your brand name. It reflects the sources selected in that Badge widget, so it matches what a visitor
sees.
## Google shows the stars when it decides to
Correct structured data makes you **eligible** for a rich result. It does not entitle you to one.
- **It takes time.** Google has to recrawl the page. Days to weeks is normal.
- **It can appear and then disappear.** Google decides per page and per query.
- **Some queries never show it**, whatever your markup says.
So: confirm with the Rich Results Test that the data is correct, then be patient. If the tester is happy,
your side of the job is done.
Google requires the rating to be about the thing on that page. A business rating fits your home page, an
about page or a services landing page. Putting it on every product page as if it rated each product is
the kind of thing that gets rich results removed across a whole site, and they take a long time to earn
back.
## This is a business rating, not a product rating
The data describes your **business**, because that is what the reviews are about. It cannot be attached
to individual catalogue items, see [reviews per product](/docs/account/reviews-per-product/).
## Stars are not showing
1. **Brand name empty** in Settings. Nothing is generated without it.
2. **Setting on but code not regenerated.** The snippet on your site still holds the old configuration.
3. **No Badge widget on the page.** Only Badge emits the data.
4. **Plan below Pro.** The data is not emitted even with the toggle on.
5. **Google has not recrawled yet.** If the Rich Results Test sees the rating, wait.
6. **Google chose not to show it.** Normal, varies by query, nothing to fix.
---
## Supported review sources
Source: https://justreview.co/docs/getting-started/supported-sources/
Summary: Every platform JustReview can collect reviews from, what each one needs from you, and which plan it requires.
Around thirty sources, plus your own reviews collected through a form on your site and CSV import.
## How to read the table
The **"What you provide"** column matters: getting this wrong is the number one cause of
[the "No reviews or Api Code is Invalid" message](/docs/troubleshooting/no-reviews-or-api-code-is-invalid/).
## Free plan
| Source | What you provide |
|---|---|
| **Google** (Business Profile) | Sign in with Google, then pick your listing from a list |
| **Facebook** | Sign in with Facebook, then pick your page |

## Plus and above
| Source | What you provide |
|---|---|
| Amazon | Seller identifier |
| eBay | **Account name**, not a link |
| Allegro | **Account name** |
| Reviews.io | **Account name** |
| Booksy | **Link** to your profile |
| Yell | **Link** to your profile |
| Trusted Shops | **TS-ID** plus your Trusted Shops email and password |
## Ultimate
The full profile URL, copied from your browser's address bar:
Etsy, Yelp, Tripadvisor, Google Shopping, Booking.com, Airbnb, Walmart, AliExpress, Capterra, G2,
Sitejabber, Product Hunt, Google Play, Apple App Store, Yellow Pages, OpenTable, Angi, Thumbtack,
Zillow, Avvo, Martindale, Vitals, Zomato, RateMDs, Healthgrades, ZocDoc, WebMD.
## Not tied to any platform
| Source | Plan | What it is |
|---|---|---|
| **Your own review form** | Ultimate (Reviews Page widget) | Customers leave reviews directly on your site. See [collecting your own reviews](/docs/getting-started/collect-your-own-reviews/) |
| **CSV import** | Plus | Reviews you already hold. See [import from CSV](/docs/getting-started/import-reviews-from-csv/) |
## Good to know
Each source connects to one profile. Several locations of the same business are possible on Ultimate,
see [multiple locations](/docs/getting-started/multiple-locations/). Separate businesses need separate
JustReview accounts.
Fetching runs in the background. Small profiles are done in minutes, large ones can take hours. After
that, reviews refresh on a schedule rather than the moment someone posts.
Both are access **you grant**, and it lapses in normal use, for example when you change your password
or lose admin rights on the listing. When that happens imports go quiet without an obvious error, see
[reviews stopped updating](/docs/troubleshooting/reviews-stopped-updating/).
## Your platform is not on the list
Two things worth knowing:
- **Reviews with no platform behind them** can still get onto your site through CSV import or your own
review form. That covers plenty of local businesses whose customers do not use review portals at all.
- **Requests for new sources genuinely influence the roadmap.** Write to
[contact@justreview.co](mailto:contact@justreview.co) with the platform and a link to your profile
there.
Some platforms are deliberately **not** supported, because their terms forbid it or they asked us to
stop. We respect those requests, see [where our reviews come from](/docs/scraping-reviews-is-it-legal/).
---
## Turn individual reviews on and off
Source: https://justreview.co/docs/getting-started/turn-reviews-on-and-off/
Summary: Hide a single review from your widgets without touching the original on the source platform.
Review Curation is available on **Ultimate**. On lower plans the switch is visible but locked.
Every review in [All reviews](https://app.justreview.co/#/reviews) has a switch. Off means it stops
appearing in your widgets. It stays in your account, and you can switch it back on at any time.

## What hiding does and does not do
**Does:** removes the review from every widget on your website, immediately.
**Does not:** change or delete anything on Google, Facebook or wherever it came from. The review is
still public there, and still counts towards your rating **on that platform**.
Visibility of a review belongs to the account owner. We do not touch it on your behalf, and neither
should anyone with access to your dashboard, without asking you first.
## Legitimate uses
**Spam and off-topic.** A review that is clearly not about your business, or is a competitor's
advertisement.
**Duplicates.** The same customer left the same review on two platforms and it shows twice.
**Reviews about something you no longer sell.** A two-star review of a discontinued product does not
inform anyone.
**Language mismatch you cannot solve otherwise.** Usually better handled by
[filtering by page language](/docs/how-to-use-the-filter-by-page-language-function/).
## Where to be careful
Hiding every negative review is tempting and counterproductive, for two reasons.
**It does not work commercially.** A wall of nothing but five stars reads as fake. A visible four-star
review with a real reservation builds more trust than a hundred perfect ones.
**It can put you on the wrong side of the rules.** In the EU, the
[Omnibus Directive](https://eur-lex.europa.eu/eli/dir/2019/2161/oj) requires that displayed reviews are
not selectively filtered to mislead consumers. Hiding spam is fine. Hiding criticism to inflate your
rating is the thing the rules are aimed at.
A better answer to a critical review is a reply. On Google you can respond, and the response shows
publicly next to the review.
## Removing a review for good
Hiding affects only your widgets. To have a review **removed** it has to happen on the platform where
it was posted, because that is where it lives. Google and Facebook both have reporting flows for
reviews that break their rules.
---
## Install the widget on GoDaddy
Source: https://justreview.co/docs/godaddy-code-embed-instruction/
Summary: Add your JustReview widget to a GoDaddy Website Builder site using Site-wide Code and an HTML element.
This guide covers GoDaddy Website Builder (Website + Marketing) and uses the JustReview
Testimonials widget as the example. Every other widget works the same way.
1. **Build your widget and click "Generate Code for your website".**

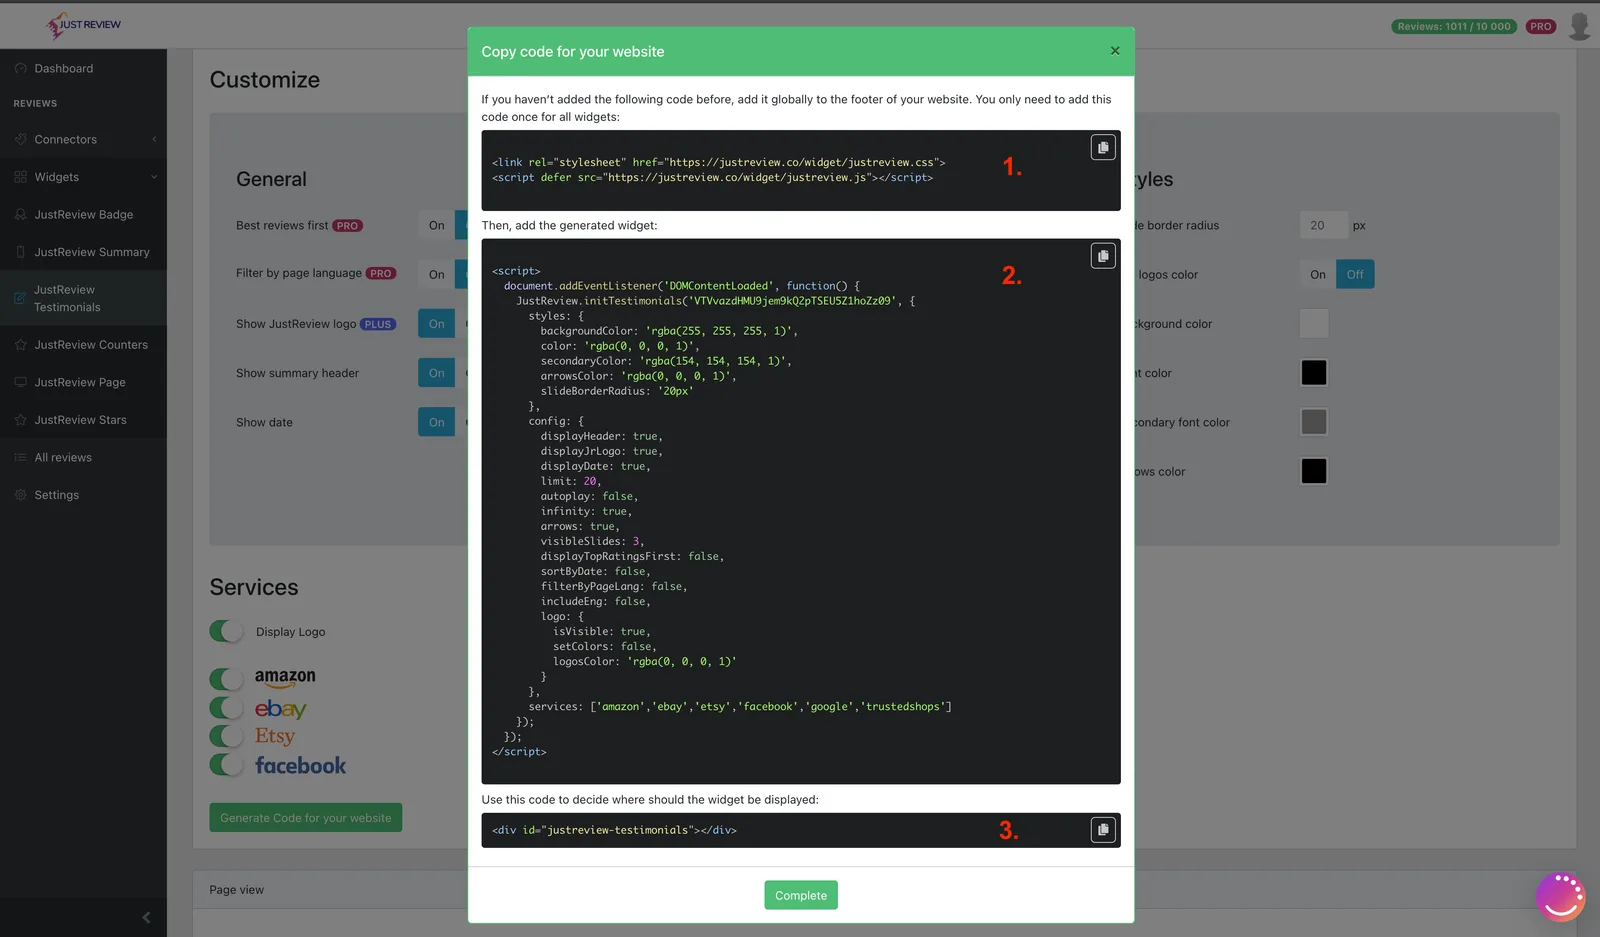
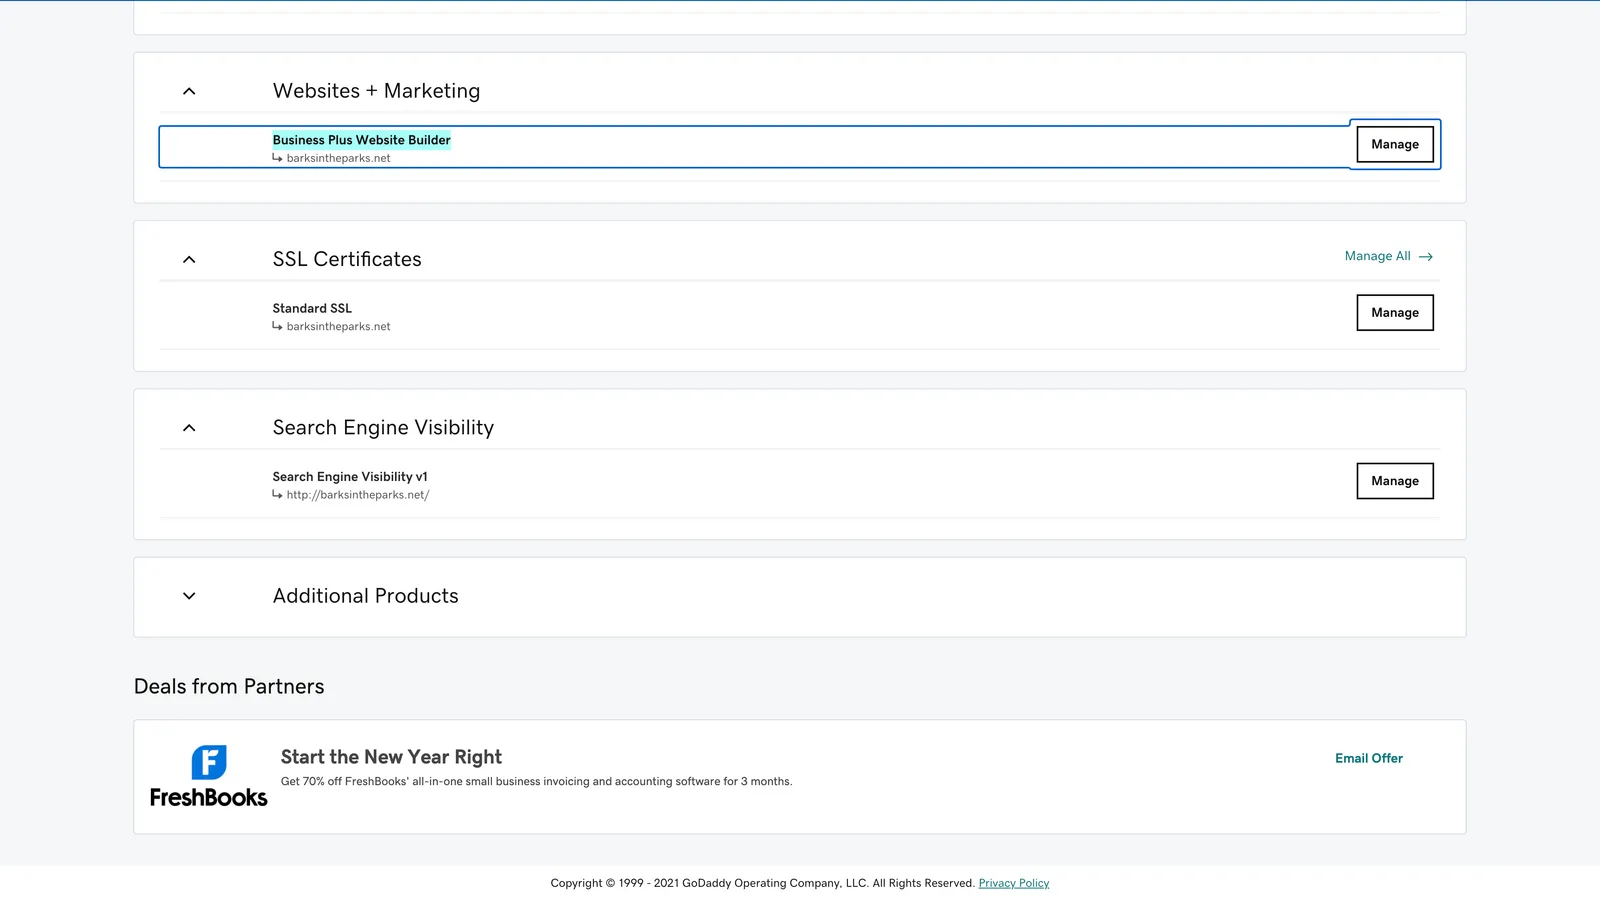
2. **Open your GoDaddy dashboard: Website + Marketing → Website Builder → Manage.**
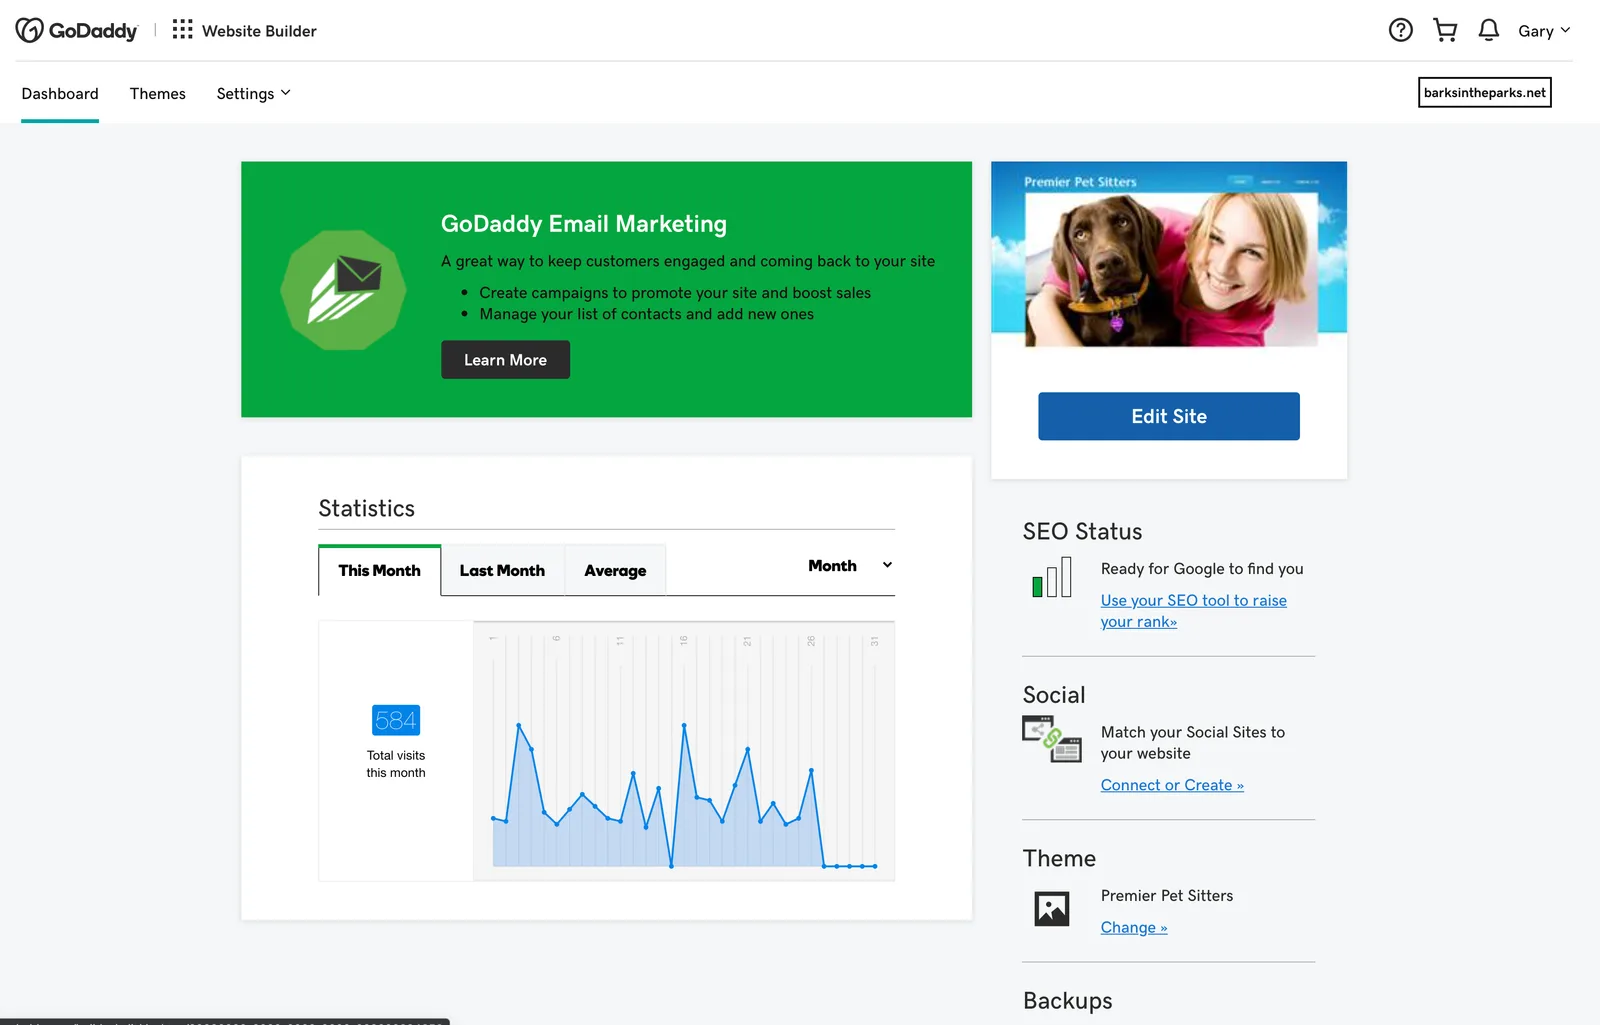
3. **Click Edit Site.**
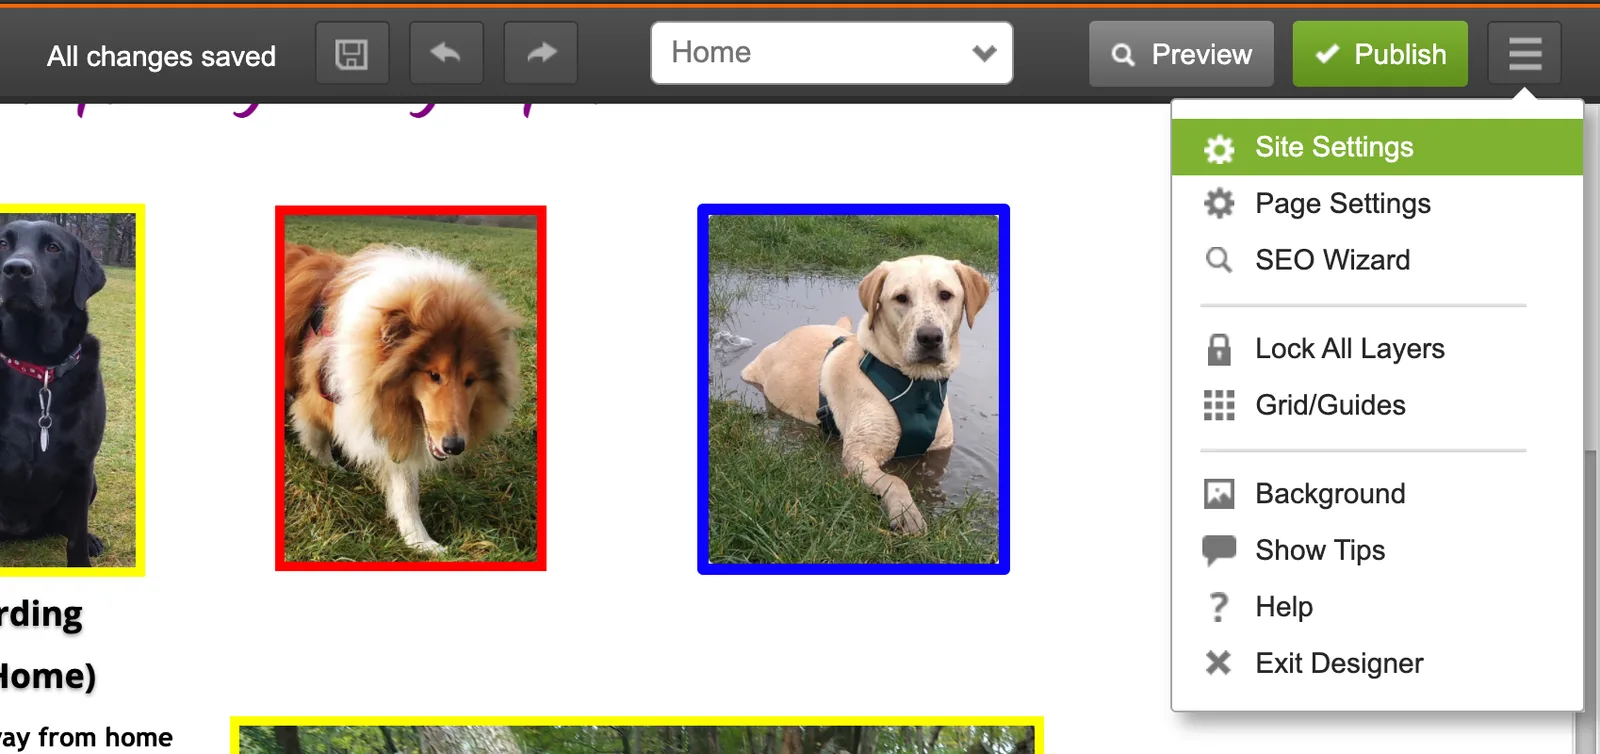
4. **Open Site Settings.**
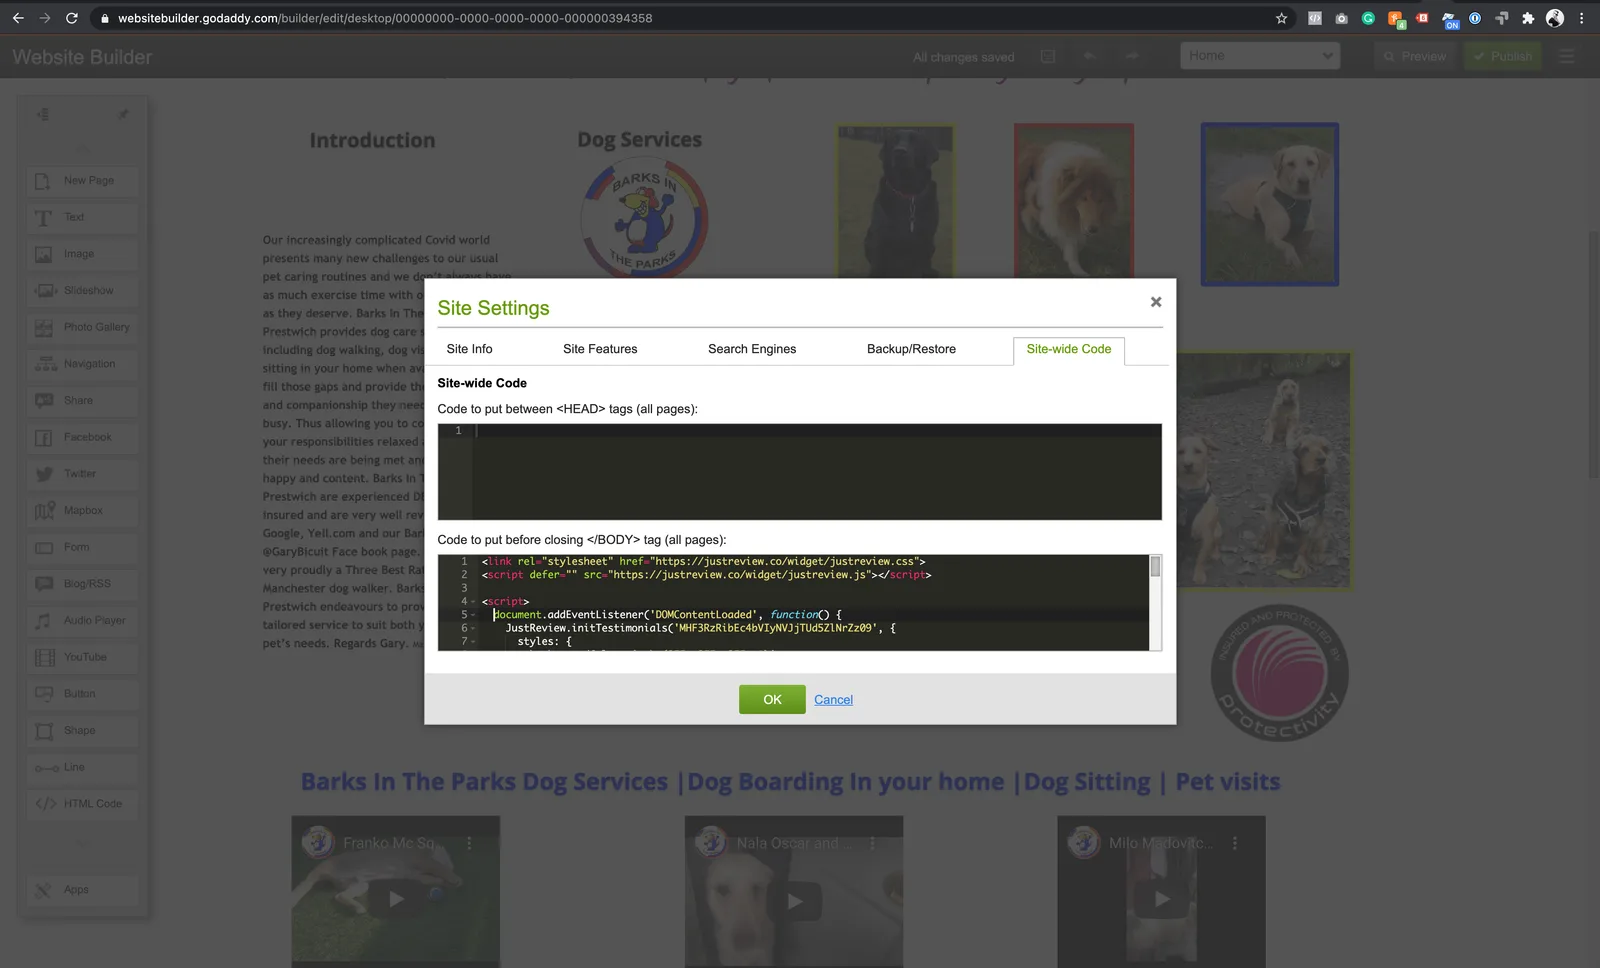
5. **Go to the Site-wide Code tab and paste part 1 and part 2 before the closing `` tag.**
Part 1 loads the library and belongs there **only once**, even with several widgets. Part 2 is
the configuration for one widget, so add one part 2 per widget.
6. **Back in Website Builder, add an HTML element where the widget should appear and paste part 3.**
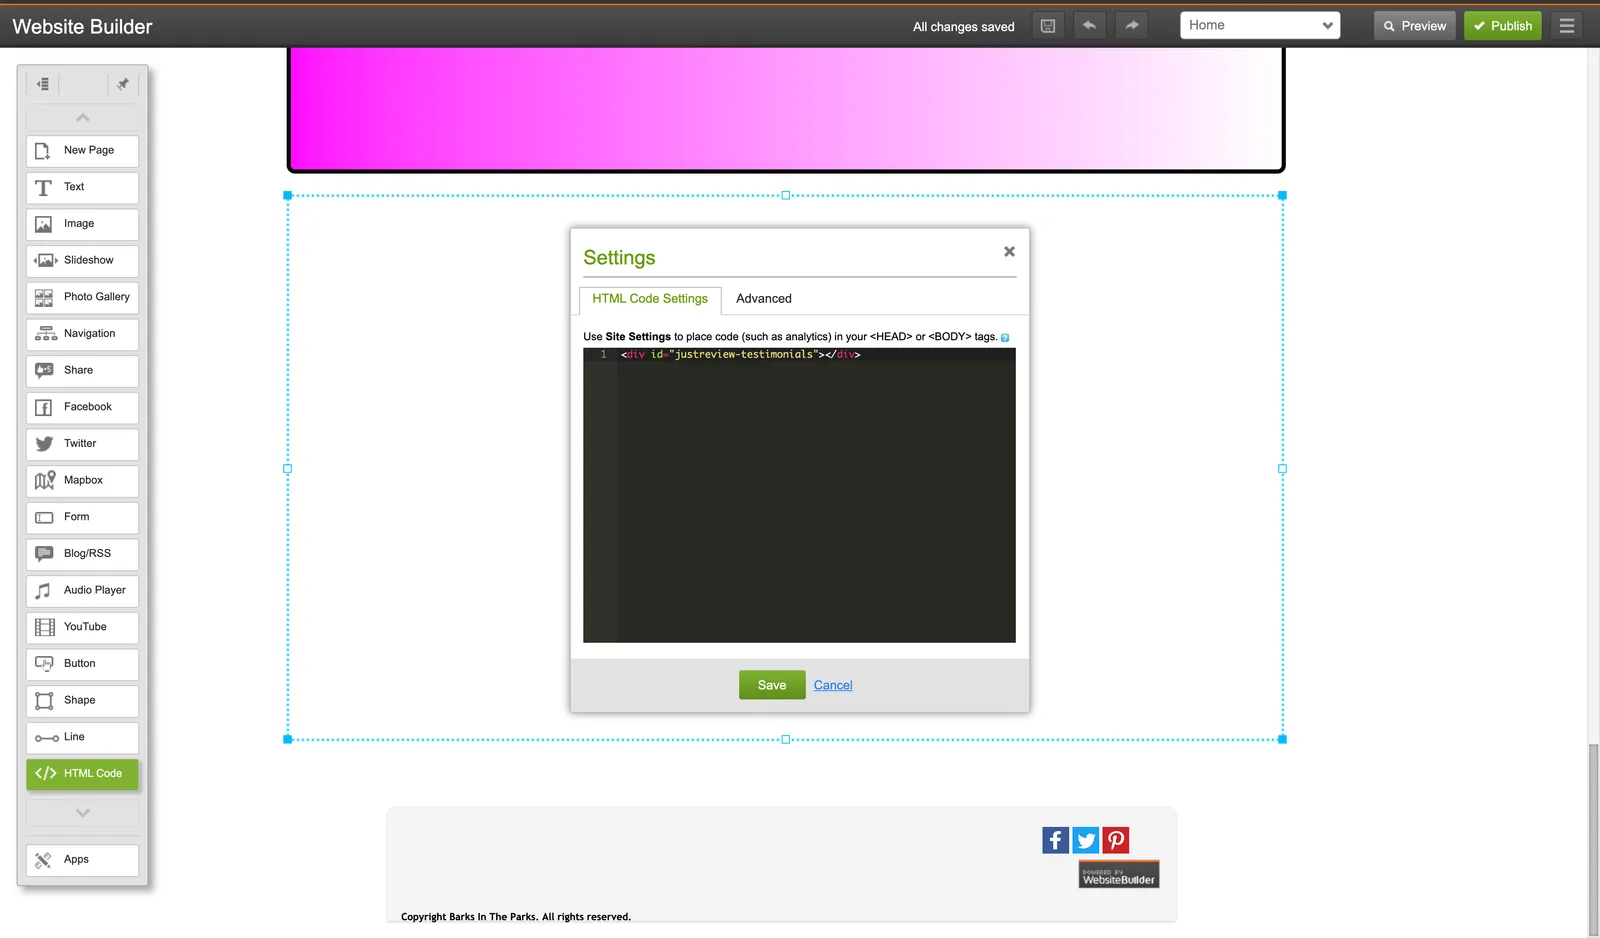
7. **Publish the site.**
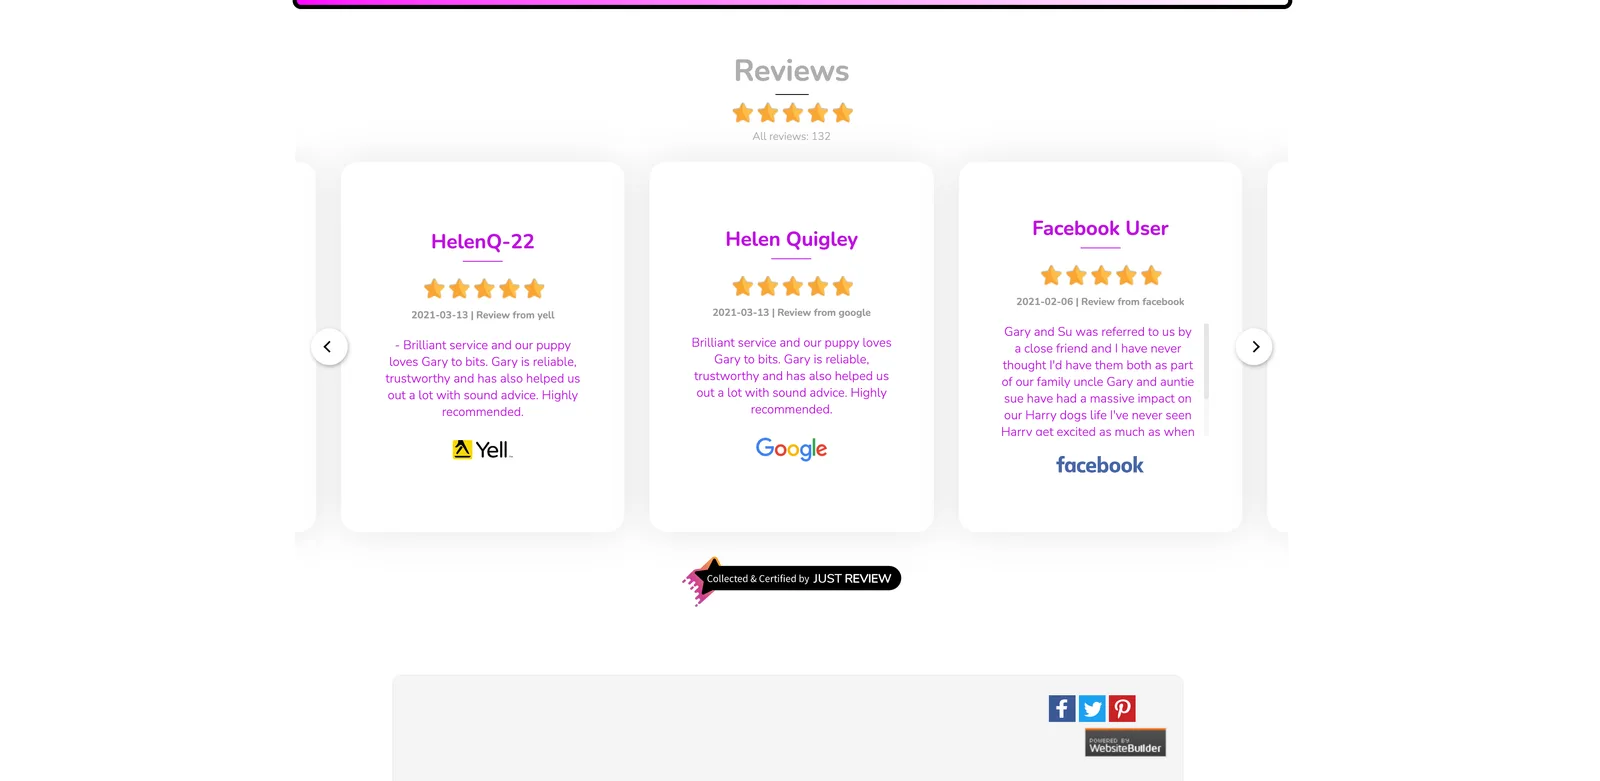
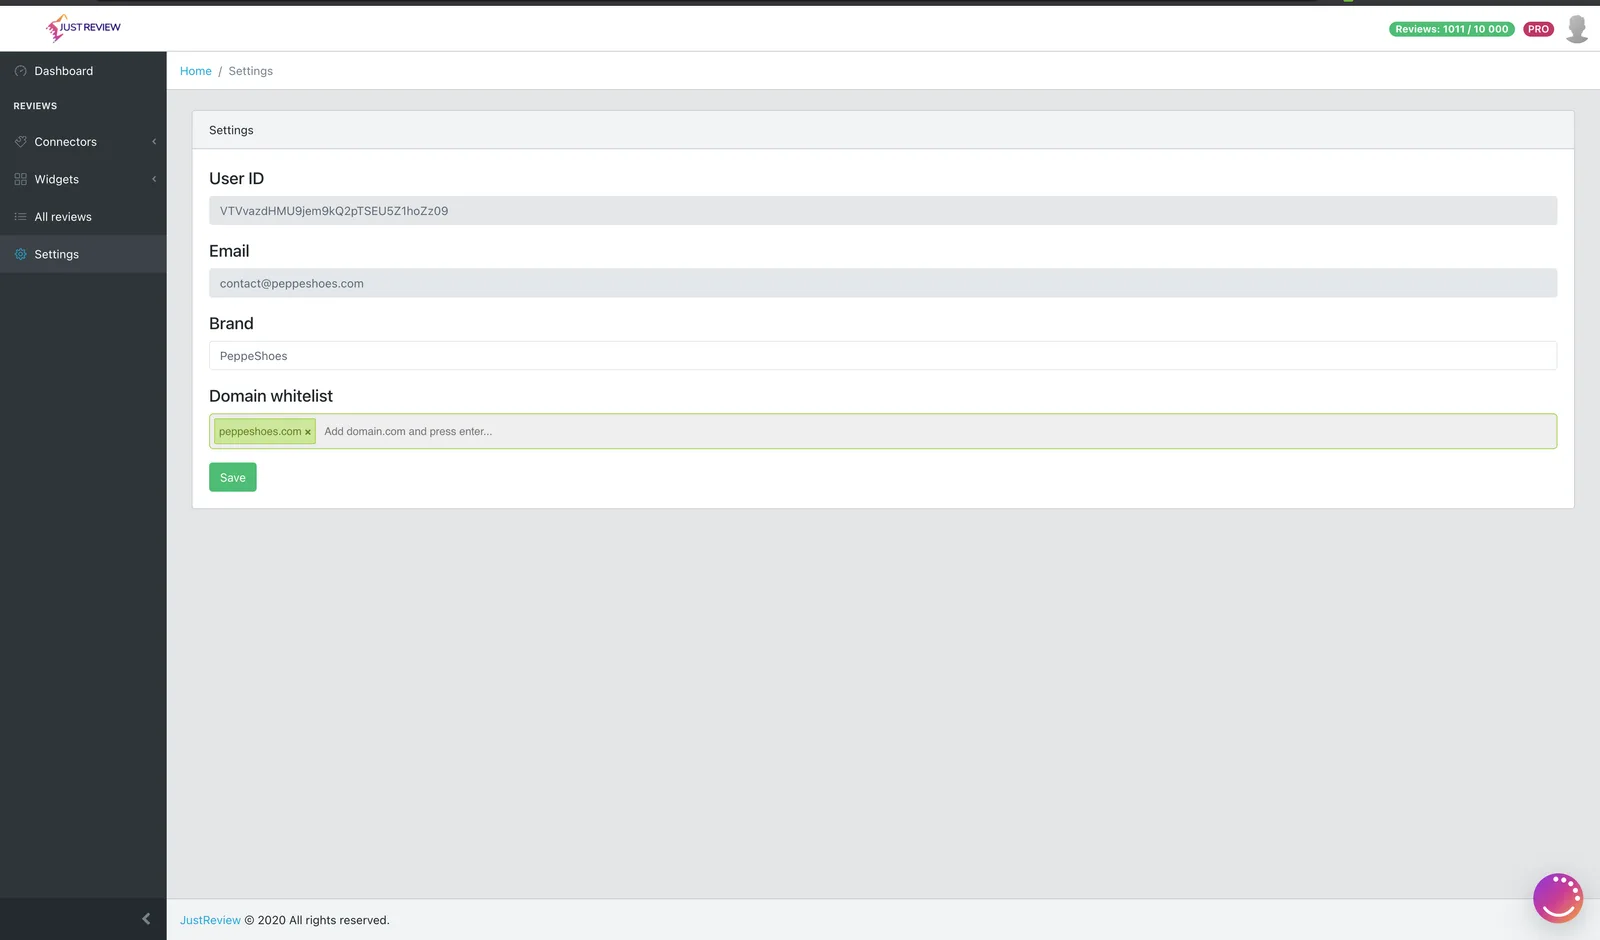
The widget only renders on domains listed in your
[Settings](https://app.justreview.co/#/settings), so the builder preview stays empty. Publish and
check the live site. Your website address must match the whitelist entry.
Widget settings live inside the snippet on your site. After changing anything in the dashboard,
generate the code again and replace part 2 in Site-wide Code.
## Widget still not visible?
1. **The site is published.** Builder previews do not count.
2. **Domain whitelist** in [Settings](https://app.justreview.co/#/settings) matches your address.
3. **Part 3 is present** on the page you are viewing.
4. The **Badge widget needs at least one review** before it shows anything.
---
## Link straight to the review form
Source: https://justreview.co/docs/how-to-scroll-to-and-open-comment-form-in-justreview-page/
Summary: Send visitors to your JustReview Page and have the review form scroll into view and open automatically.
Useful when you email customers asking for a review, or add a "Write a review" button somewhere on
your site. The link opens your reviews page, scrolls to the form and expands it, so the customer
does not have to hunt for it.
1. **Enable the option in the JustReview Page widget.**
It is the first option in the widget settings.
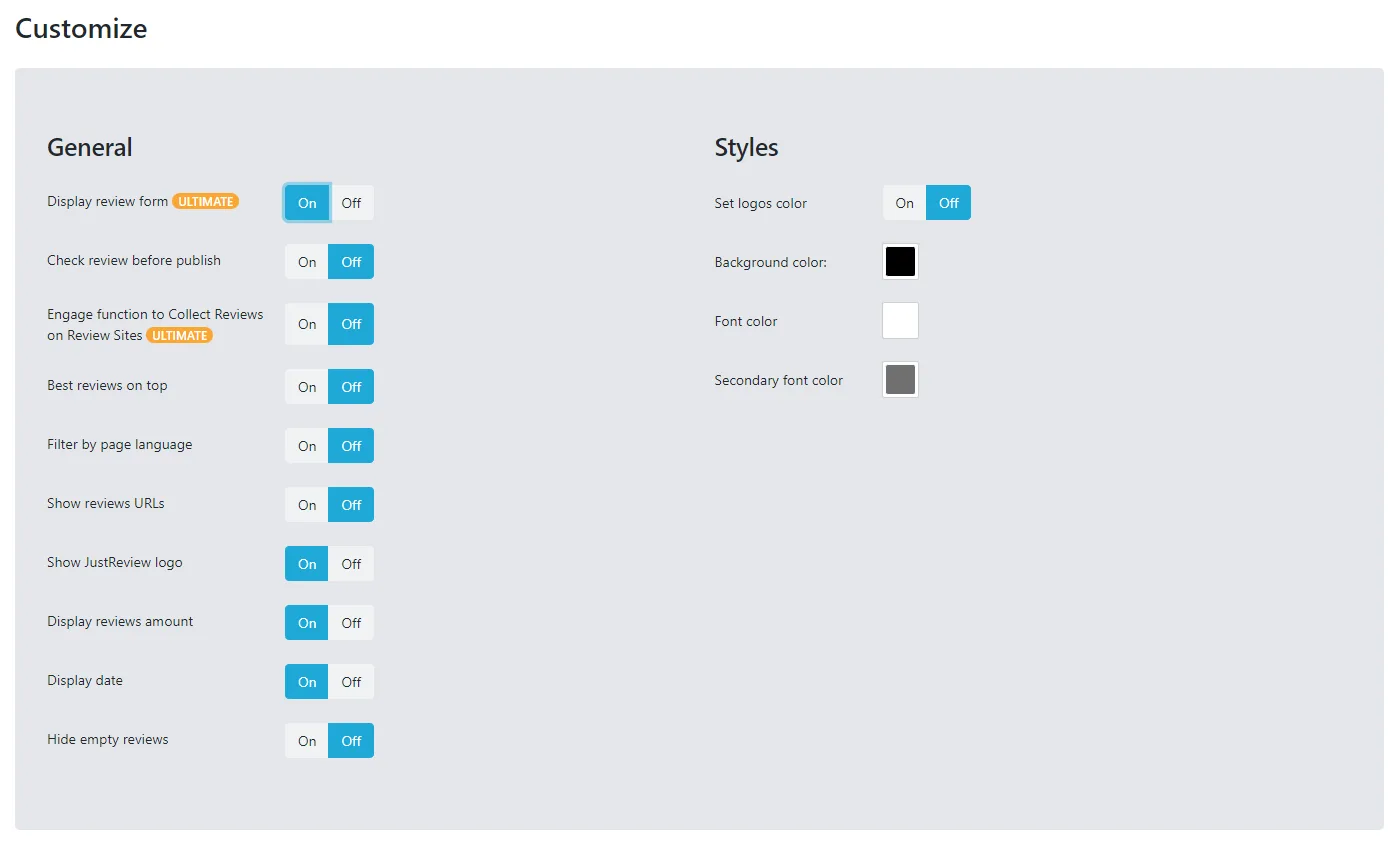
2. **Add `#leave-review` to the end of your page URL.**
```
https://yourwebsite.com/reviews#leave-review
```
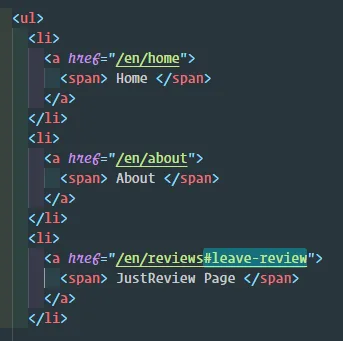
3. **Regenerate the code and replace the snippet on your site.**
The option is stored inside the snippet, so the old code keeps the old behaviour.
This option is available on **Ultimate**. See [pricing](https://justreview.co/#pricelist).
## Nothing happens when I open the link
- **The option is switched off** in the widget, or the code on your site was not regenerated after
switching it on.
- **The URL is missing the `#leave-review` part**, or your CMS strips the fragment from links.
Check the address bar after clicking.
- **The page has no JustReview Page widget on it.** The link only works on the page where that
widget is embedded.
- **A sticky header covers the form.** The scroll lands correctly but the form sits under the
header. Add scroll padding in your own CSS:
```css
html { scroll-padding-top: 90px; }
```
---
## Filter reviews by page language
Source: https://justreview.co/docs/how-to-use-the-filter-by-page-language-function/
Summary: Show only reviews written in the language of the current page, with options to always include English or pin a specific language.
On a multilingual website, a German visitor seeing Polish reviews is noise. This option makes the
widget show only reviews matching the language of the page they are on.
## How the language is detected
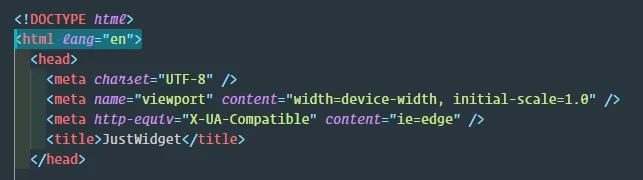
The widget reads the `lang` attribute of the `` tag and displays only reviews in that
language.
```html
```
This means the filter is only as good as your markup. If every page declares `lang="en"`, every
page gets English reviews regardless of its actual content.
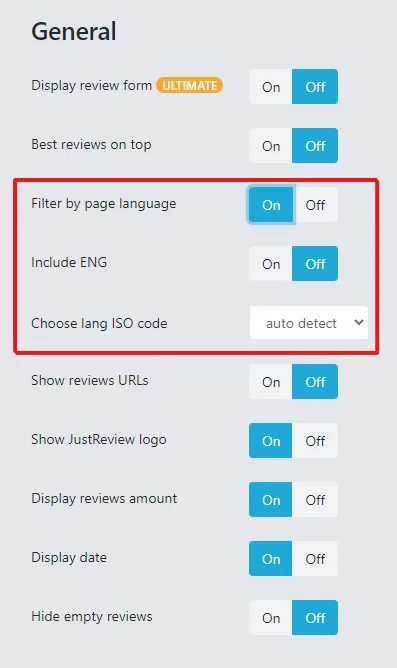
## The three settings
**Filter by page language** shows only reviews in the language taken from the ``
attribute.
**Include ENG** additionally shows English reviews next to the page language. Useful when your
local-language reviews are still few and you do not want a nearly empty widget.
**Choose lang ISO code** pins the language manually instead of reading it from the page. Use this
when your markup is unreliable, or on a single-language page that differs from the rest of the site.
The settings combine. Pinning `de` plus **Include ENG** shows German and English reviews together.
Available for **JustReview Testimonials** and **JustReview Page** on the **Pro** plan and above.
See [pricing](https://justreview.co/#pricelist).
Like every widget setting, this one is stored in the snippet on your site. Generate the code again
and replace it, otherwise nothing changes.
## The widget went empty after I enabled this
That usually means the filter is working correctly and you simply have no reviews in that language.
1. **Check what `` your page declares.** View source and look at the very first tag. A
page declaring `lang="en-GB"` is matched as English.
2. **Turn on Include ENG** so the widget falls back to English reviews.
3. **Check the language mix of your reviews** in [All reviews](https://app.justreview.co/#/reviews),
where you can filter by language.
4. **Consider pinning the language** with the ISO code if your CMS outputs the wrong `lang` value.
---
## Install the widget on any website
Source: https://justreview.co/docs/other-sites-universial-tutorial/
Summary: Add your JustReview widget to any website where you can edit the HTML source. Works with every platform and hand-coded sites.
This is the universal method. Use it on any site where you can edit the HTML source, or as a
reference when your platform is not listed in this help center.
If you use WordPress, Shopify, PrestaShop, Wix, Squarespace, GoDaddy or Shoper, follow the guide
for your platform instead. The steps are the same, but you get the exact screens to click.
1. **Build your widget in the dashboard.**
Open [app.justreview.co](https://app.justreview.co/#/widgets) and pick the widget you want.
Adjust the colours and layout in **Customize**, and choose which review sources to display
in **Services**.
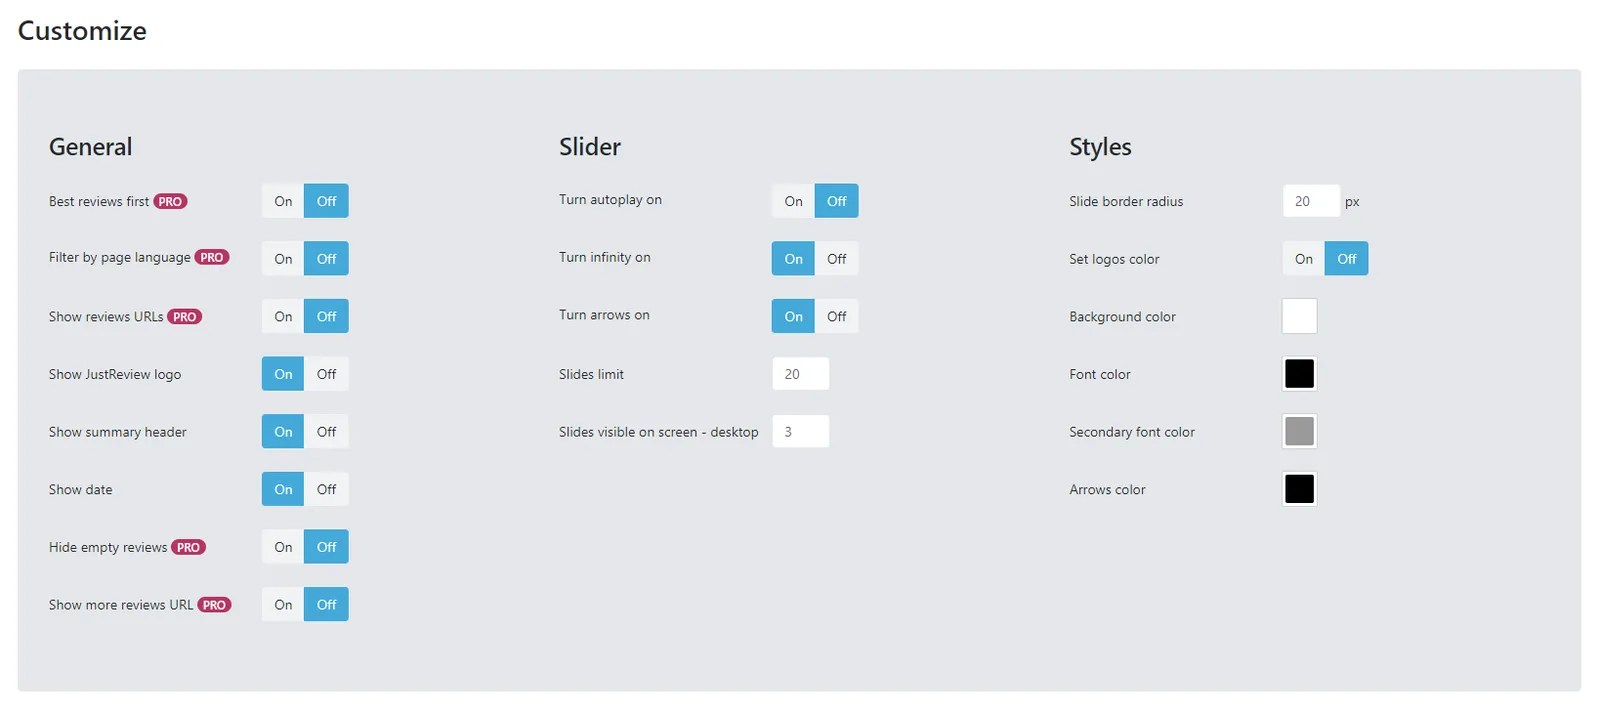
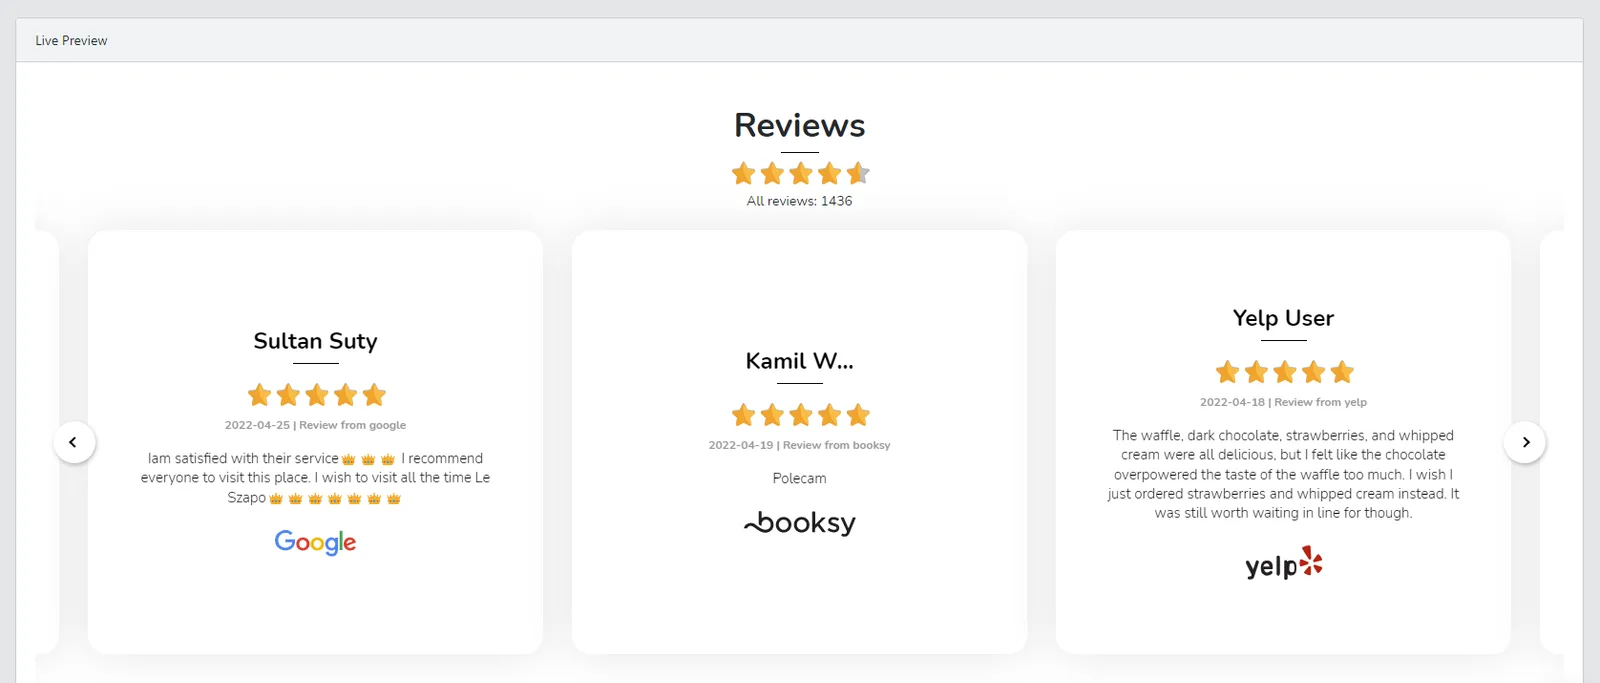
2. **Check the live preview.**
Below the **Customize** and **Services** sections there is a **Live Preview** window that
reflects your changes in real time. Get it looking right here before you copy any code.
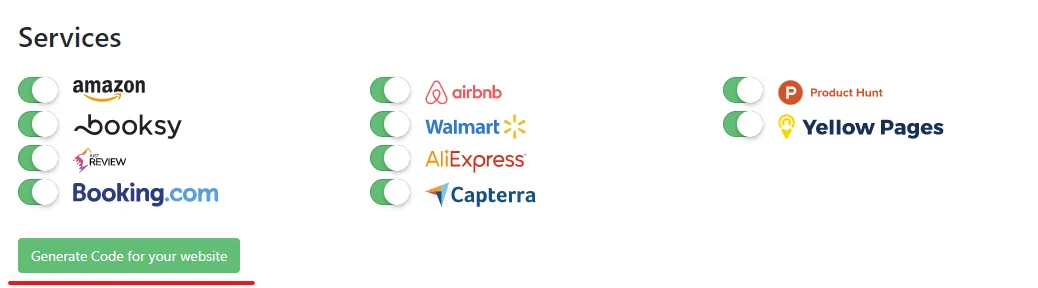
3. **Pick the review sources to display.**
In the **Services** section, select which connected sources should appear in this widget. A
source has to be connected first, see [Connectors](https://app.justreview.co/#/connectors/google).
4. **Click "Generate Code for your website".**
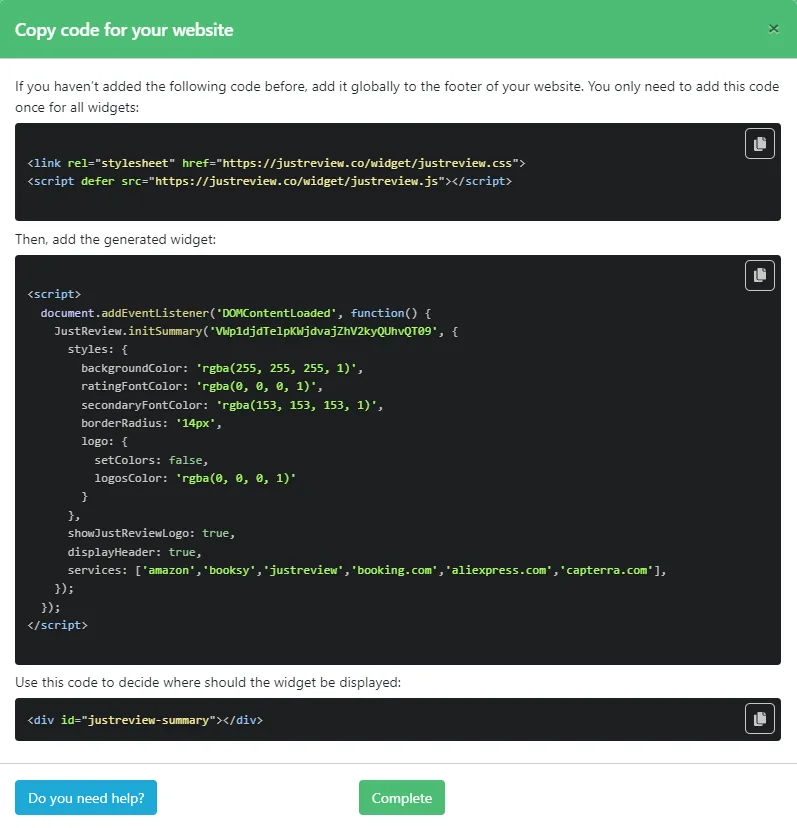
5. **Copy the three parts of the snippet.**
A dialog opens with up to three code blocks. Each has a copy icon in its top-right corner.
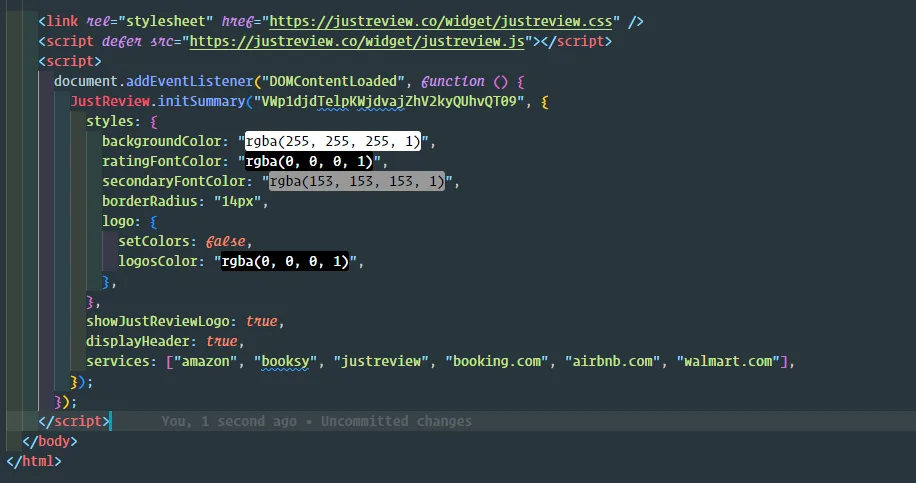
6. **Paste part 1 and part 2 before the closing `` tag.**
Part 1 loads the JustReview library. Part 2 is the configuration object holding the settings
you just chose. **Part 2 must sit directly below part 1**, otherwise the widget may not work.
```html
```
7. **Paste part 3 where the widget should appear.**
Part 3 is the container element. Put it exactly where you want the widget rendered on the page.
Some widgets, such as the Badge, attach themselves to the corner of the screen and have no
part 3 at all.
```html
```
The widget only renders on domains listed in your
[Settings](https://app.justreview.co/#/settings). If the list does not include your address, the
widget stays invisible. This is also why the widget does not appear inside your CMS admin preview,
only on the live website.
The settings are baked into the snippet on your site. Change anything in the dashboard, then
generate the code again and replace the old snippet, otherwise your website keeps showing the
previous configuration.
---
## Install the widget on PrestaShop
Source: https://justreview.co/docs/prestashop-code-embed-instruction/
Summary: Add your JustReview widget to a PrestaShop 1.7 theme by editing head.tpl, footer.tpl and your page template.
This guide covers PrestaShop 1.7 and uses the JustReview Testimonials widget as the example. Every
other widget works the same way.
1. **Build your widget and click "Generate Code for your website".**


2. **Add the library to your theme templates.**
Both files live in your theme:
```
httpdocs/themes/{your_theme}/templates/_partials/head.tpl
httpdocs/themes/{your_theme}/templates/_partials/footer.tpl
```
Paste part 1 and part 2 at the end of these files. Part 1 loads the library and belongs there
**only once**, even when you display several widgets. Part 2 is the configuration for one widget,
so add one part 2 per widget.
`footer.tpl`:
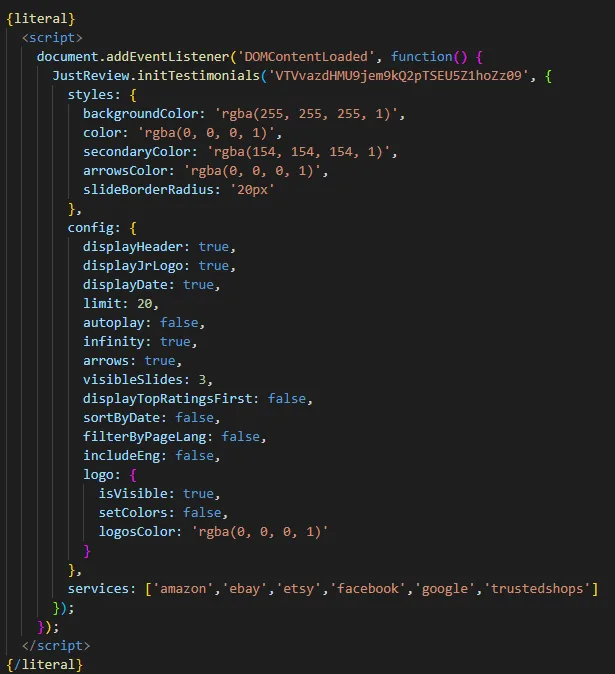
`head.tpl`:

3. **Paste part 3 where the widget should appear.**
Put the container `
` into the template that renders that spot, for example `index.tpl` for
the home page or `product.tpl` for product pages.
```html
```
4. **Clear the PrestaShop cache.**
Go to **Advanced Parameters → Performance** and clear the cache, otherwise the shop keeps
serving the old compiled template and your change appears to do nothing.
Editing the parent theme directly means a theme update can overwrite your changes. If your theme
supports a child theme, put the edits there.
The widget only renders on domains listed in your
[Settings](https://app.justreview.co/#/settings), which is why it stays invisible in the back office
preview. Your shop address must match the whitelist entry.

Widget settings live inside the snippet on your shop. After changing anything in the dashboard,
generate the code again and replace part 2 in your templates.
## Widget still not visible?
1. **PrestaShop cache** cleared after the edit (**Advanced Parameters → Performance**).
2. **Domain whitelist** in [Settings](https://app.justreview.co/#/settings) matches your shop address.
3. **Part 3 is present** in the template that renders the page you are looking at.
4. **Smarty compilation** set to recompile while you test, so template edits take effect.
5. The **Badge widget needs at least one review** before it shows anything.
---
## Where our reviews come from
Source: https://justreview.co/docs/scraping-reviews-is-it-legal/
Summary: How JustReview obtains the reviews it displays, what stays under your control, and how a platform can ask us to stop.
Every review JustReview displays already exists somewhere public, written by your customer about
your business. We do not create reviews, we do not edit their content, and we never invent them. All
we do is bring them together in one widget on your own website.
## The four ways a review reaches your account
**1. Official platform APIs.** For Google and Facebook you connect your own business profile
through the platform's own sign-in screen. You grant access, the platform issues a token, and we
read only the reviews of the profiles you selected. You can revoke that access at any time in your
Google or Facebook account, and the connection stops working immediately.
**2. Licensed data providers.** Sources beyond Google and Facebook are delivered through a
third-party data provider we pay for. We do not operate our own crawlers against those platforms.
**3. Your own import.** With CSV import you upload reviews you already hold, for example from a
previous review tool or your shop software.
**4. Reviews collected by you, through us.** The JustReview Page widget includes a review form on
your website. Those reviews belong to you, are moderated by you, and are not published anywhere
outside your site.
## What stays under your control
- **Which sources are connected**, in [Connectors](https://app.justreview.co/#/connectors/google).
- **Which reviews are visible.** On the Ultimate plan you can switch individual reviews on and off
in [All reviews](https://app.justreview.co/#/reviews).
- **Which reviews appear in each widget**, chosen per widget in the **Services** section.
- **Removing everything.** Disconnect a source and its reviews stop being displayed. Delete your
account and the data goes with it.
Review text, rating, author name and date are shown as the source has them. Hiding a review removes
it from your widget, it does not alter or delete it on the original platform.
## Reviews and the law
We are not lawyers and this page is not legal advice. Two things are worth knowing.
**Review content is not ours, and it is not yours either.** It belongs to the person who wrote it.
That is precisely why we display reviews with author and rating attached, instead of rewriting them
into marketing copy. Presenting reviews truthfully, without selectively hiding negative ones to
mislead, is what consumer protection rules in the EU and elsewhere expect. The
[EU Omnibus Directive](https://eur-lex.europa.eu/eli/dir/2019/2161/oj) requires traders who display
reviews to say how they make sure those reviews come from real customers. If you show reviews on
your site, that obligation is yours, and the source labels in our widgets are there to help you
meet it.
**Displaying a review is not the same as owning the platform's data.** We show reviews for
businesses that ask us to, about themselves. We do not resell review databases and we do not
recreate another platform's directory.
## For review platforms
If you operate a review platform and want your service excluded from JustReview, or want to discuss
an official integration, write to [contact@justreview.co](mailto:contact@justreview.co). We act on
such requests: several sources have been removed from the product at the platform's request, and we
would rather have a working partnership than a dispute.
## For business owners
If a review about your business is false or breaks the rules of the platform it was posted on, the
removal has to happen **on that platform**, because that is where it lives. Hiding it in JustReview
only affects your own widget. Google and Facebook both have their own reporting flows for this.
---
## Install the widget on Shoper
Source: https://justreview.co/docs/shoper-code-embed-instruction/
Summary: Add your JustReview widget to a Shoper store using the custom JS field and template files.
This guide uses the JustReview Testimonials widget as the example. Every other widget works the
same way. Shoper splits the snippet across two different places, so follow the order below.
1. **Build your widget and click "Generate Code for your website".**


2. **Add part 2 to the custom JavaScript field.**
Go to **Wygląd i Treści → Wygląd Sklepu → Obecny Szablon Graficzny**, open **Własny Skrypt JS**
and paste part 2 at the bottom of the file.
**Leave out the `` tags.** This field already is a JavaScript file, so
including the tags breaks it.
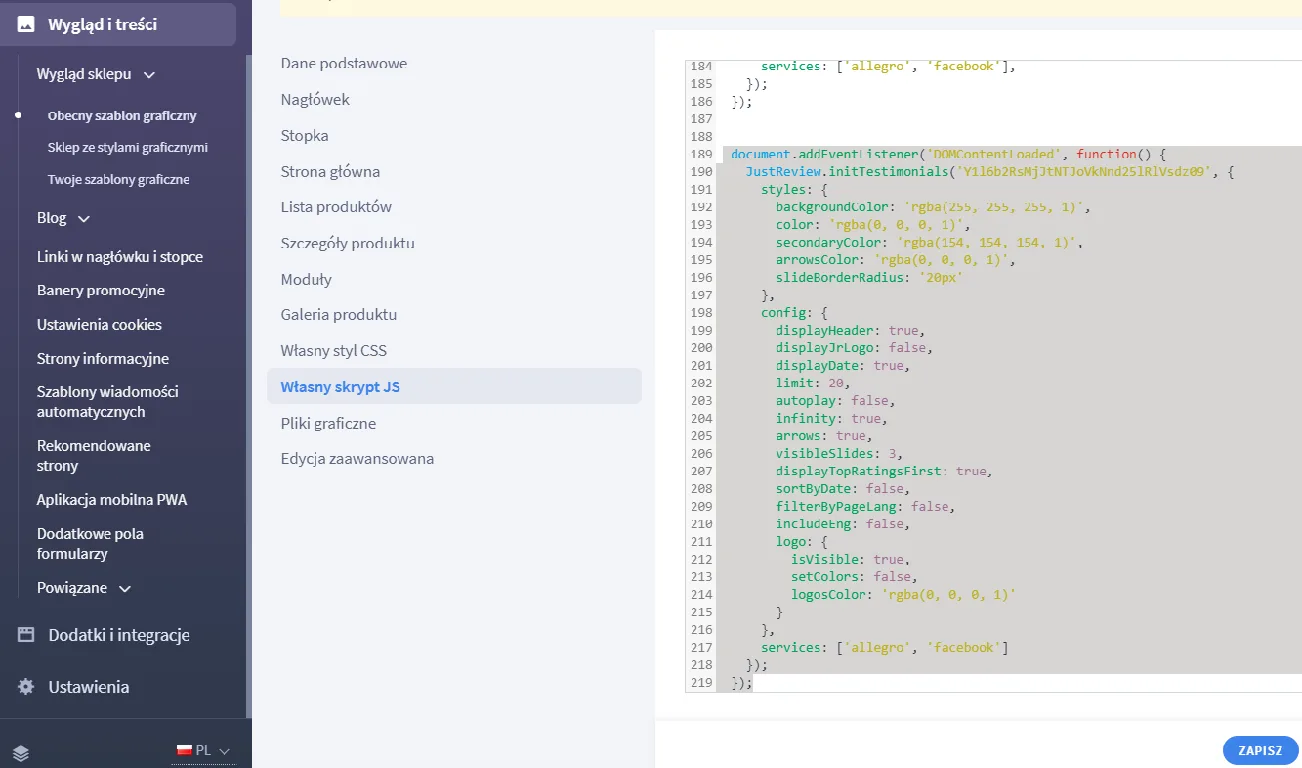
3. **Add part 1 to `footer.tpl`.**
Open **Edycja zaawansowana**, find `footer.tpl` and paste part 1. It loads the library and
belongs there **only once**, even when you display several widgets.
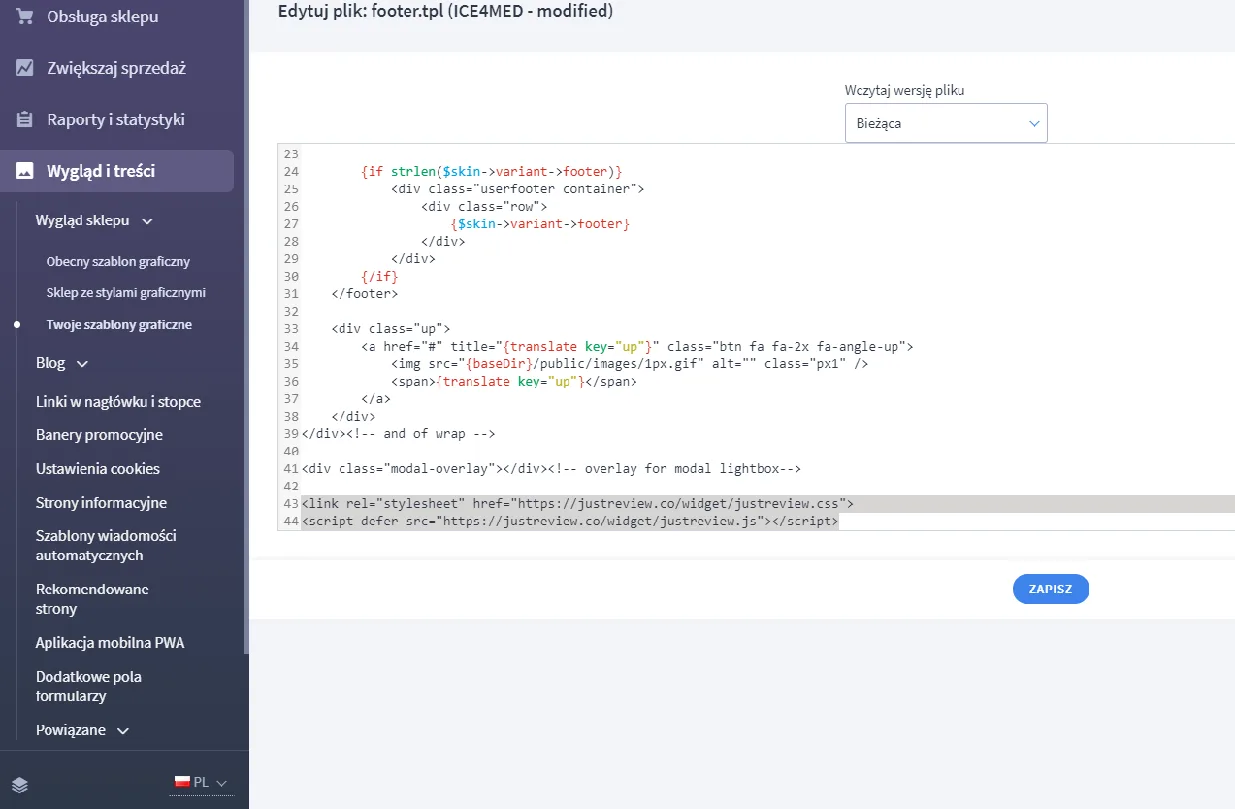
4. **Paste part 3 where the widget should appear.**
Still in **Edycja zaawansowana**, open the template that renders the target page, for example
`index.tpl`, and paste part 3 there.
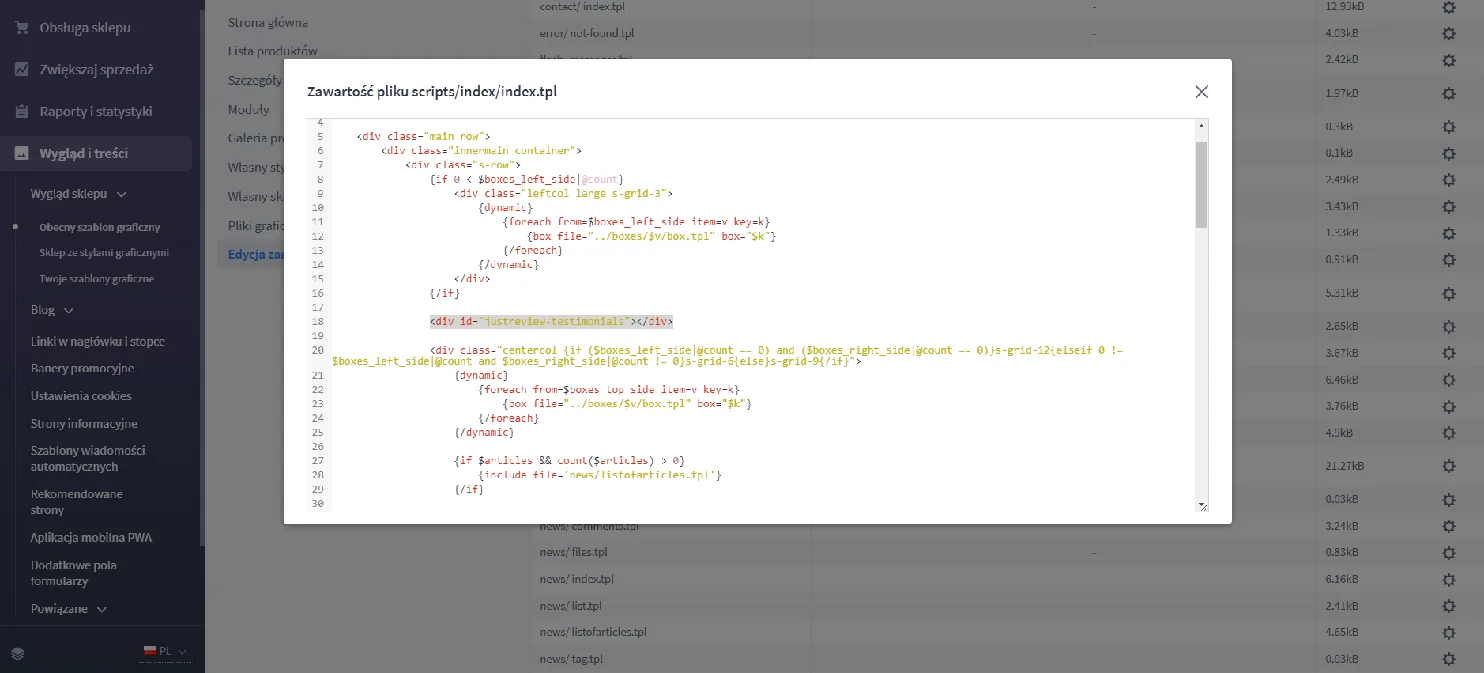
The widget only renders on domains listed in your
[Settings](https://app.justreview.co/#/settings). Your shop address must match the whitelist entry.

Widget settings live inside the snippet on your shop. After changing anything in the dashboard,
generate the code again and replace part 2 in **Własny Skrypt JS**.
## Widget still not visible?
1. **Part 2 has no `
```
Where you call it depends on your platform:
**Infinite scroll or AJAX filters.** Most scripts fire an event or accept a callback when the new
batch is inserted. Call `refreshJustReview()` there.
**A generic fallback: watch the container.** When there is no event to hook into, observe the grid
and reinitialise when new nodes appear.
```html
```
**Single-page apps.** Call it after each route change, in the hook your framework gives you for
"navigation finished".
Part 1 of the snippet (the library) still belongs on the page exactly once. Only the init call is
repeated. Injecting the script tag again on every load can break rendering.
On aggressive infinite scroll the observer can fire many times per second. Debounce the call by
100-200 ms so you are not reinitialising on every inserted node.
## Widget worked and then stopped completely
That is a different problem. Check, in order:
1. **Your domain whitelist** in [Settings](https://app.justreview.co/#/settings) still matches your
address. A migration from `http` to `https`, or adding `www`, changes it.
2. **The container element is still on the page.** Theme updates and page-builder edits remove it
surprisingly often.
3. **A caching or optimisation plugin** started deferring, combining or minifying the script. Exclude
`justreview.js` from JavaScript optimisation.
4. **The snippet was regenerated in the dashboard but not replaced on your site**, so it still carries
old settings.
---
## Install the widget on Wix
Source: https://justreview.co/docs/wix-code-embed-instruction/
Summary: Add your JustReview widget to a Wix site using an HTML Box, including the iframe domain whitelist gotcha.
This guide uses the JustReview Testimonials widget as the example. Every other widget works the
same way.
Wix is the one platform where the domain whitelist needs special attention, see the warning below.
1. **Build your widget and click "Generate Code for your website".**


2. **In the Wix Editor, add an HTML Box, then click Edit Code.**
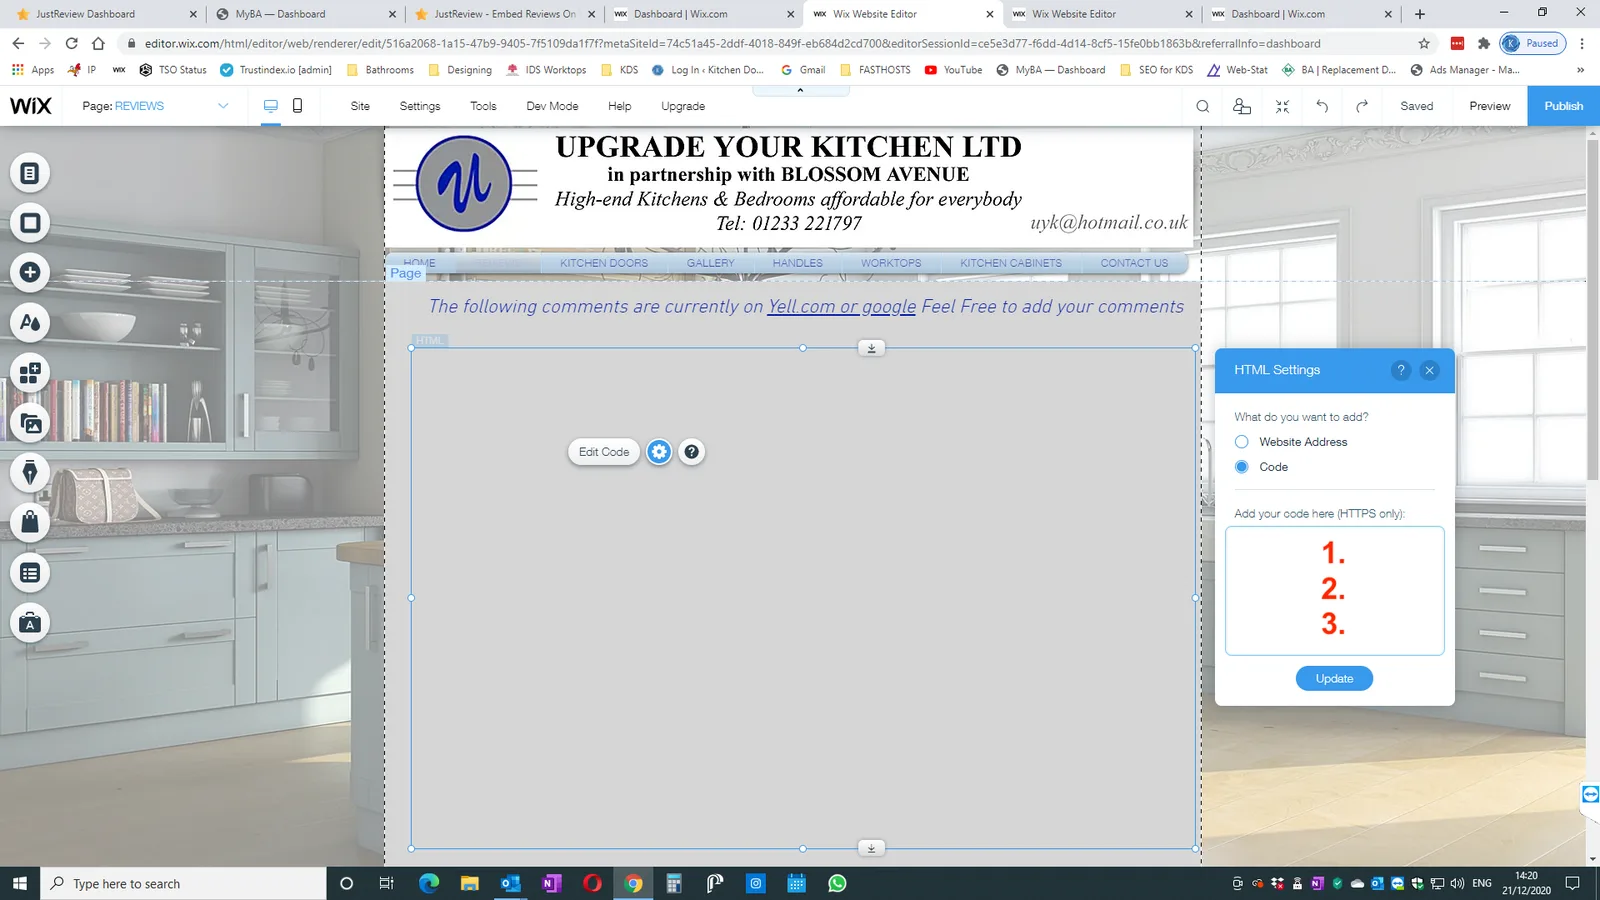
3. **Paste all three parts of the code into the box.**
Wix is different here: everything goes into the same HTML Box, parts 1, 2 and 3 together.
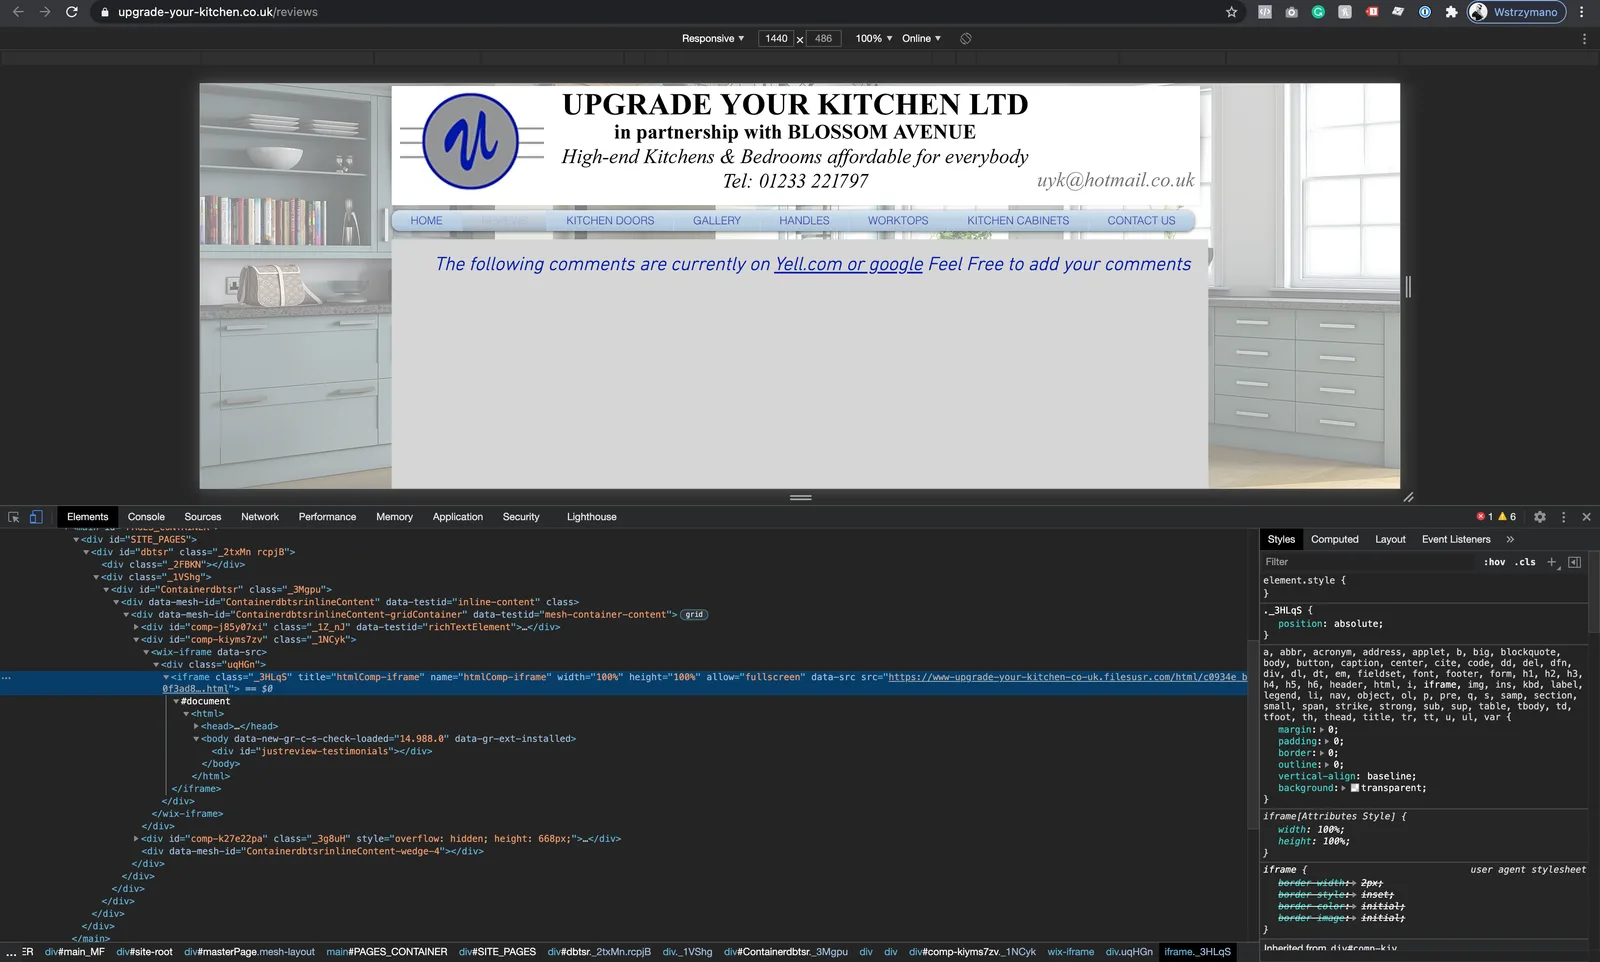
4. **Publish the site.**
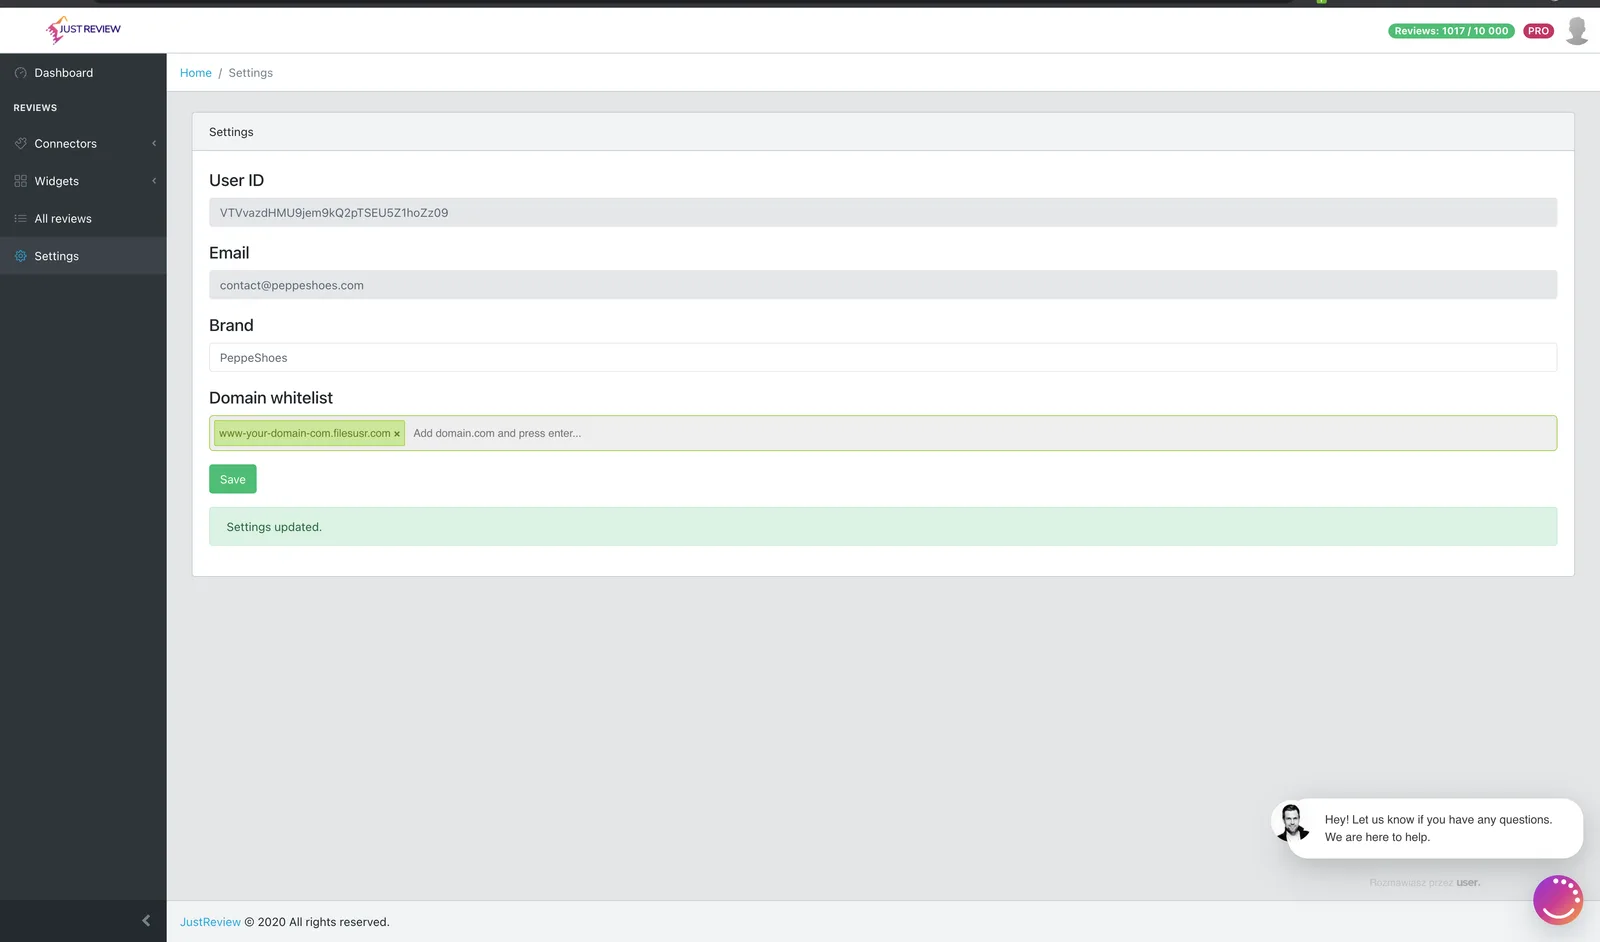
Wix puts custom code into an iframe served from its own domain, not yours. The whitelist check sees
that domain, so your normal address will not match. Two ways out:
- **Whitelist the Wix iframe host.** Take your Wix domain and replace every dot with a dash, then
add `.filesusr.com`. For `www.example.com` that gives:
```
www-example-com.filesusr.com
```
- **Or clear the domain whitelist field entirely**, which lets the widget run on any domain.
Nothing renders inside the Wix dashboard. Publish the site and check the live page.
Widget settings live inside the snippet in your HTML Box. After changing anything in the dashboard,
generate the code again and replace it.
## Widget still not visible?
1. **The iframe host is whitelisted** in the `filesusr.com` form above, or the whitelist is empty.
2. **The site is published.** Editor previews do not count.
3. **All three parts** are inside the same HTML Box.
4. **The HTML Box is tall enough.** Wix gives it a fixed height, so a taller widget gets clipped.
Drag the box bigger.
5. The **Badge widget needs at least one review** before it shows anything.
---
## Install the widget on WordPress
Source: https://justreview.co/docs/wordpress-code-embed-instruction/
Summary: Add your JustReview widget to WordPress using the theme editor, a post or page, Elementor or Divi Builder.
This guide uses the JustReview Testimonials widget as the example. Every other widget works the
same way.
## Add the library to your theme
1. **Build your widget and click "Generate Code for your website".**


2. **Open the theme editor: Appearance → Theme File Editor.**
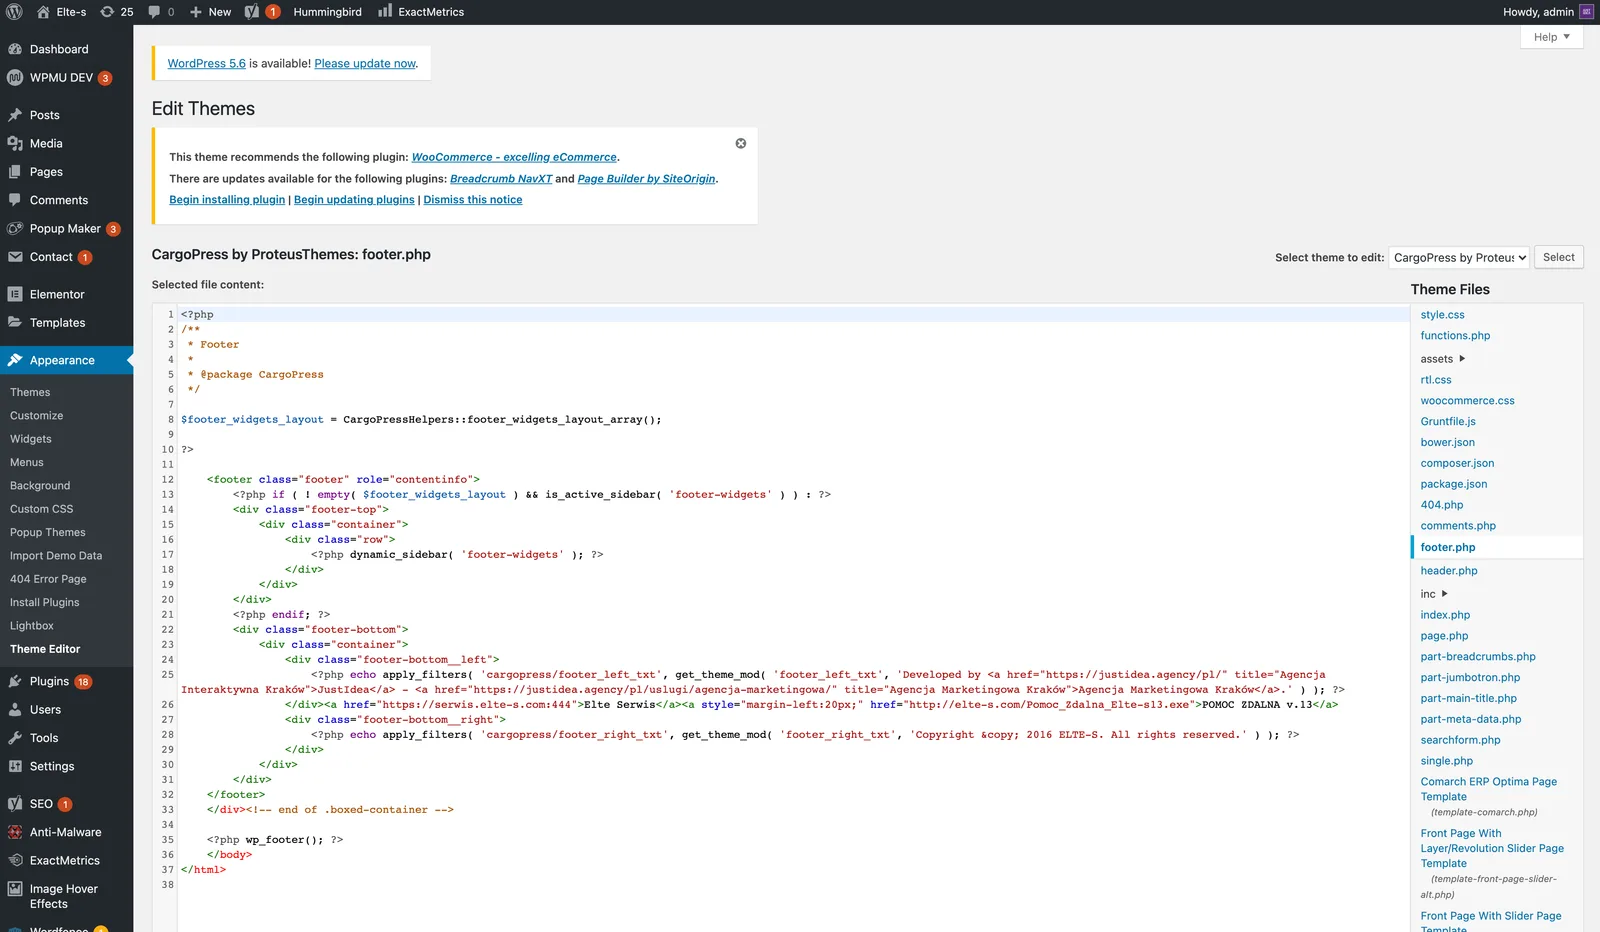
3. **Edit `footer.php` and paste part 1 and part 2 before the closing `` tag.**
Part 1 loads the library and belongs on the page **only once**, even when you display several
widgets. Part 2 is the configuration for one widget, so add one part 2 per widget.
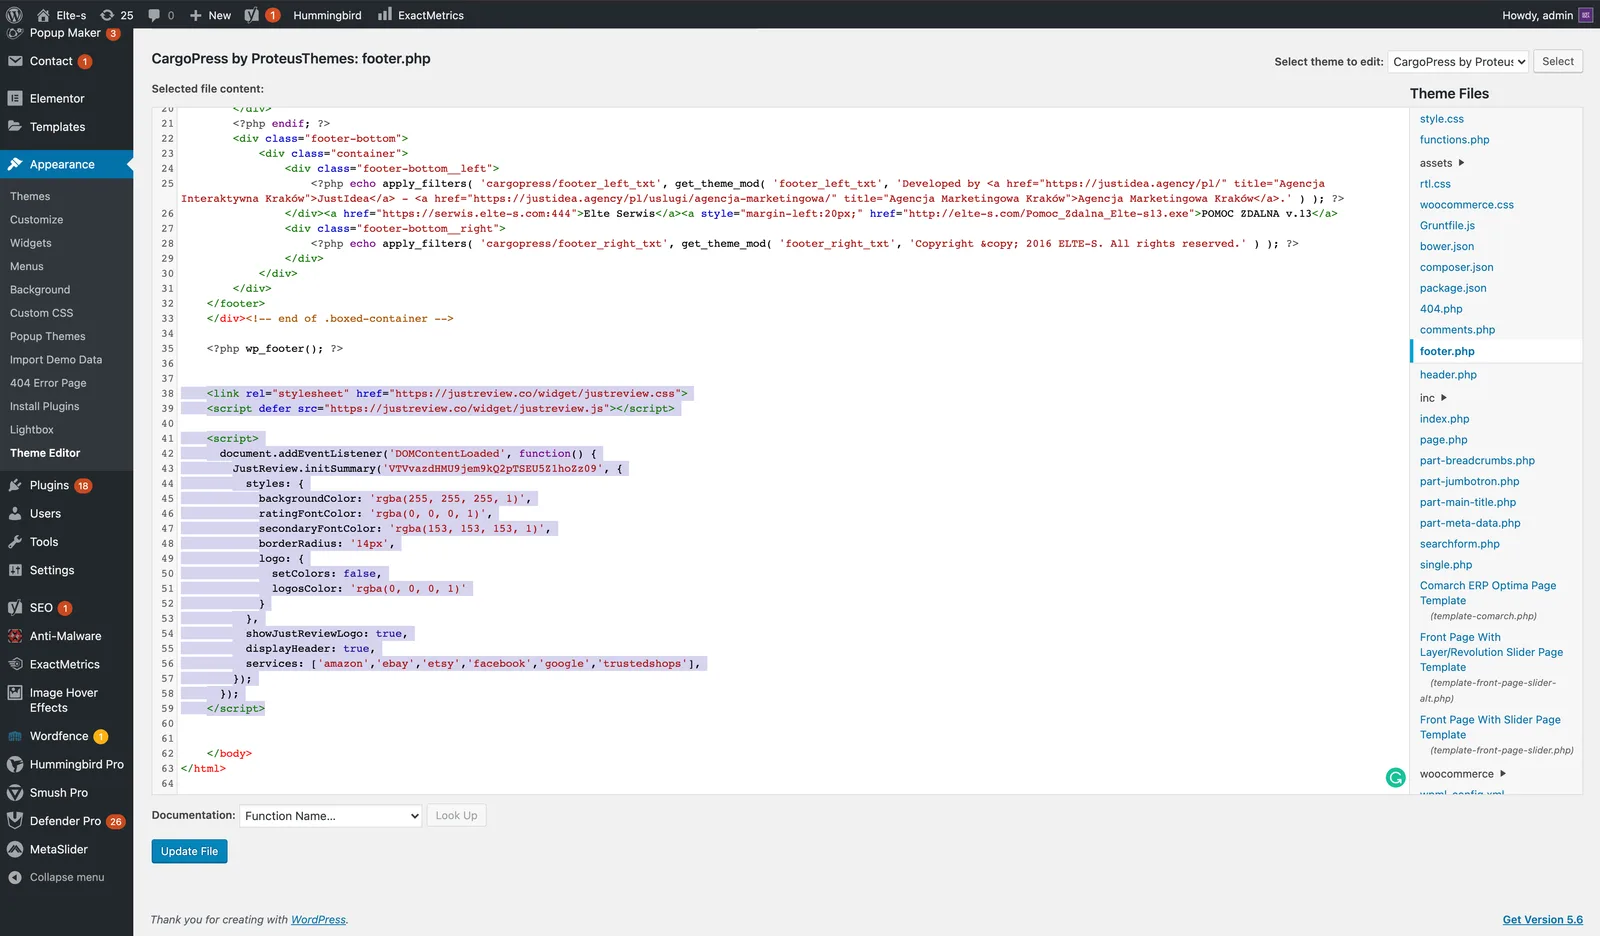
Save with **Update File**.
Editing `footer.php` directly means a theme update can wipe your changes. Safer options: use a
[child theme](https://developer.wordpress.org/themes/advanced-topics/child-themes/), or a snippet
plugin such as WPCode that injects code before ``.
## Place the widget on the page
Part 3 of the snippet is the container that decides where the widget renders. Pick the method that
matches how you build pages.
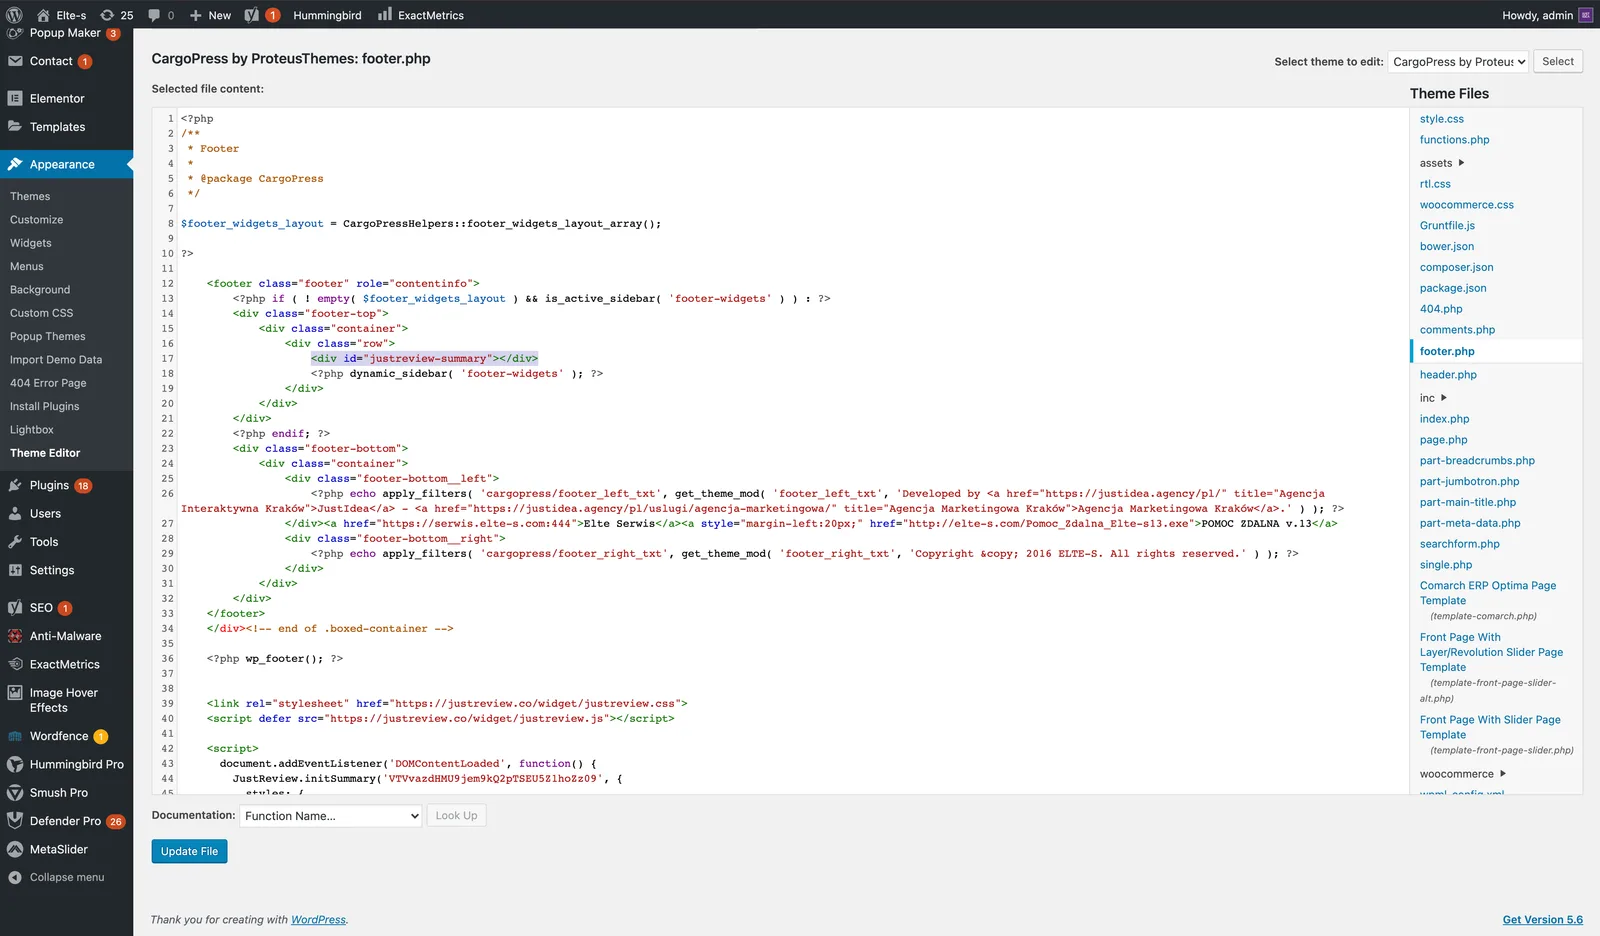
Paste part 3 into the template file at the spot where the widget should show up.
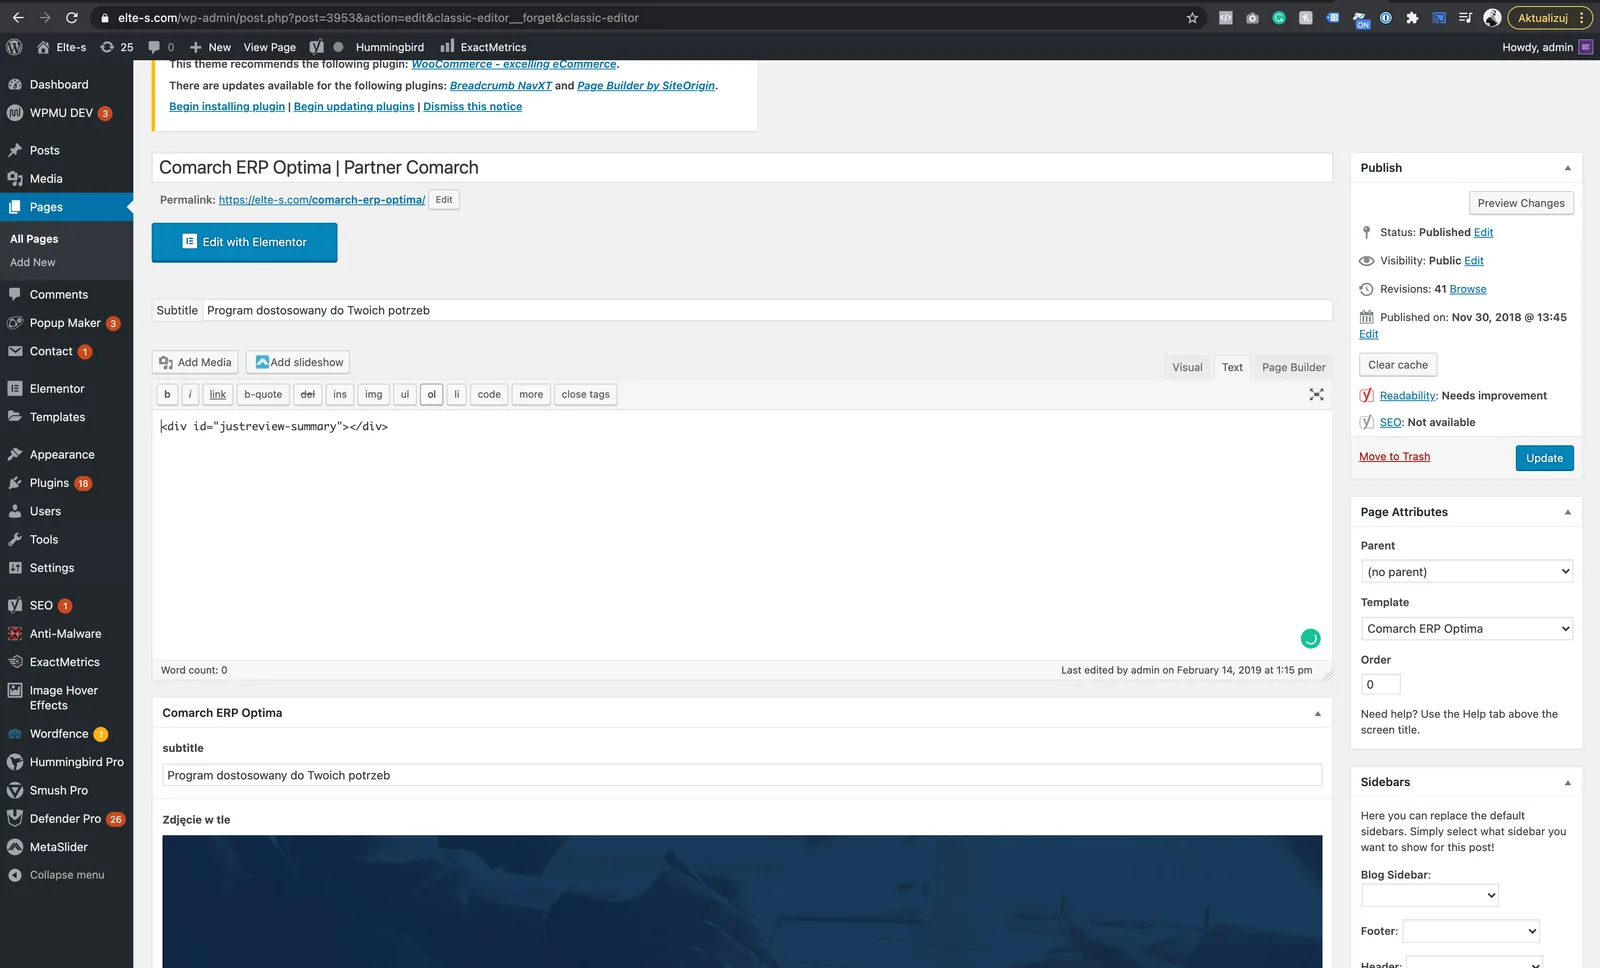
Add a **Custom HTML** block (or switch the classic editor to the **Text** tab) and paste part 3
there.
Add an **HTML** widget to your layout, then paste part 3 into it.
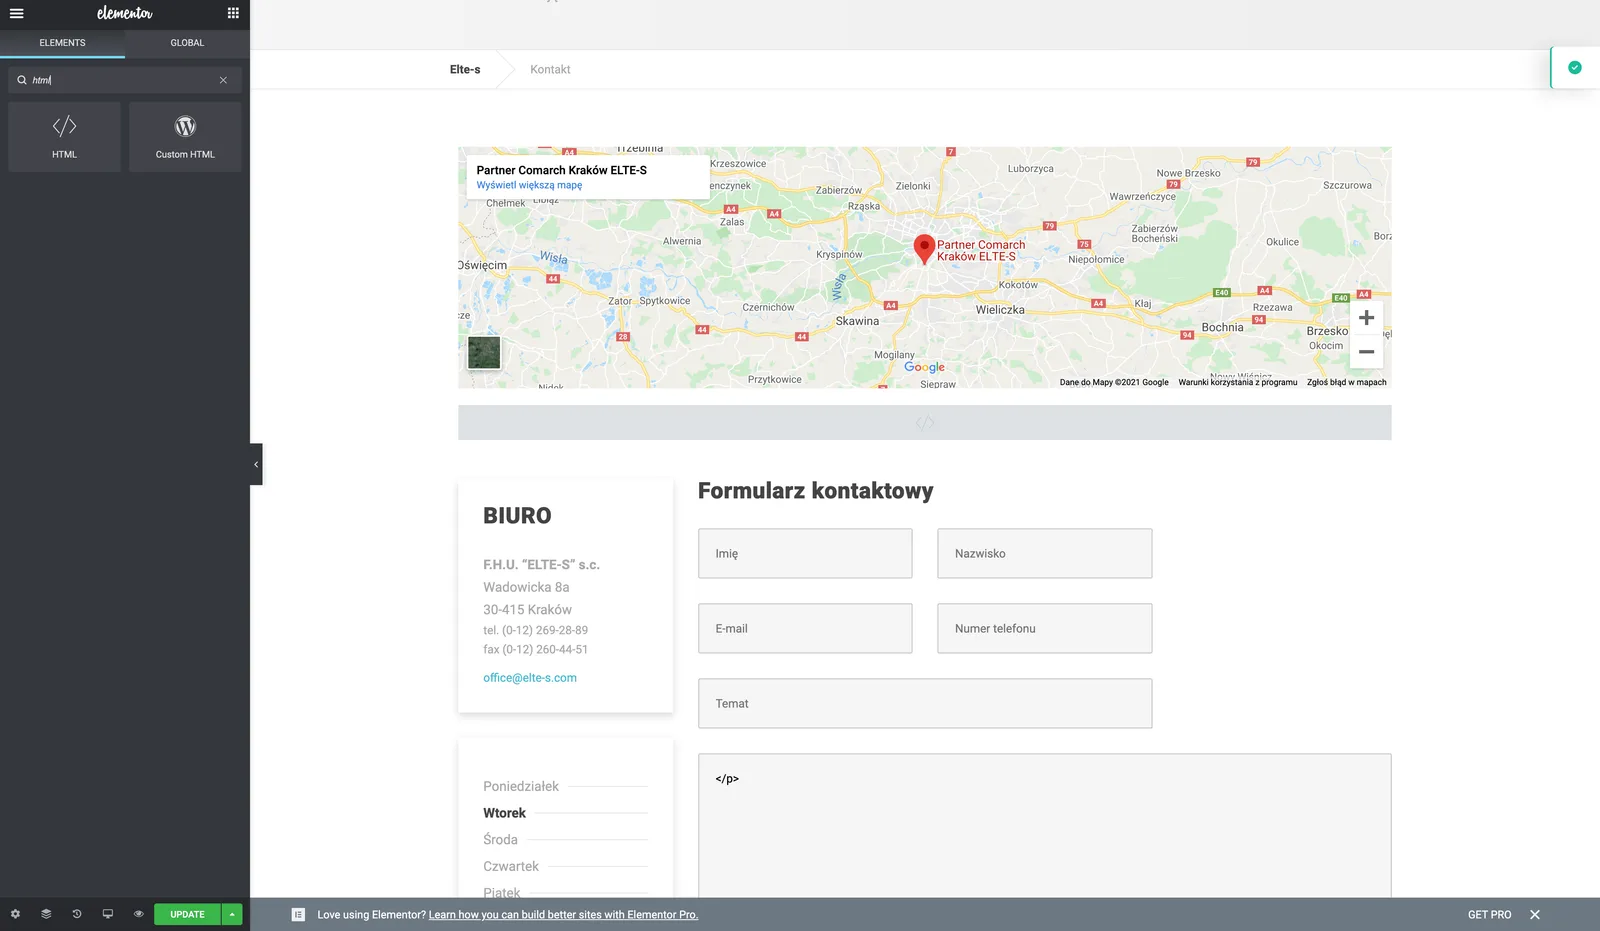
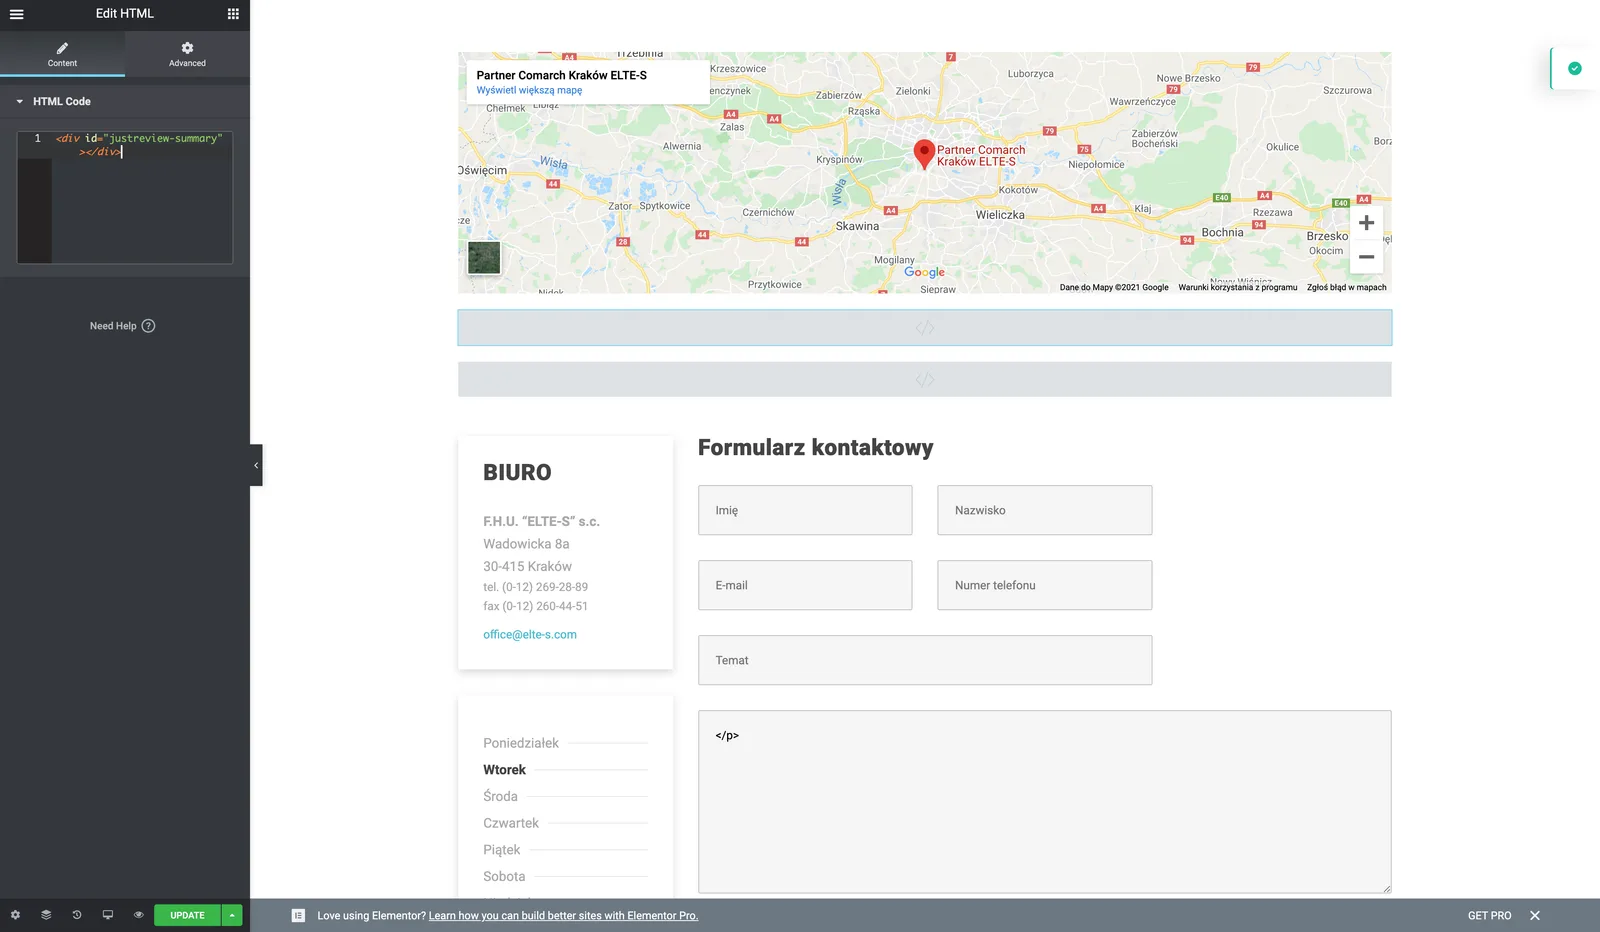

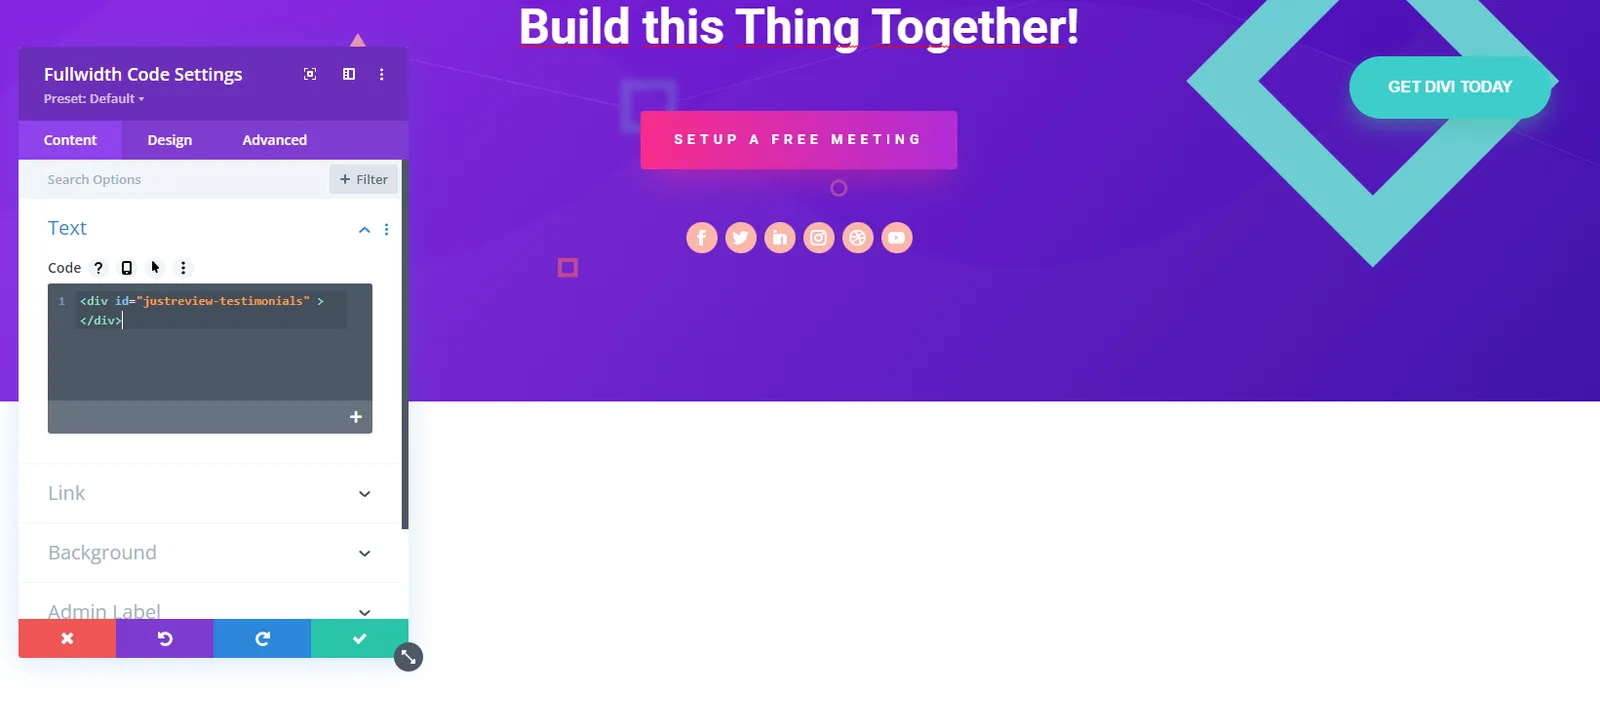
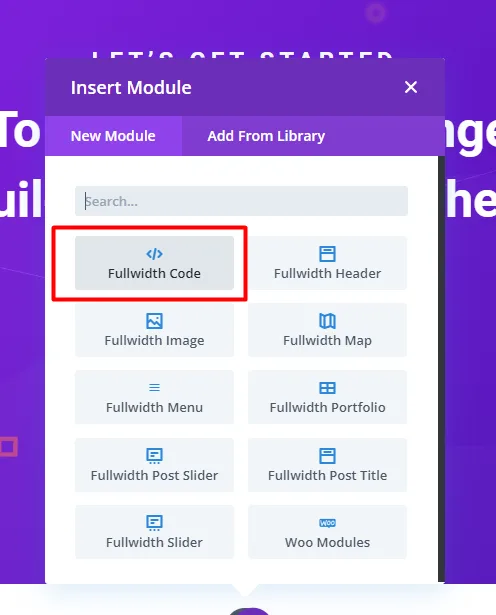
Divi needs the three parts split across different places.
1. Add a **Code** module inside a new section and paste your container `
`.
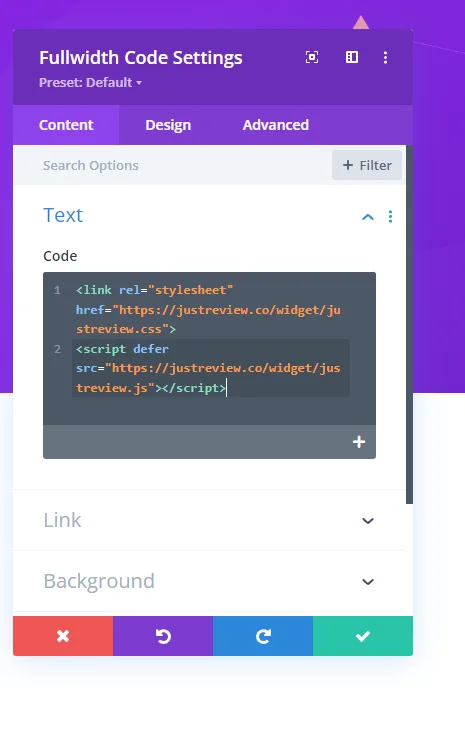
2. Add the library files (part 1).
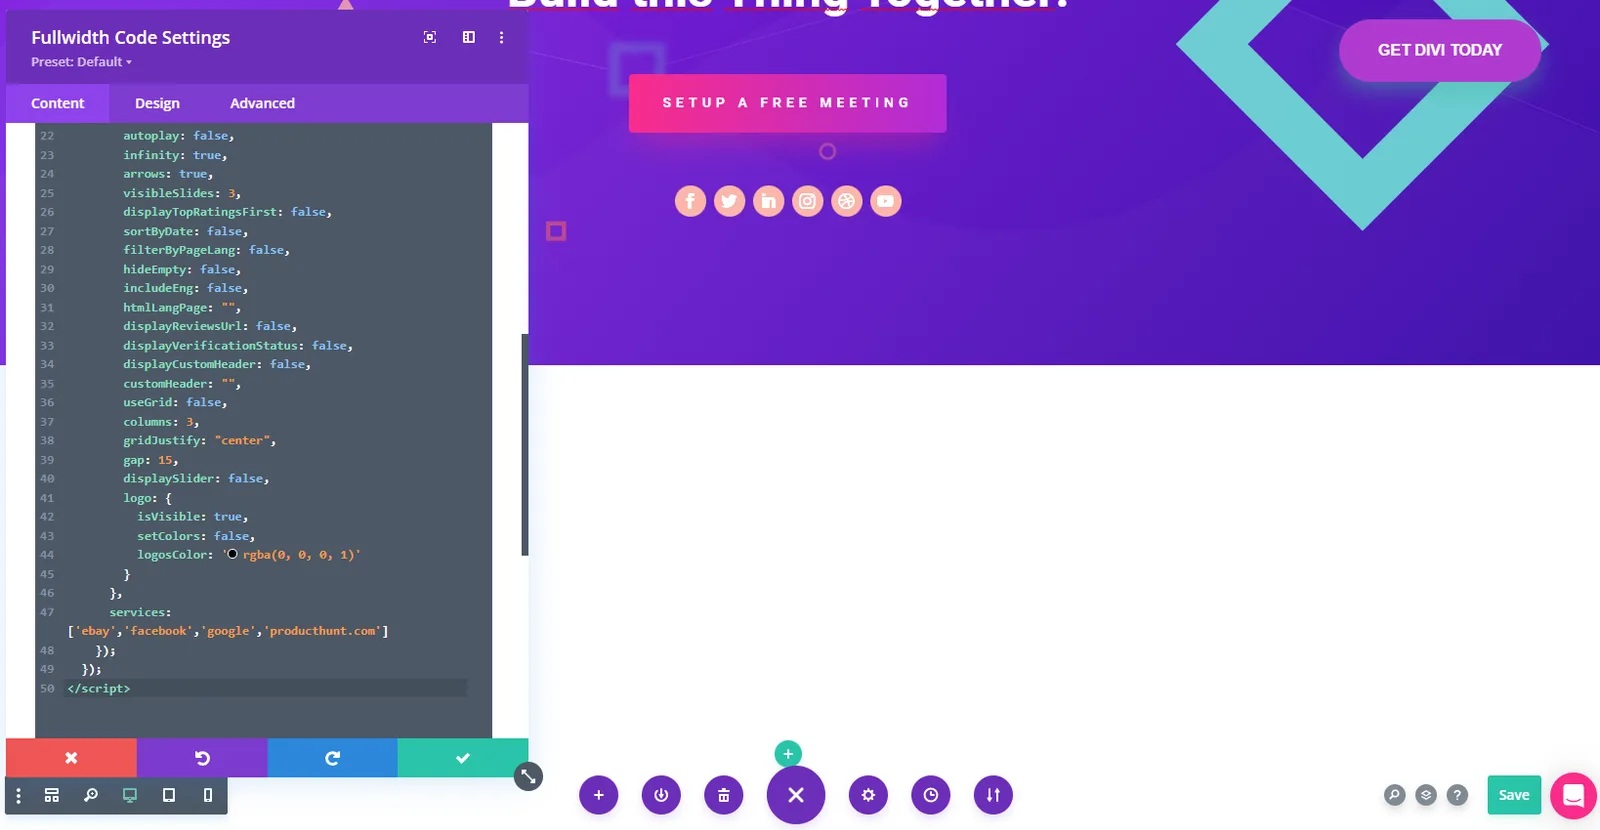
3. Add the JustReview configuration script (part 2).
Do not forget to save.
The widget only renders on domains listed in your
[Settings](https://app.justreview.co/#/settings), so the WordPress admin preview stays empty. Save
your changes and check the live site instead. Your website address must match the whitelist entry.

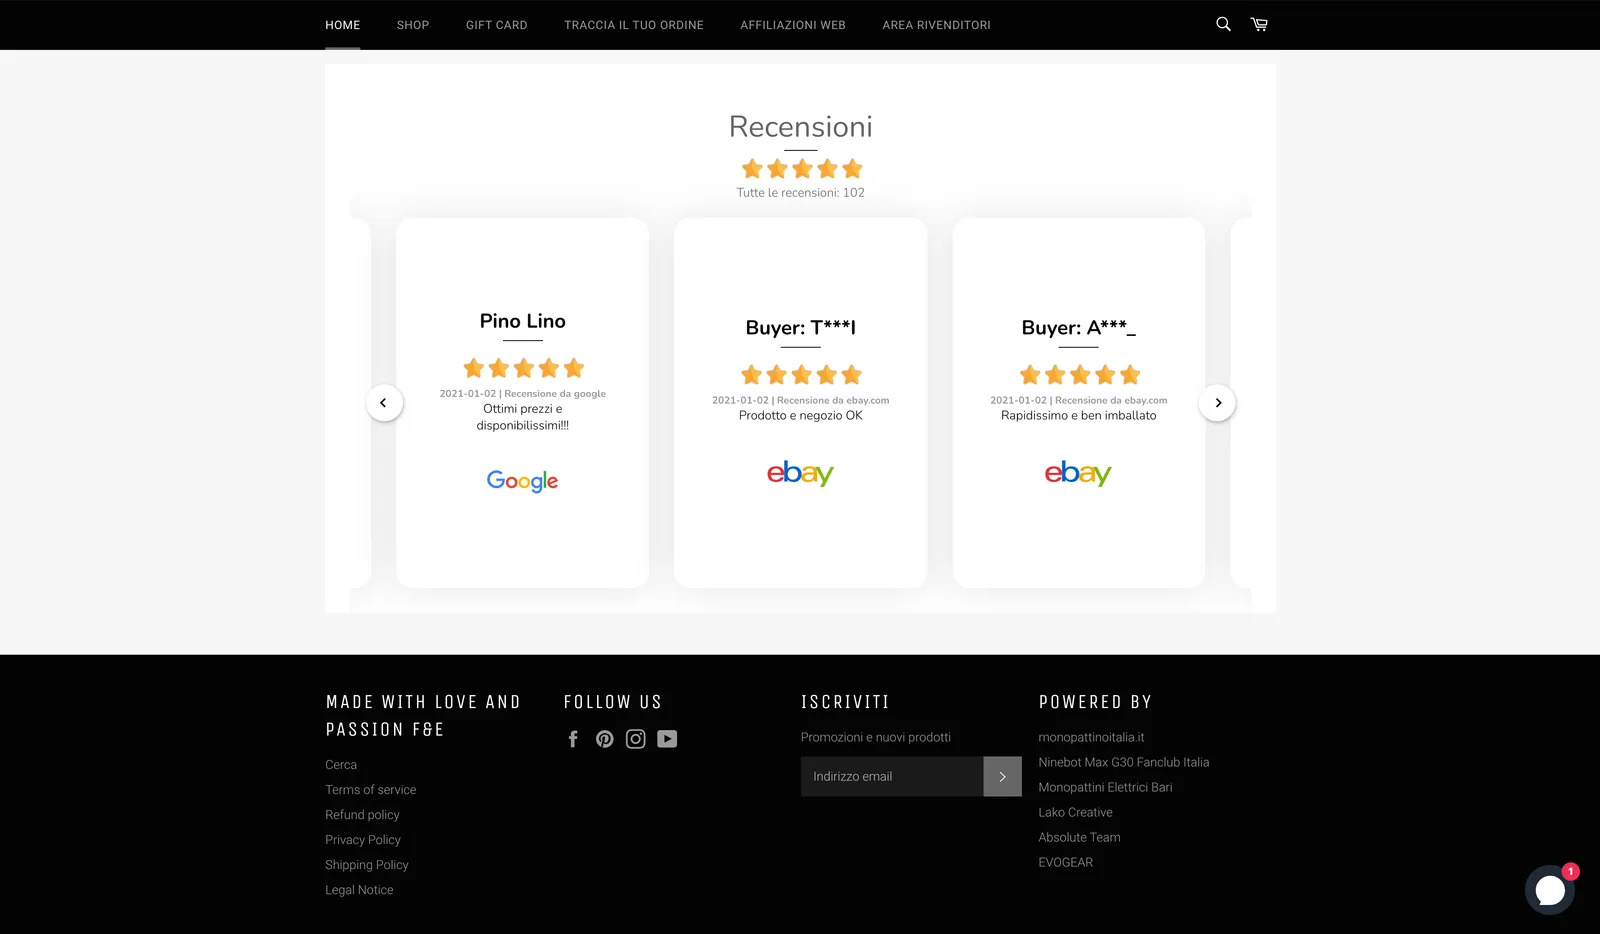
Widget settings live inside the snippet on your site. After changing anything in the dashboard,
generate the code again and replace part 2 on your website.
## Widget still not visible?
Work through these in order, they cover almost every case:
1. **Domain whitelist** in [Settings](https://app.justreview.co/#/settings) matches your address.
2. **Part 3 (the container `
`) is present** on the page. Without it there is nothing to fill.
3. **Caching plugin.** WP Rocket, LiteSpeed Cache and similar tools cache the old HTML and can
defer or combine JavaScript. Purge the cache, and exclude `justreview.js` from JS optimisation.
4. **Part 1 appears exactly once.** Loading the library twice can break rendering.
5. The **Badge widget needs at least one review** before it shows anything.
==============================================================================
# Articles
==============================================================================
---
## Best Google reviews widget in 2026: 7 tools, honestly compared
Source: https://justreview.co/blog/best-google-reviews-widgets-2026/
Summary: Seven review widgets compared on what decides the bill: metered page views. Free plan limits and entry prices, read from vendor pages in July 2026.
Every "best Google reviews widget" list on the internet is written by one of the vendors, including
this one. So here is the deal: everything below about another tool was read from that tool's own
public pages on 26 July 2026, the sources are linked, and where a vendor does not publish something
the table says so. Our own product is in the list and is not automatically the answer.
There is one thing that separates these tools, and it is not the design of the slider. It is
**whether the vendor counts your traffic**. Most of them do. That decides both your bill and whether
your reviews are visible on the day your best page goes viral.
## The free plans, side by side
Read on 26 July 2026 from each vendor's pricing page. Prices move, promotions run, check before you buy.
## What a "view" actually means
This is the part that catches people out, so here are the definitions in the vendors' own words.
**Elfsight**: "The number of views is the number of times a widget loads on a webpage or via a share
link. Exceeding this monthly limit will temporarily deactivate your app." On the free plan that is
200 loads. Not 200 visitors, 200 widget loads.
**EmbedSocial**: "A view is a page view. It is counted each time a visitor loads a page that contains
your widget." So if the widget sits in your footer, every page of your site burns the allowance.
**SociableKit**: "If you exceed your plan's allowance, the widget may stop displaying normally until
the limit resets or you upgrade."
Three vendors, one shape: your social proof disappears at the moment the most people are looking at
it. If you put a review widget in a global footer on a site with any real traffic, a metered plan is
a bill that grows with your success, and an outage risk when it does not.
## The seven, briefly
### Elfsight
The biggest player, about 96 widget apps in one subscription, and their All-in-One Reviews app lists
60+ review sources, more than we support. Two things to know: the Google Reviews app takes a single
Google source (their help centre says so, and points you at a different app for more), and reviews
sync every 72 hours. If you want lots of widget types beyond reviews, they are the obvious pick.
Full breakdown: [JustReview vs Elfsight](/vs/elfsight).
### Trustindex
Cheapest way to get unlimited reviews on one website: 65 USD a year, annual billing only, with
unlimited widgets and views. They also actually collect reviews for you, with email campaigns, QR
codes and physical NFC cards. Worth knowing that their invitation system routes 1 to 3 star ratings
to a private form and 4 to 5 star ratings to the public platform, which is a practice several review
platforms prohibit. Pricing is per domain: 1, 5 or unlimited.
Full breakdown: [JustReview vs Trustindex](/vs/trustindex).
### EmbedSocial
The strongest review management of the group: you can reply to Google reviews from their console,
with an AI assistant, collect reviews by email, and repost reviews as Instagram or LinkedIn content.
The trade-offs are the page view meter (500 free, 5 000 on the 24 EUR plan) and connected sources
capped at 1, 3, 6 and 15. Their free Google widget shows the latest five reviews.
Full breakdown: [JustReview vs EmbedSocial](/vs/embedsocial).
### Featurable
The most honest free tier in the category: unlimited page views and full CSS control, free forever.
The catch is scope. Google only, no other source at all, 15 reviews per widget on free, and paid
plans are annual only at 29 USD a month equivalent. If Google is your only source and always will be,
this is a genuinely good free option.
Full breakdown: [JustReview vs Featurable](/vs/featurable).
### SociableKit
The most granular pricing: 10 USD a month for one source with unlimited views and widgets, then 5 USD
for each extra source. Great for exactly one profile, expensive the moment you have a Google profile,
a Facebook page and two locations. Their free plan meters 2 000 views and needs a manual refresh.
Full breakdown: [JustReview vs SociableKit](/vs/sociablekit).
### Tagembed
A social wall product that also does reviews: nine named review sources inside a mostly social
platform list. Views are metered hard (500 free, 10 000 on the 19 USD plan) and so are feeds (1, 2, 4,
10). AI moderation and summaries arrive on the higher plans. Pick it if you want one wall with
Instagram and reviews together.
Full breakdown: [JustReview vs Tagembed](/vs/tagembed).
### JustReview
Ours, so weigh it accordingly. We bill by how many reviews you store and never count views, widgets,
websites or domains, on any plan including the free one. Twenty-plus sources including marketplaces
and booking platforms that the others mostly do not cover: Allegro, eBay, Amazon, Etsy, Booksy,
Booking.com, Airbnb. What we do **not** do: send review invitations, reply to reviews (in development),
or offer AI features. If those matter more than traffic-independent pricing, one of the tools above is
a better fit, and the comparison pages say exactly where.
## How to actually choose
Four questions, in this order.
**1. Where do your reviews live?** If the honest answer is "Google, and that is it", Featurable's free
plan or Elfsight's Google app will do. If your customers also review you on Facebook, a marketplace or
an industry platform, the shortlist collapses to the tools that support that specific source. Check
the source, not the marketing count: several vendors publish different platform totals on different
pages of their own site.
**2. Do you need the tool to collect reviews, or only to display them?** These are different products
sold under one name. Trustindex and EmbedSocial genuinely collect. Elfsight, Featurable, SociableKit,
Tagembed and JustReview mostly display. Buying a display tool and expecting invitation campaigns is the
most common disappointment in this category.
**3. How much traffic will see the widget?** If the widget goes in a global footer or on a busy
homepage, a metered plan will cost more than the sticker price suggests. Multiply your monthly page
views by the pages carrying the widget and compare against the plan cap before choosing.
**4. How many websites and locations?** Per-domain pricing (Trustindex) and per-source pricing
(SociableKit) are cheap for one profile and add up fast for agencies and multi-location businesses.
Per-review pricing does the opposite.
## What none of these tools can do
No widget puts star ratings in your Google search results just by being installed. Google's guidance
on self-serving reviews excludes ratings about your own business, shown on your own site, from review
rich results. Some vendors inject `aggregateRating` markup anyway and some site owners do see stars,
but you are relying on a grey area, not on a feature. Treat "rich snippets included" claims with that
in mind.
And none of them can show Trustpilot reviews through a third-party widget, whatever the platform count
on the pricing page suggests. That is a licensing decision on Trustpilot's side, not a technical gap.
If something in this comparison is out of date or wrong, tell us at contact@justreview.co and we will
correct the page. Our own plans and limits are on the [pricing page](/pricing), and the widget itself is
on the [Google reviews widget page](/embed-google-reviews-widget-on-website).
---
## Google reviews widget on Squarespace (and why the editor looks empty)
Source: https://justreview.co/blog/google-reviews-widget-squarespace/
Summary: How to embed Google reviews on Squarespace with Code Injection and a Code block, plus the four reasons the widget shows nothing, starting with the one that fools everybody.
Squarespace has no plugin directory, so every review widget arrives the same way: as a script you
paste yourself. The mechanics take about three minutes. What takes people an afternoon is the part
nobody warns them about, which is that a correctly installed widget renders nothing in the
Squarespace editor and looks broken until you check the live site.
Here is the whole thing, in the order you will actually do it.
## Two places code can go, and they are not interchangeable
| | Code Injection (Settings) | Code block (on a page) |
|---|---|---|
| Applies to | the whole site | one page |
| Squarespace plan needed | Business or higher | available on lower plans |
| Good for | the library and widget configuration | the container where reviews appear |
| Survives page duplication | yes | no, it is copied with the page |
The clean setup uses both: the heavy part once site-wide, the light part where the reviews should
show. If you are on a plan without Code Injection, everything has to live in the Code block instead,
repeated on every page that shows reviews.
## The three parts of the snippet
When you generate the embed code in your dashboard you get three pieces, and they are not
interchangeable either.
**Part 1, the library.** One script tag that loads the widget engine. It belongs in the Footer field
of Code Injection, and it goes there **once** even if you plan to show four different widgets.
**Part 2, the configuration.** A small block that describes one widget: which sources, how many
reviews, which colours, slider or list. One part 2 per widget, all of them in the same Footer field.
**Part 3, the container.** A single empty `div` that marks the place on the page where reviews will
be drawn. This is the piece that goes into a Code block, on the page where you want the widget.
```html
```
Concretely: Settings, Advanced, Code Injection, paste part 1 and part 2 into Footer, save. Then open
the page, add a Code block with the `` icon, paste part 3, save. The
[step-by-step version with screenshots](/docs/squarespace-code-embed-instruction/) is in our docs.
## Why the editor shows nothing
This is the single most common support message we get about Squarespace, and the answer is not a bug.
Our widget only renders on domains that are on the whitelist in your
[account settings](https://app.justreview.co/#/settings). The Squarespace editor previews your site
on a Squarespace preview address, not on your domain, so the widget refuses to draw. It is the same
protection that stops somebody copying your snippet into their own site and showing your reviews as
theirs.
So the sequence is: paste, save, open the live URL in a normal tab. If reviews appear there, you are
done, whatever the editor showed you a minute earlier.
Two related traps worth checking at the same time:
- The whitelist entry has to match the address people actually visit. If your site answers on
`www.example.com` and the whitelist says `example.com`, add both.
- A brand new Squarespace site on a `.squarespace.com` trial address is not your domain either. Test
after connecting the real domain, or whitelist the trial address temporarily.
## The other three reasons nothing appears
**The Code block is still in draft.** Squarespace saves page edits separately from publishing them.
An unpublished Code block exists for you and for nobody else.
**Part 3 is missing on that particular page.** Code Injection is site-wide, the container is not.
Reviews will only draw where the container exists, so duplicating a page that has it, and forgetting
it on a new page, produces exactly this symptom.
**The source has not finished importing.** On a first connection, a profile with a long history takes
a while to pull in. The widget draws nothing rather than an empty frame, which looks identical to a
broken install. Check the dashboard: if the source shows zero reviews, the problem is upstream of
Squarespace.
## What this costs your page
Two static files, both cached at the CDN edge. Measured on production on 26 July 2026 with Brotli
enabled: 128 KB of JavaScript and 15 KB of CSS over the wire, plus one request for the review data.
Nothing runs on Squarespace's side, so page rendering is untouched and the widget draws after the
page is interactive.
That number matters more on Squarespace than on most platforms, because Squarespace templates are
already heavy and you cannot strip much out of them. If you are adding several third-party widgets,
add them one at a time and check your Core Web Vitals after each.
## Where to put reviews on a Squarespace site
Three placements earn their keep, in this order:
1. **On the page where the decision happens**, next to the price, the booking button or the contact
form. Reviews work as an objection handler and belong next to the objection.
2. **Just above the contact form.** On service sites this is usually the highest-value spot on the
whole site.
3. **On a dedicated reviews page** in the main navigation, which also gives you a URL you can link
from quotes, emails and your Google Business Profile.
What we would avoid is the site-wide footer. It feels efficient, it is one container and it appears
everywhere, but reviews stop being read the moment they become furniture on every page.
## Which widget type fits a Squarespace layout
Squarespace sections are full-width blocks with generous padding, which rules some widget shapes in
and others out. From what people actually install, three work well.
**A slider of testimonials** is the safest default. It fits a full-width section, it does not fight
the template's vertical rhythm, and it shows several reviews without a wall of text. Set it to two
or three visible slides, not five: Squarespace content columns are wide, and squeezing five cards
into one row makes each review unreadable on a laptop.
**A compact rating summary** works where a slider would be too much: in a sidebar-like column next to
a booking form, or directly under a page title. One number, the star row and the review count carry
most of the trust signal, and they take 80 pixels of height instead of 500.
**A full reviews page** belongs on its own page in the main navigation. It is the only placement
where visitors arrived to read reviews, so give them all of them, sorted by date, rather than a
carousel that hides most of the content behind arrows. All six widget shapes are on the
[Google reviews widget page](/embed-google-reviews-widget-on-website) if you want to see them side
by side before choosing.
One Squarespace-specific detail: whatever you pick, the container `div` in part 3 inherits the width
of the section it sits in. If the widget looks cramped, the fix is usually the Squarespace section
width setting, not the widget configuration.
## One thing to decide before you install anything
Whichever tool you pick, check how it bills. Several widget vendors count monthly views, meaning the
number of times the widget loads, and switch the widget off when you pass the limit. On a Squarespace
site with a review widget in a template area, that meter runs on every page view of your entire site.
We compared the seven main tools on exactly this in
[best Google reviews widget in 2026](/blog/best-google-reviews-widgets-2026/), and the numbers are on
our [pricing page](/pricing) too: JustReview never counts views, on any plan, including the free one.
---
## How to add a Google reviews widget to WordPress (3 ways, measured)
Source: https://justreview.co/blog/google-reviews-widget-wordpress/
Summary: Three ways to put Google reviews on a WordPress site, what each one costs in page weight and database queries, and the five reasons a review widget usually fails to render.
If you want Google reviews on a WordPress page, you have three real options: a plugin, a snippet
in your theme, or a Custom HTML block in the editor. All three end up doing the same thing in the
browser, because every review widget on the market is client-side JavaScript. The difference is
what happens on your server, and that difference is measurable.
Here is the short version. A plugin adds PHP that runs on every page load and usually stores review
copies in your database. A snippet adds two cached static files and touches nothing in WordPress.
Unless you specifically need reviews inside WordPress content (for search inside your own site, or
for a custom template loop), the snippet is the lighter choice.
## The three ways, side by side
| | Plugin | Snippet in theme | Custom HTML block |
|---|---|---|---|
| Where the code lives | `wp-content/plugins` | `footer.php` in a child theme, or a code-snippets plugin | Inside one page or post |
| PHP executed per page load | yes | no | no |
| Rows written to your database | usually yes (review cache) | no | no |
| Survives a theme update | yes | only in a child theme | yes |
| Needs an admin to touch code | no | yes | no |
| Works on one page only | no | no | yes |
| Breaks when the plugin author disappears | yes | no | no |
The last row matters more than people expect. Review plugins are a graveyard: the platform changes
an API, the plugin stops importing, and the site keeps showing three-year-old reviews until someone
notices. A widget that fetches from a live endpoint fails loudly instead, which is easier to catch.
## What the widget actually costs
We measured our own production files on 26 July 2026, requesting them the way a browser does, with
Brotli enabled:
So the page pays roughly 143 KB of transfer for two requests, both served from the CDN edge with a
long cache lifetime, plus one request to our API for the review data itself. On the WordPress side
the cost is zero: no PHP executes, no query hits `wp_posts` or `wp_postmeta`, and nothing is written
to your database.
That is the honest number, not a marketing number. 143 KB is not nothing. It is, however, less than
a single hero image on most WordPress themes, and it is static, cacheable and off your server.
A plugin that renders reviews server-side moves that work back onto your hosting, on every
uncached page view.
## Why not just call the Google API yourself?
Because of a cap that surprises most developers on day one: Google's public Places API returns a
maximum of five reviews per place, and you do not choose which five. That is why so many free
"Google reviews" tools show exactly five reviews and no more. To display more than that, reviews
have to be imported and stored, which is the part that takes infrastructure rather than an afternoon.
There is a second reason. Once you have built the Google integration, the next request from your
client is always Facebook, then the industry platform they actually care about, then the marketplace
they sell on. That is a different integration each time, with a different failure mode each time.
## The snippet method, step by step
This is the version we recommend for most WordPress sites.
1. **Decide where the reviews should appear.** Put a container in the template or in the page
content where you want the widget to render:
```html
```
2. **Load the widget once, globally.** In a child theme's `footer.php`, or through a code-snippets
plugin that outputs to `wp_footer`, add:
```html
```
3. **Initialise it with your account hash.** The hash comes from your JustReview dashboard, and the
`services` array decides which connected sources feed this particular widget:
```html
```
4. **Check it on a page that is not cached.** Open the page in a private window and look at the
browser console. An empty container with no console error almost always means the script was
blocked, not that the code is wrong. More on that below.
The full copy-paste version, including the block editor route, lives in our
[WordPress installation guide](/docs/wordpress-code-embed-instruction/).
## The five reasons it renders nothing
We see these in support in roughly this order.
**1. A consent tool is holding the script.** Cookie banners with automatic blocking (Cookiebot's
`auto` mode is the common one) rewrite third-party `
```
Check your own widget's network and storage footprint before you do this, and keep the decision
documented. "It sets no cookies" is a claim you should be able to prove, not assume.
**2. A caching or minification plugin reordered your code.** Autoptimize, WP Rocket and friends
combine and defer inline scripts. If your `JustReview.init...` call ends up executing before the
library has loaded, you get `JustReview is not defined` in the console and an empty div. Exclude the
inline init from combination, or wrap it in a small retry loop.
**3. The container is missing.** Page builders sometimes strip unknown `id` attributes, and a Custom
HTML block inside a collapsed accordion may not exist in the DOM when init runs.
**4. The account hash is wrong.** Copying it from an old tab or a colleague's account produces a
valid-looking call that returns no data.
**5. The source has not finished importing.** First-time imports of a large profile take time. If
the API returns no reviews, the widget renders nothing rather than an empty frame.
## Where to put it on a WordPress site
Placement decides whether the widget does any work at all. Three spots earn their keep, in this
order.
**On the page where the decision happens.** For a service business that is the service page, not the
homepage. For a shop it is the product page and the cart. Reviews work as an objection handler, so
they belong next to the objection: the price, the booking form, the "add to cart" button. A slider
parked in the footer of every page is decoration.
**Just above the contact or booking form.** This is the cheapest win on most WordPress sites,
because the form is where visitors hesitate and reviews answer the question they are actually asking:
"will these people show up and do the job?"
**On a dedicated reviews page, linked from the main menu.** This one has a second benefit: it is a
page you can point to from quotes, emails and Google Business Profile, and it is indexable content of
your own. Use the reviews-page widget rather than the slider there, because visitors who land on that
page came to read, not to be entertained by an autoplay carousel.
What we would not do: put the same slider in the header of every template. It pushes your actual
content below the fold on mobile, and reviews stop being read the moment they become furniture.
If you want to see all six widget types side by side before choosing, they are on the
[Google reviews widget page](/embed-google-reviews-widget-on-website), and the display limits per
plan are on the [pricing page](/pricing).
## Which option should you actually pick?
- **Snippet in a child theme** if you want reviews sitewide with the least server cost. This is the
default we would choose.
- **Custom HTML block** if reviews belong on one landing page only, or if nobody on the team is
comfortable editing theme files.
- **Plugin** only if you need review content stored inside WordPress, for example to loop over it in
a custom template or to make it searchable by your site's own search.
One thing worth deciding at the same time: do not plan for Google alone. Every business we onboard
starts with Google and ends up connecting at least one more source, because Google is where people
look and the other platforms are where the reviews already are. Whatever you install, check that it
can add a second source without a rebuild.